Photo
What do you need to finish the balcony?
For those who make repair, the following questions are quite relevant. How to separate the balcony not only correctly, but also beautiful? Invite the wizard or do everything yourself? Which option is better and more practical: finishing with panels, cafeter, plastic or wood?Recently, the balcony has ceased to be simply open serving the perimeter of a residential building. Residents consider balconies as a way to increase the useful area of the apartment.
The finishing of the balcony with their own hands is not such a complex process, as it may seem at first glance. The main thing is to stockday and prepare in advance all the necessary materials and tools that you will need during the work:
- drill;
- Perforator;
- shurtpers;
- saw on wood or electrolybiz;
- Bulgarian;
- a hammer;
- screwdriver;
- Pistol for mounting foam;
- building level;
- pencil;
- dowels;
- mounting foam (2-3 cylinders);
- insulation (30 mm thick);
- Saws.
The trim of loggias usually takes place in several stages:
- exterior finish;
- Preparation for measurements and glazing;
- insulation;
- Interior decoration.
So, we will dwell at each stage of the work carried out in more detail.
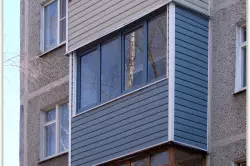
Balcony finish from the outside

Spend an outdoor balcony with siding - and your balcony will look modern. Due to the stylish appearance, you will be able to identify your balcony that is distinguished among others.
Outdoor decoration of the balcony is an important step from which your repair will correctly. You can use the help of specialists or do it yourself. If you have chosen the second option, you may need the following materials and tools:
- Professional owl of the brand C8;
- Wooden rails (20x30 size);
- tree bar (50x50 or 50x70, without bitch);
- mounting foam;
- Long wood screws;
- Roofing screws (the head must coincide with the color of the proflist);
- tin sheets (with curved angles of 90 degrees);
- Bulgarian;
- Pistol for foam;
- screwdriver;
- Scissors for metal;
- line;
- pencil;
- roulette.
Article on the topic: How to independently make a bedroom and living room
Now consider how the balcony is happening with your own hands from the outside:
- Prepare the base for the installation of a wood bar. Install it on the railing or parapet along the horizontal level.
- Take the first sheet of the proflist and measure the length you need, cut the remaining part with the grinder or scissors for metal.
- Screw from the back side of the proflist the cutting of 20x30, having previously cutting it along the length of the professional leaf.
- The first sheet attach the place where it should get up.
- Align the top of the horizontal level.
- Attach the straightener to the bar for the frames mounted in advance.
- Press the bottom of the proflist to the balcony.
- With the help of long black tape screws, roll and twist two crates: on the balcony and on a straightener. The main thing is not to overdo it with a tight.
- Do these manipulations with all sides of the loggia or balcony. Plates must be laid on each other.
- With the help of pointed screws, attach corners from tin on those places where you need to close the balcony slots.
- Propine all joints and cut the surplus using the stationery knife.
- Calculate outside the visible foam "styss" so that it can not collapse from ultraviolet.
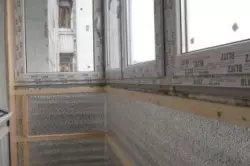
Glazing and insulation

From above the waterproofing film, the insulation is attached, and then another, internal, wooden frame is mounted.
In the next step, you will need to correctly make measurements for windows and remove old glazing. The distance is measured by roulette from the wall to the wall and the ceiling to the parapet. We will not stop in detail at the stage of glazing and measurements, we usually do specialists, therefore we turn right to the warming step.
To begin with, you should make a choice of material for insulation. It depends on what functions will be your balcony. If you plan to combine with residential room, then everything will be insulated: the ceiling, parapet, overlap, concrete slabs. As a rule, a foam or polystyrene foam is most often used. Both are plates, thickness from 5 to 15 cm, with air bubbles inside.
Article on the topic: Decorate the ceiling: Plasterboard patterns
So, go to the insulation process:
- Isolate from moisture all surfaces of the balcony.
- Apply moisture insulating primer.
- After the waterproofing is dry, glue with a special adhesive composition of polystyrene plates.
- Additionally, attach plastic dowels with wide heads.
- Place vaporizolation.
- Stick the reinforcing mesh to overlap plates.
- On top of it, apply painting or plaster.
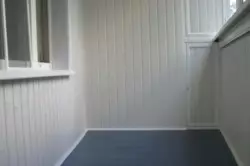
Internal finishing with plastic panels
When the skeleton is assembled, frame, we start collecting the body of the trim. Panels connect with each other and fix to the slats.
Further, the interior decoration of your loggia or balcony is made in such a sequence: the plaster of the walls and the ceiling, painting or finishing with materials (clapboard, plastic, panels, ceramic tiles, etc.), depending on the functionality of the room and the taste preferences of its host. Consider the most common finishes options.
The most commonly applied the walls of the walls of plastic. Its advantage is that it has a long service life and airproof, but may be fragile and combustion. The decoration panels takes place in several stages:
- Prepare a working area, dismantle the old coating, remove the dirt.
- With the help of screws on the walls, secure wooden slats with a size of 20x40 mm.
- Fix the upper border at the ceiling level, and the bottom limit of the crate - at a distance of 50 mm from the floor.
- Close the rail around the openings.
- Install the first sheet in the corner and align the level using the level.
- With the help of self-samples or stapler, fasten the sheet of plastic to the crate.
- In the groove of the previous panel, insert the following and snap.
- With the help of brackets or screws, secure the outer side.
- Similarly, make the installation of other panels and screw the finish profile.
- After installing the last panel, cut the sheet of the desired size, snap between adjacent straps and press tightly to the crate.
- Install the F-profile around the door and window opening.
- Cut in the corners of surplus and mounted the plinth.
Interior decoration with wooden panels (clapboard)
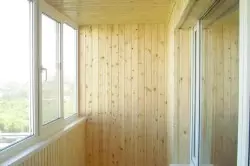
Parametent with plastic panels Wooden lining is completely without harmful. Perhaps the interior decoration of the balcony or loggia, from various wood breeds.
Article on the topic: Mini walls for the living room - 100 photos of new designs
The trim of the balcony with your own hands using the lining is similar to the installation technology, but a little more complicated than working with plastic. A tree is a material that has a greater sound insulation and thermal conductivity, compared with plastic. Stages of work will be as follows:
- Prepare a workplace, disassemble the old coating and clean it from dirt.
- With the help of screws, fasten wooden rails around the openings and in the corners (cross section 20x40 mm).
- Molding the first sheet of lining to the crate and secure it with the help of screws.
- In those places where screws are attached, drill holes with a drill.
- Secure the metal brackets from the outside with nails.
- Lock also the remaining wall panels.
- Use wooden lump for the substrate.
- In the corners, see wooden cartoons with small carnations.
- Treat wood panels with protective composition.
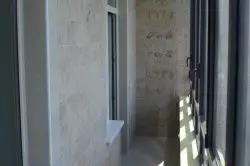
Interior decoration of the cafenel

The tile is a familiar and well-known finishing material. The trim of balconies tiles is a new trend in the design of the premises, because the possibilities of using the tiles are gradually expanding.
The most hygienic, reliable and time consuming is the process of laying a tile on the balcony. However, if you follow the necessary technology and be careful, then make repairs well and correctly you can even begin. Stages of work will be as follows:
- With the help of a level or construction plumb, draw a vertical, in which, in the future, you will start laying the first row.
- Moisten the back of the tile with water.
- In small areas, apply the adhesive composition on the wall with a toothed spatula.
- Apply and firmly press the tile, easy to knock and shift to the right place.
- Share the gaps with special crosses.
- Place the rows of one-piece tiles, then proceed to cutting with stoveturis.
- Remove all excess glue from seams and tiles.
- Wipe the tile with a damp cloth.
- Using the rubber spatula, apply a grout, filling the seams.
- Remove the surplus, after drying, wash the tile.
By applying these practical tips, you can make a balcony finish with your own hands correctly even a newcomer, decently saving at the same time and considering my desires and needs.