
Table of contents: [Hide]
- Total design for waving
- Welding table manufacture
- Production of blanks for the table
- Formation of grooves
- Formation of places for fastening
- Build Table for Peeling
Modern furniture manufacturers offer young parents a variety of constructions of changing tables for kids. As a rule, they are sufficiently massive furniture in the form of a bedside table or chest.
Size of the sizing of the changing chest.
The pellentator (horizontal surface, limited sideboard) is usually fixed on the top cover. Such a construction is inconvenient, as it takes a lot of space in the room. Therefore, it is much easier to make a changing table with your own hands.
Total design for waving
In addition, the table made by the personnel will cost you much cheaper than the factory analogue, if you build it, you can provide all the little things and nuances that are important to you and your baby.
At your request, the mobile version of the table for swaddling can be installed on the bed or bedside table.
When it disappears the need for it, it can be removed and removed to it where it will not interfere. The very small dimensions of such a design make it even more convenient. In this case, all the functions assigned to it will perform, and sufficiently high sterns will not allow the child to roll and fall from the table.
Fastening with reliable metal corners allow you to secure the design on any furniture without additional drilling of the lid. For example, on a fairly high bedside table, so that parents do not have to bend over the child.
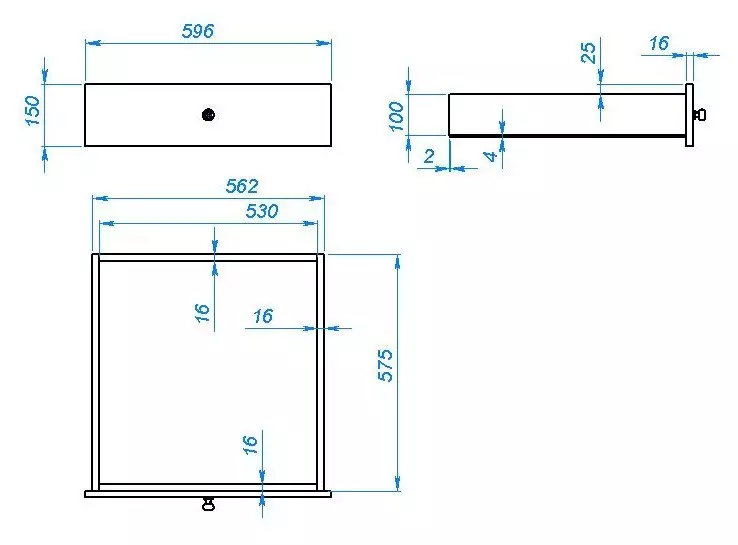
You can make a changing table with your own hands, but the following dimensions are considered optimal:
- For countertops - 80.5 × 78.5 cm (it will be attached to the grooves made in the sidewalls and on the back wall).
- For the rear wall - 77.2 × 10 cm.
- For side panels (sides) - 81.5 × 3.5 cm (such parts will need 2 pcs.).
- For the front strip - 81.5 × 3.5 cm.
- For legs - 60 × 4 cm (they will be attached to the side walls).
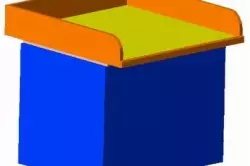
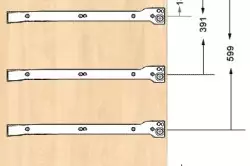
Image 1. General view of the changing table fixed on the bedside table.
The stability of the entire design will give a screed, which is located under the bottom of the table top.
The general view of the future design is shown in the image 1.
In this way, you can make a table with your own hands, the dimensions of which will be 83.5 × 81.5 cm with the calculated height of the side of 10 cm and the stands with a thickness of 4 cm.
Naturally, you can change the specified sizes on your own. Most often, the table for swaddling is made under specific furniture, so the dimensions of the bottom must match the upper lid of the couch or the chest.
Back to the category
Welding table manufacture
In order to make a changing table with their own hands, you will need the following materials:
- Plywood with a thickness of 0.8 cm - 1 sheet;
- Wooden board with a thickness of 2.2 cm - 250 × 10 cm (it is better to take an array of pine or linden);
- Wooden timing segment 4 × 2 cm and 60 cm long - 2 pcs.;
- Metal fastening corner - 8 pcs.;
- glue designed for work with wood;
- Furniture foam for mitigating a thickness of at least 2-2.5 cm;
- cloth with waterproof coating (or impregnation);
- Morilka, paint or varnish (at your request).
Drawing of a changing chest.
In addition, you will need the following carpentry tools:
- electric jigsaw or hacksaw;
- Electrode and a set of drills for woodworking;
- clamps;
- Horizontal milling nozzle, machine or carpentry chisel;
- sandpaper of different grainability;
- Santimeter roulette.
After you prepare everything you need, you can start collecting a table with your own hands. But remember that all the details and billets should be carefully polished and not have burrs and uneven edges. Otherwise, the risk of painful child is too large. Therefore, process all the details, even those that will subsequently be inside the design, very carefully.
All nodes and attachments should be reliable and durable. Additional precautions in the manufacture of children's furniture are not unnecessary.
Back to the category
Production of blanks for the table
Before drinking the blanks, all the details are placed. It is necessary to take into account all previously calculated dimensions. If you do not have a circular at hand, the roundings on the side can be formalized with the help of fir-handed items, such as cups. The edges of the details are of the most reasonable to have it so that they coincide with the edges of the plywood sheet or board. With this reception, you will save the material, and the saws will have to do much less.
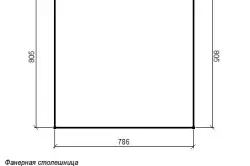
Image 2. Preparation of a changing table details.
In order for the edges of the plywood, "looked like" under the sawpage of the jigsaw, cobble the future cut of the painting tape. Such a measure will help avoid too much garbage. All the edges of the blanks are treated first with sandpaper with a large grain, and then smaller squeak. You can speed up the process using a special drill nozzle.
Drawings of blanks and their dimensions are shown in the image 2.
Naturally, your sizes may differ from the specified. The image shows the drawing of the left side. The right is pumped in the same way, but in the mirror image. It is best to first cut the sidewalls with letters under rounding and only then delete too much. This will avoid possible errors and inaccuracies in the manufacture of the workpiece.
Back to the category
Formation of grooves
After the workpiece of all parts of the design are ready, in the side and on the back wall of the table it is necessary to form the grooves under the fastening of the table top. The size of the grooves depend on the thickness of the plywood from which the peel is made. In this case, the grooves must be a depth of 6-8 mm, and the width is 7-9 mm. Place the grooves about a distance of 2 cm from the lower edge of the details.

Facilic boards of a changing table.
The easiest way to make the grooves with a milling machine or a special nozzle, but you can do and an ordinary chisel. Make sure that the stop of the tabletop entered the place of attachment with some effort on your part. Large gaps are not allowed, otherwise the whole design will be unreliable.
For fastening the front strip table, it is necessary to make a pressure of 5-7 mm long. To do this, there is a markup on both sides, which is about 2 cm from the edge. This distance depends on the thickness of the side of your table. Wood between the marked is chosen using the chisel.
In the same principle, a backup for the bottom of the table is formed in the front partition. Over the entire length of the details you need to make a groove of 1.5 × 0.7 cm. Its edges need to round. It is best to do this with a shaped cutter. But if you have no such tool in the presence, then simply construct the edge with a joinery knife and carefully treat it with emery paper so that there are no burrs left.
Back to the category
Formation of places for fastening
Next, you need to drill the nests for fastening parts with each other. A non-separation holes are drilled in the side so that approximately 3-5 mm remains to the rear surface. If the spike passes through the part, then its end can be painful a child or parents. In the case when you could not make such holes, after assembling the table, be sure to close the plastic plug fasteners, putting them on the glue.
In each of the lateral parts, the following nests need to be drilled:
Marking under the guides.
- For fastening the bottom planks (legs) - 4 pcs.;
- for connecting to the back panel - 3 pcs.;
- To connect to the front wall -1 pcs.
Then the corresponding holes are made in the front panel, legs and rear sheet. The depth of the nests directly depends on the length of the nap (spikes). Usually they are drilled by 2-3 mm deeper fastening length.
But when calculating the size of the socket, take into account the depth of the holes of both fastened parts. Otherwise, you will not be able to dock the blanks reliably, but without cracks. Exactly the same nests must be drilled in the bar, which will serve as a tie design to give it hardness.
All holes must first be placed, make sure that they correspond to each other, and only then you can start drilling.
Back to the category
Build Table for Peeling
After all the preparatory work is carried out, you can start assembling the design.
First connect legs with side panels. In the nests intended for agrees, glue is added with a dispenser or a conventional cotton wand. As a rule, in the manufacture of furniture use special joinery adhesives, but you can do the usual PVA. The spikes are inserted into the nest and drive it into the hole, slightly tapping with the hammer (it is better to use a wooden cyonyan to use).
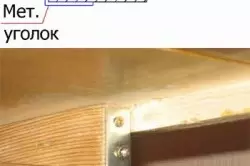
Fastening the changing table to the bedside table.
Next, the free ends of the attachments are inserted into the holes, drilled in the legs (they are also needed to be pre-lubricated with glue). Details are tightened with clamps and leave until complete drying of glue.
For the same technology, losing glue all the grooves and holes under the fasteners, the rest of the table are collected. The rear wall is satisfied with the first table top, then braided inserted into the back panel jacks and the screed bar. Next, the back plank, sides and countertop are collected.
First, the left part of the structure is formed and only then the right. At the same time, the legs are connected to the screed. The latter joins the front panel.
After the end of the assembly, the whole table is tightened with clamps and is left until complete drying. Metal corners are screwed to the table so that they serve as limiters. When the table is installed on the lid of the chest or tube, the corners will not allow him to be shifted aside. Lastly, the tabletop is glued with a softener and clums fastened or cloth.
Article on the topic: How and from what to make a rocking chair with your own hands