
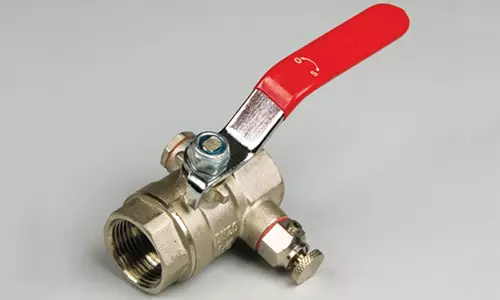
The ball valves are modern products that came to replace the usual rod, at the bottom of which thick gum was screwed, designed to stop the water. The rod of such a crane pressed rubber, as a result of which the water stopped flowing. Modern ball valves are more comfortable and attractive outwardly, they have only one drawback: if the water includes a large number of different salts, the ball sphere is quickly slapped and the product ceases to work.
When installing a ball valve on the threads, it is necessary to wind fum-tape, flax or liquid fum.
So that this is not happening, you need to open and close the crane in at least 1 time in 2 months to shoot down salt deposits. Installing a ball crane is a fairly simple event, and you can do it with your own hands. However, in order to correctly and qualitatively perform the installation of the ball crane, you need to prepare for its installation and clearly follow the instructions.
Preparation for installing a ball crane
In order for the installation of the ball crane to go easy and without any difficulty, it is necessary to prepare correctly. It is very convenient because it allows you to overlap water immediately after the occurrence of such a need. For this, as a rule, a ball valve is used, which is installed on a total taping.
Installing ball valves makes the use of water supply and conducting various preventive and repair work easier and more convenient.
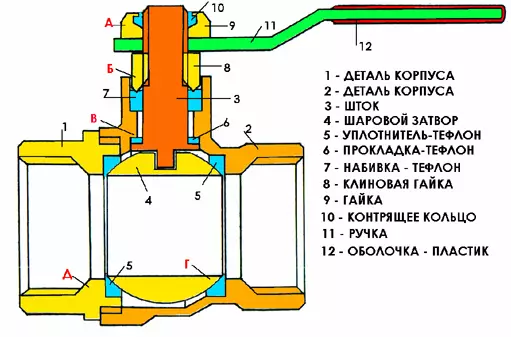
Scheme of the device of the ball crane.
In order to install a ball valve, it is necessary to overlap water supply in all riser. In view of this, it is necessary to bother in advance about obtaining permission to disable water supply from the respective companies. You should prepare all the tools and materials that are necessary in order to correctly install a ball crane on the riser with your own hands. A set of tools for mounting minimal:
- gas or adjustable key;
- FUM tape (yellow or white tape for winding on the thread).
Article on the topic: Frameless furniture with their own hands: Stages of sewing (video)
Tips for the correct installation of the ball crane
To properly install a ball crane on her own hands, follow the following recommendations. When replacing the installed item, you should start working from water drain from an existing pipeline system. If the installation is performed in an apartment or a private house, then in the place where old fittings will be dismantled, it is necessary to prepare a few rags or some suitable container for draining water from the system. This will allow you to work further in more comfortable conditions.
Mounting and repairing of the ball crane.
It is necessary to determine the future place of installation so that the valve is established with the possibility of normal access to it and the freedom of rotation of the crane handle in the open and closed position was provided.
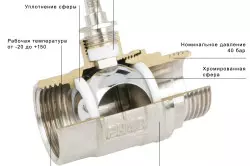
High-quality crane installation requires, first of all, the right choice of the product. The ball valve must be chosen so that its diameter corresponds to the diameter of the riser on which it will be installed. It is necessary to draw attention to the fact that the flanges of the crane can have different thread types. Before you buy the product and proceed to install it with your own hands, you need to decide on the appropriate type of item.
The type of product will depend on the place of its installation on the existing pipeline. Before you start installing a ball crane with your own hands, pay attention to the arrow on the marking. The direction of the arrow must match the direction of the medium. This condition is very important to observe for the normal functioning of the system. You need to choose a model with suitable carvings. Ball cranes are several types:
When screwing the ball valve on the pipe, it should be at least 4 threads of the thread.
- with external thread on both sides;
- with internal carvings on both sides;
- On the one hand, the outer, and on the other - internal;
- On the one hand, the American woman, and on the other - internal.
Article on the topic: Separation of bedroom living room 17 sq m
Installation of the product is carried out only after the thread will be predetermined by fum-tape or flax with sealing paste, which will ensure the sealing of the compound. Instead of Fium-tape and flax, you can use liquid FUM (suitable for connections no more than 2 ').
When winding the tape and flax, make sure that the winding direction coincides with the direction of screwing the element to the pipe. After the installation is completed, it is necessary to maximally make sure that nothing prevents the normal turn of the product handle.
If, when screwing the ball valve to the pipe, it is too easy to rotate (by hand), then the fum-ribbon or flax should be coated as long as the spin of the product will not go with a certain effort. Excessive efforts try not to apply either, since in this case the installation may result in the deployment: the product is simply burst.
Step by step instructions for installing a ball crane
Above the useful tips to remember, performing the installation of the item with their own hands. Now you are offered a step-by-step instruction, according to which you can independently mount the ball crane.
If you change the old product to a new product, you first need to remove the old product, carefully clean the thread from flax, then try to turn the new product. It often happens that after dismantling the old product, it turns out that a certain number of turns simply rotted, so the threads need to be preinted. When cheating the product to the pipe, it should be at least 4 turns.
If, after removing the old product, you see that the thread is in a normal state, you can safely screw the new product, which should coolant at least 4 turns. However, for a start, you need to drive the thread with a rain. If in the process of checking the product without fum-ribbon can reach 4-5 revolutions, then you need to wind the tape and finally shut the product to the pipe for 4-5 revolutions.
Article on the topic: how to repair the dripping crane
In the process of the device of the water supply or heating, you must first schedule the place where the fittings will be mounted, and then cut off the pipe in this place, make the appropriate thread on it and turn the product to 4-5 revolutions.
After completing the installation, look again, will there be anything to interfere with the rotation of the handle of the product. If the crane with a closed thread on the flange is screwed to the pipe with an open thread, then the fum-tape is needed clockwise (depending on the pipe hole). The product should be wound enough hard, so if it is screwed too easy, add more tapes. If there is an open thread on the other end of your crane, then you need to hire a fum-tape or flax to fasten the flange from the pipe on the ball crane, following everything to be screwed enough to tight. Now you can turn on the water supply.
In the case of a centralized supply of heating and high pressure, you need to use high-quality products that can work normally in such conditions. Do not install products without glad, because If the leakage occurs, you will not be able to fix it.