
Shower lady today are a very convenient universal element of a modern bathroom.
To select the optimal ladder or channel, you need to calculate the average water consumption in the shower.
Choosing a shower swamp, keep in mind that if necessary, you can easily install it without only in the bathroom, but also in the sauna, pool, in the kitchen. In addition, there is now a wide range of swabs with various patterns for every taste.
Checking a configuration
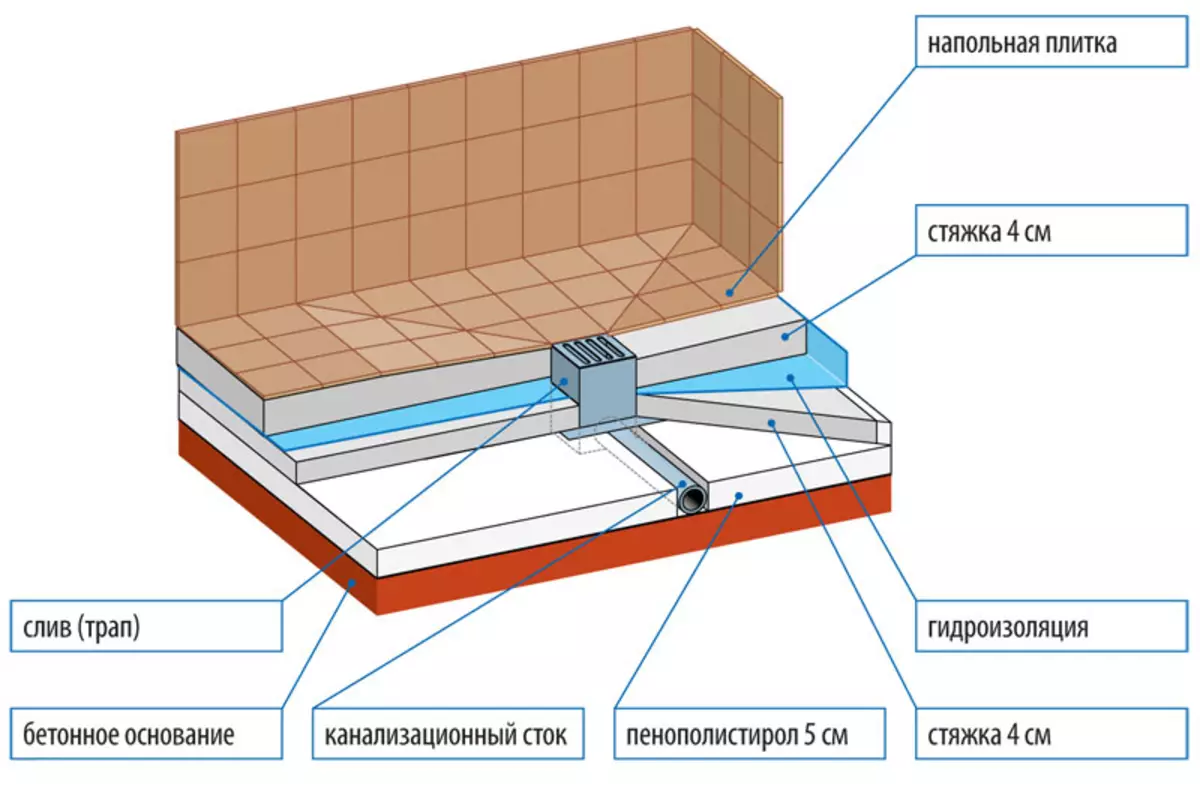
Installation scheme of built-in ladder.
Almost any soul ladder consists of several main elements. Therefore, before installing it is important to check them all for the presence and integrity. There are four main components of shower gears: housing (usually made of durable polypropylene), designer grille, plastic grille for repair and hydrotherapy from polypropylene. If all these elements are present in the kit and they are intact, you can be calm. Your shower booth will be reliable and fairly resistant to any chemical composition.
After unpacking and checking the kit, it's time to proceed in itself to the installation of a shower ladder. The sequence of the installation of shower trails occurs in several stages. With the proper compliance with the sequence of all actions, the installation will be easily and quickly.
Setting the base and fixing legs
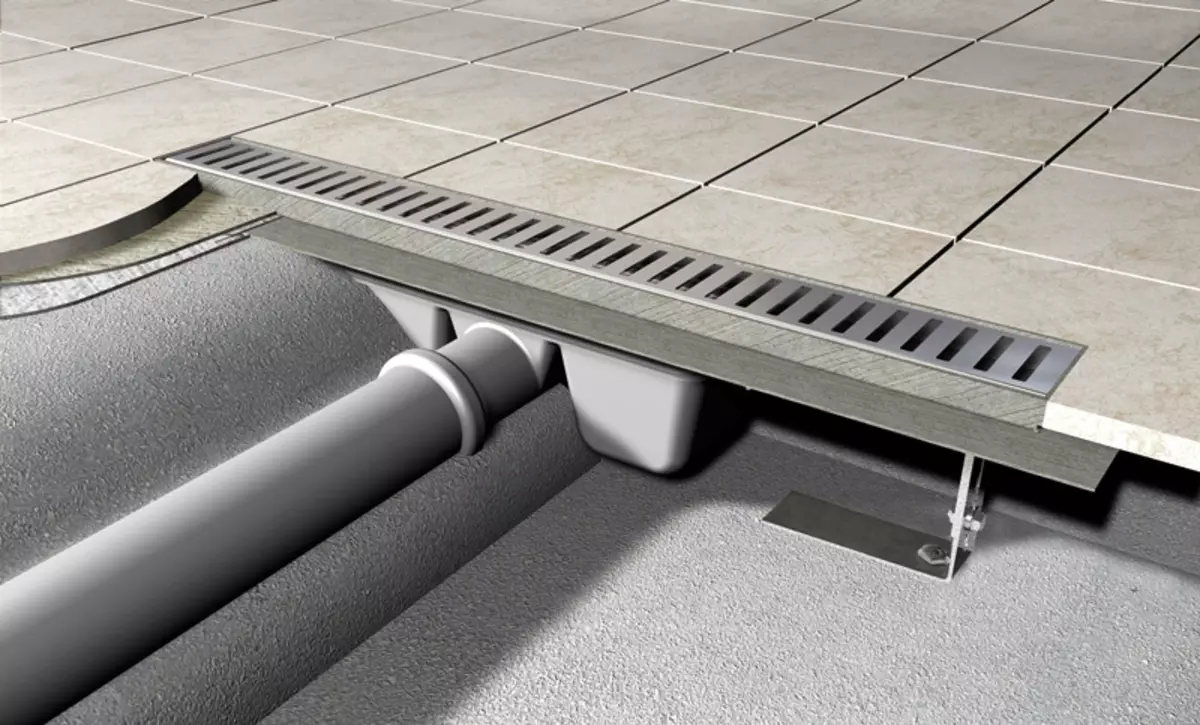
First remove the garbage stuck from the siphon and the lattice of the ladder and take it all into a safe place for a while. Start laying the sewer pipe. Carefully make sure that the pipe is laid in this angle, under which the installation of the ladder is planned, and the slope should be no more than 3 cm. That is, the ladder will be able to clearly enter the pipe. Attach the siphon to the ladder, following the garbage to his hole in his hole. Now install the ladder body under drainage. At the same time, do not tighten the pipe at the same time, since the excess bias may subsequently provoke the disruption of water in the siphon.Article on the topic: Provence in the interior with your own hands
Diagram of installing shower ladder and tap pipes.
After that, proceed to the base. As a base for a ladder, a concrete screed over the perimeter of the cabin will be an excellent option. First, clean and degrease the surface for better clutch. Fill the screed and wait for its complete drying. After that, thoroughly clean the siphon - after all, the garbage or a solution could get into it, which is not categorically impossible.
Now you can start setting the legs. The height can be installed independently and adjust the nuts, and if the legs were not in the set, you can use ordinary plaster for accurate and reliable fixation of the ladder in height. Before final fixation, it is not bad to calculate the height of the legs, so that I did not have to redo anything.
After adjusting the legs, proceed to the device of the waterproofing layer for the shower. Its installation is required, since it is precisely such a layer that it is capable of completely protecting the room of the bathroom and nearby walls from the possibility of the appearance of fungus due to excessive dampness. As such a protective layer, it is best to establish a two-component vapor-permeable or dispersion membrane. It just stacked in the floor and does not give water and spread a couple.
Laying layer tile

Formwork installation scheme from boards.
Now squeeze the glue solution for the tile and proceed to laying. When applied, remember the need for a small slope toward the drain. Top on glue laying tiles. As you can press it closely to the floor, and overlook the glue, wash the dry soft cloth.
After the tile dries and finally grabbing, it is necessary to close the shallow seams between the individual tiles. It is necessary for additional protection against moisture and pairing tiles. Polyurethane sealant is very good as an impressive substance. His dignity is that it is very resistant to different temperatures and is completely not erased over time.
Article on the topic: What are the purification filters for water
But under the walls of the cabin soul over polyurethane, it is best to use an additionally also silicone sealant. Only before this, creep the skot of the nearby row of tiles, as it is very difficult to wash it from the tile. Cover the seams from above with silicone sealant, following the manufacturer's instructions. And after drying it, remove the scotch.
Now you can safely install the grille (and if in the kit there is both the designer grille too) for the ladder in the shower and separate small details of the siphon. After installation, everything is well rinsed and wipe, especially carefully following the dirt to be in the details of the siphon. Lay from above on the shower ladder design cover. Installation of the shower ladder is over!
Additional advice
Many prefer to install a shower ladder on their own, so basically rely on their own intuition. To prevent particularly gross errors in relation to the installation of the route, carrying out its installation, clearly follow the two main rules.
- In the large spreading zone of the water in the shower cabin, it is necessary to ensure the slope of the ladder from 1 to 3 cm. At the same time, the space of the spreading should be about one meter. The bias can be made by overlaying a thicker layer for tile. However, if the cabin is very large, respectively, the slope should also be greater. Then partially you can make a bias due to the screed. Otherwise, too large adhesive layer in a short time can give a detachment and destroy the tile coating in the booth. Properly made of a ladders to fully provide a good flow of water.
- When installing shower gears, make sure that the lattice lattice does not protrude above the surface of the tile in the booth. It is recommended to install below the facing tile level in the floor by 1-1.5 mm. This and the flow of water additionally optimizes, and create more secure conditions for receiving the soul.
Article on the topic: How to choose Curtains for Khrushchev as efficiently as possible