
More recently, the warm floor was an exclusive element with housing arrangement. To date, the technology of laying electric heating floor is quite simple, therefore almost everyone can set this element in their home. Thanks to the modernized technologies for the manufacture of such a design, it is possible to obtain an economical heating system of available rooms.

Electric heating floor diagram.
Select the electric warm floor is best based on the features of the existing apartment or private house. The selected system should generate a sufficient amount of heat, to spend not too much electrical energy, be easy to install.
It is especially important to pay attention to the ease of installation in case it is planned to perform the installation of electric warm floor with their own hands.
Such a heating system can be used in any room and under any outdoor base. It can be stacked on the street.
Types of such systems that are present on the construction market today have a different configuration and a large range of power indicators. This allows you to simplify the choice and buy a heating system that fully complies with the requirements of the home. There are the following types of warm floors:
- Cable.
- Infrared film.
- Cable floor based on.

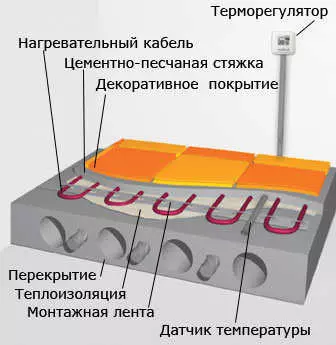
Example 1. Scheme of cable electric heating floor.
The main working element of the warm floor of a similar type is a wire for heating, which turns electrical energy to heat. The cable consists of several conductive veins, polyester films, copper conductor, aluminum screen and plastic layer for protection.
The heating system with cable is the most difficult. Installing it for a long time, because it will take carefully pave the cable, observing the step. At the end you need to pour the screed. An additional layer of screed can lead to a significant loss of the room's height. This moment is fundamental when laying floors in the premises of apartment buildings. The disadvantage of such a design is that it is impossible to lay it under furniture and plumbing devices. Among the advantages of the warm sex like this type, it is worth noting that the heating wire can be installed in rooms that have a non-standard layout, as well as to heat outdoor elements of the building - flow, drain, roof.
Cable floors based on
Example 2. Cable floor diagram based on.
A variant of the warm floor of a similar type has a small thickness and is a mat with a grid, on which the cable is fixed for heating with a cross section of approximately 2.7 mm. This type of warm floor is enough to simply install, because the heating cable is laid and fixed on the base. The laying process will be imprisoned only in the layout and fixing mats.
The floor with a cable on the ground is the best option for mounting the heating system under the tile, because the thickness of the layer of the glue mixture will be enough so that the mats are in its thicker. If a similar type of warm sex is planned to be installed under laminate or linoleum, it will be necessary to fill the screed, but it does not necessarily have to be a large thickness. Such a warm floor is not allowed to be installed in the zones of the room where furniture or plumbing devices are planned.
Article on the topic: Patterns of decorative pillows do it yourself
Using infrared film
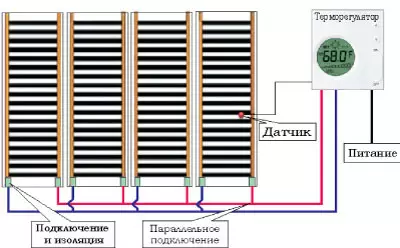
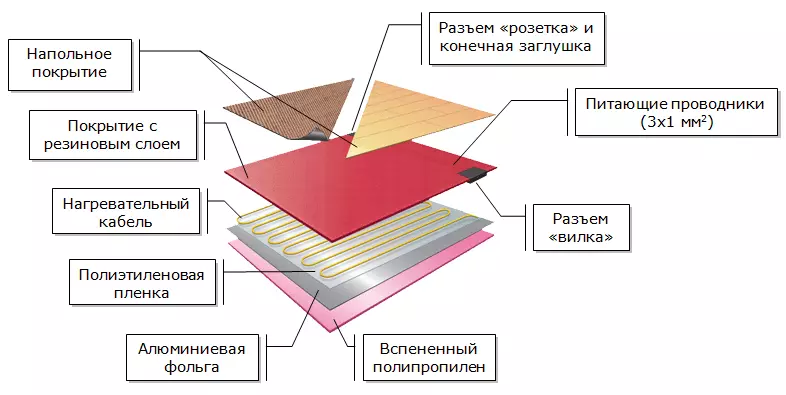
Connection diagram of infrared film.
The warm floor of this type consists of a film that is folded into two layers, and carbon heating elements, has a thickness of approximately 0.5 mm. The advantage is that such a thickness of the warm floor makes it possible not to change the height of the room.
Infrared warm floor has the best energy saving indicators if you compare it with other heating systems. In the process of its use, you can save up to 60% of electrical energy. Stop the electric warm floor with an infrared film for heating is the easiest way - the film strips will need to be decomposed on the floor surface, and it is not necessary to take into account the placement of furniture. Outdoor coating can be installed immediately, without pouring the screed.
Film infrared warm floor can be installed on any base - horizontal, vertical, under the tilt.
This is achieved by dry installation.
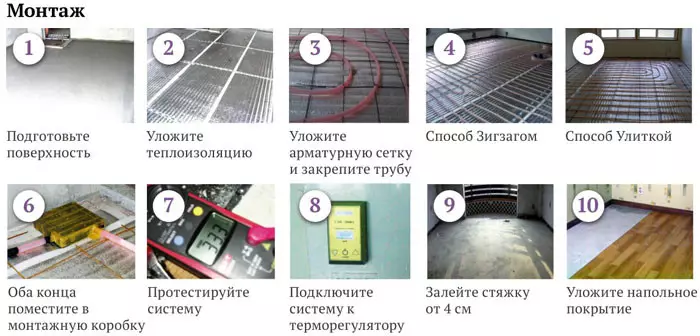
Step-by-step installation instructions
How to distribute heating elements and control nodes?
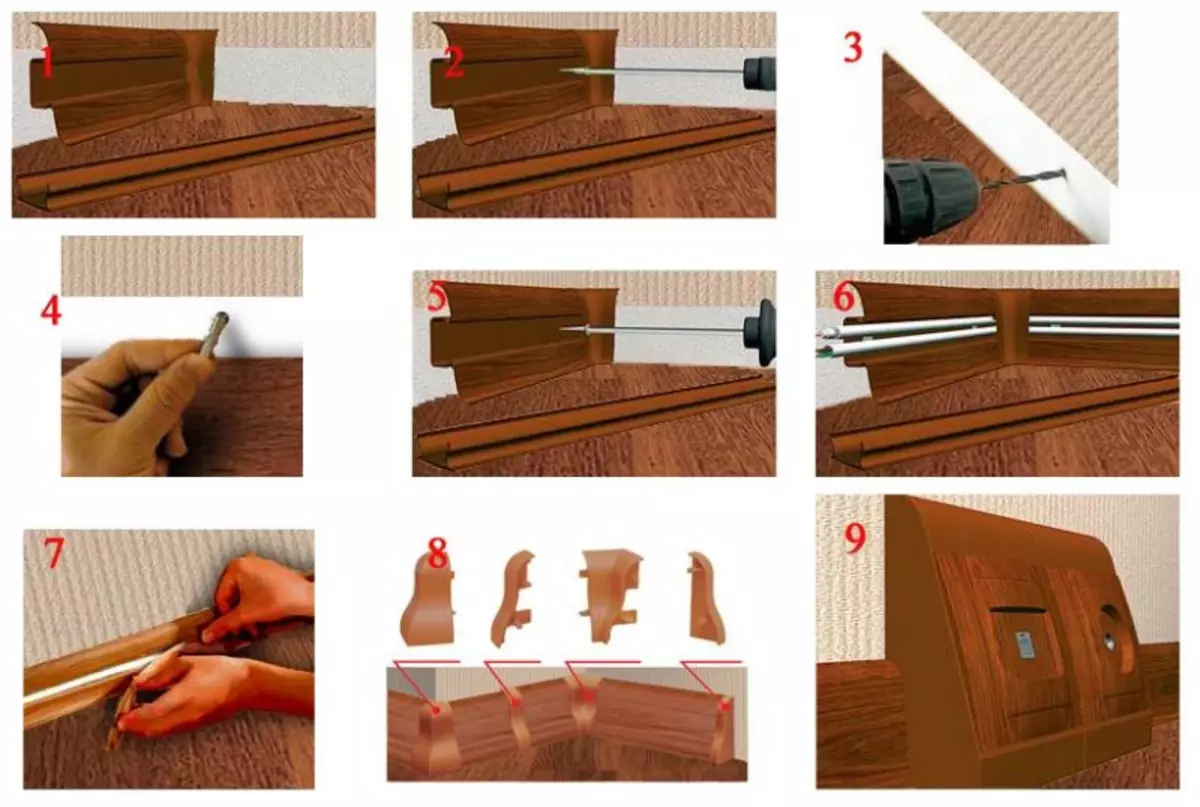
Scheme of phased installation of electric plinth.
First of all, you will need to create a floor plan for a warm floor on paper. In places where heating pipes or other heat sources pass are not allowed to install heating elements. This is due to the specific features of such heating systems. All single-mounted heating elements are sucking equally. If there is a restriction on the output of heat (for example, furniture without legs) or additional heat will come from the street, then the elements can overheat and fail. Furniture in this case can also be damaged, overheating it.
As a result, the figure of the wrong shape should be turned out, which is inscribed in a rectangle. According to the contour of the resulting figure and inside it needs to be placed heating elements of the heating system.
This is the lack of such a heating system. If you want to rearrange the furniture, you should know that it can significantly affect the operation of the system.
For individual rooms, even if they are formally delimited, you will need to form separate contours with regulators and power supply. In the process of filling, the screed between them will have to be paved on the basis of the floor to the damper tape.
When on paper, the layout will be drawn, the markup can be transferred to the floor.
In a convenient location on the wall, it is necessary to note the position of the regulator for the heating system. Here you will need to do a hole for the mounting box and lower the floor shoes. After preparatory work and melting are performed, you can start counting the required amount of material.
How to calculate the number of materials?
Electric floor mounting scheme.
According to the calculation of thermal loss of each of the rooms, you will need to choose a step of laying the cable, after which it is necessary to determine which wire length will be necessary.
If you plan to install a film system, then the calculations are performed even easier: it is necessary to choose the number of items that can be covered with an existing area.
In the calculations, you need to turn on the cable to connect the thermostat to the warm floor, as well as the meter and thermostat to the heating system elements.
Article on the topic: The main architectural elements of the facade, titles and ways to emphasize them with backlight
It should be known that it is not allowed to connect a heat-mall system to the outlet.
After the calculations when the power of all the warm floors is obtained, it is necessary to check the general input of electricity to the ability to withstand a similar load. If the input is not enough, then it is necessary to replace it and mount the suitable fuses.
How to prepare the basis for the floor?
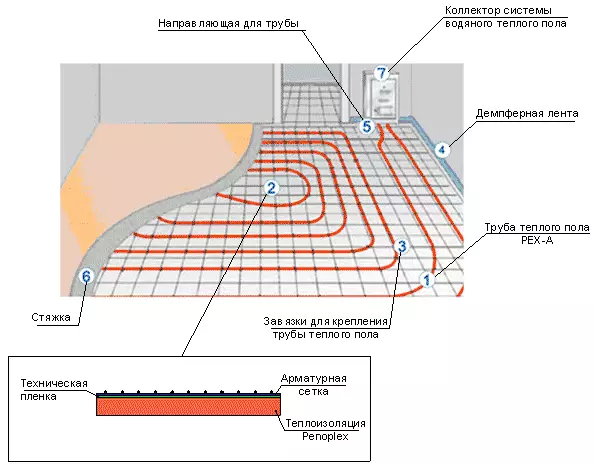
Warm floor placement scheme.
If necessary, the old layer of the screed must be dismantled to the surface.
The electric warm floor is installed after the execution of all draft construction works, that is, this process must be performed after the walls and the ceiling will be made, the screed is filled. In most cases, at the end of the draft work, the floor surface will be covered with a layer of dust and garbage, it will be elements of a frozen solution of plaster or cement. Before mounting the warm floor, it is necessary to clean the base. To do this, it is necessary to remove the hardened pieces of the construction mixture with a spatula or to use a solvent. The floor surface is moistened with water, after which the remnants of the construction mixture, garbage and dust are sweeping with a brush.
In order for the warm floor to work efficiently, while not overheating, the base from concrete must be smooth.
How to perform laying the heat insulating layer for the floor?

Table properties of some heat insulation materials.
It should be known that when operating a warm electric floor system will necessarily disseminate heat in all directions. That is why there will be not only the base of the floor of the floor, which is heated, but also the concrete surface with which the heating elements are connected.
To have the ability to reduce heat losses and exclude heating plate slabs, you will need to mount the material for thermal insulation. The heat insulation layer will shield heat flows, reflect them and direct them in the middle of the heating zone. The type and thickness of the heat-insulating layer will need to choose from the fact that the room is located below - heated or unheard.
In the process of arranging the warm sex in the rooms of apartment buildings, where heated rooms are placed on the bottom, it will take to use the rolled material of the heat insulation from the foil, which has a thickness of 3-5 mm. In this case, it is recommended to use sheet or extruded polystyrene foam. It is necessary to decompose, dock and fix the stripes of the insulating layer using the building stapler. In order to be able to prevent the material shift relative to the floor surface, it is necessary to fix the heat insulating layer to the concrete base. Additionally, it is recommended to smoke the locations of the strokes by assembly scotch.
If the warm electric floor is planned to lay in a private house, where the heated room will be located over the unheated, the foam or other material, which has a thickness of 8-10 cm, should be used as a heat insulating layer, which has a thickness of 8-10 cm. It is recommended to combine this layer with a foil.
You should know the following:
- If it is planned to install a warm floor on a unheated loggia, it will be necessary to form a solid layer of insulation with a thickness of up to 10 cm. You can use polystyrene foam or mineral wool.
- If the warm floor is a supplement to the main heating system, then the foamed polyethylene can be used as a substrate, which is covered with foil.
Article on the topic: How to install sliding partitions
How to connect temperature controller and sensor?
Warm floor mounting process.
Before starting to install the heating elements of the heating floor, it will be needed to mount the temperature controller and connect a special sensor to it. The temperature controller by which you can vary the temperature mode of the floor, you will need to install on the wall at a suitable place at a minimum of 30 cm from the floor surface. The device that measures the heating temperature must be laid in the middle of the warm floor at a distance of 60-70 cm from the wall on which the thermostat is placed.
Connection diagram of electrical warm floors implies a wire lining to a temperature controller that comes from the heating elements of the heating system of this type, a corrugated pipe with a temperature sensor inside and cable from the central power grid. If you turn on the warm floor to heating mode, the indicator will be lit on the front part of the temperature controller, and the heating elements of the warm floor on electricity will be heated heat.
How to stack the heating elements of a warm electric floor?
The order of laying the heating elements of the warm electric floor.
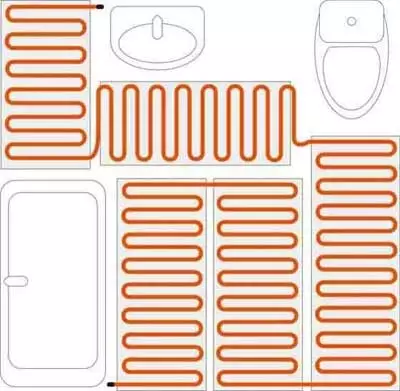
The technology of installing electric warm floors implies the calculation of the heating components with the retreats from the walls of about 5 cm, from the heating devices - about 10 cm. Laying this design can be made throughout the area of the room or only in that part where it is not planned to arrange furniture, sanitary devices and Other interior items. Here everything will depend on the selected method of installing a warm electric floor. It is important to remember that the cable floor cannot be laid under furniture and fixture devices. The floor from the film can be mounted anywhere, does not matter where the floor elements of the room are located.
During the installation of the electric floor, the fixation of the bands with heating elements to the floor surface is produced using double-sided tape. From each other, the mat can be connected using mounting tape. In the process of a warm floor device with a cable to a concrete base, you will need to consolidate the segments of the mounting tape in 0.8-1 m increments using a dowel or self-tapping screws. After that, the wire must be postponed with the specified step and secure on the tape.
It is necessary to lay the heating cable in the form of a snake, where the step between the turns should be at least 8 cm. It is possible to calculate the step as follows: the number 100 is multiplied by the area of the room and is divided by the heap cable length.
When installing the heating cable, it is necessary to ensure that the wire does not stretch, there were no sharp extinguishes and voltages inside.
At the final stage of laying such a design, it is necessary to pour the screed with a layer of approximately 5 cm. It will have to stand for about 30 days. Only after this period can be mounted floor coating.
The device of warm floors, which are at the heart of infrared heating elements, is convenient because it is not necessary to form a screed - a floor coating can be installed directly to the mounted heating system. Technology laying electric heating floor is simple, you only need to purchase all the necessary tools and materials.