
Installation of a drain route is a difficult task, but if you come up with this question neatly and responsibly, you can implement all the work on your own.
In order for the shower ladder to function as it should be necessary to create a gender of the floor by 1-2%.
To install a drain gear, you need to perform many manipulations: connect the ladder to sewer riser, make waterproofing and thermal insulation, perform a concrete tie, which will have a slope, lay the tile.
No special tools for these works you will need:
- trowel;
- adjustable key;
- a container for the solution;
- Rule.
Design of drain route
A drainage ladder device is very complex and multifunctional. Thanks to the design of the drain gear, it is carried out:
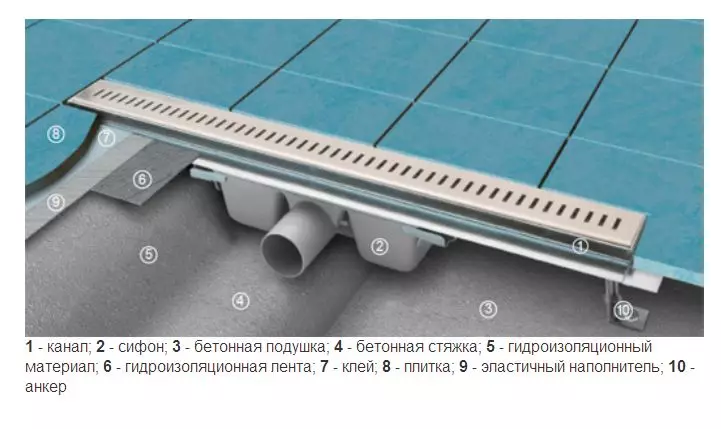
Diagram of a device linear shower ladder.
- draining water into the sewer;
- Sealing a joint shower with floor;
- Preventing sewage breaks (wastewater filtered from large contaminants);
- Ensuring access to the drain system for cleaning it;
- Inaccessibility of a fox sewer indoor air due to hydraulic vehicle.
Materials for the manufacture of drain sneakers for shower serves metal and / or strong plastics. Frames made from both of these materials are called combined. Materials used for their manufacture should not be corrosion, since the ladders constantly interact with water. The design of the ladder should provide for the possibility of long-term operation, therefore be durable, durable and not disturb the tightness of the floor.
It is especially important that the outer corps of the funnel responded to these requirements, which is concreted into the floor and passes into the waterproof membrane. Funnels are with one plum and passing pipe. The latter are cut into the already prepared drainage and can have different heights. This factor is very important, as it determines which height will need to be lifted in the shower.
A drainage ladder is a waterfront with a flange that provides hermetic fixation. Complete to the funnel there is a siphon with a grid, which creates a waterproof and protects the sewage from the blocks. The siphon grille can be removed during operation. Before you purchase a ladder, make sure that there are no defects in it and the model parameters are suitable for you. In addition, the installation will require additional materials:
- Drain pipes;
- Connecting couplings.
Article on the topic: How to build a soul pallet with your own hands
General rules of work
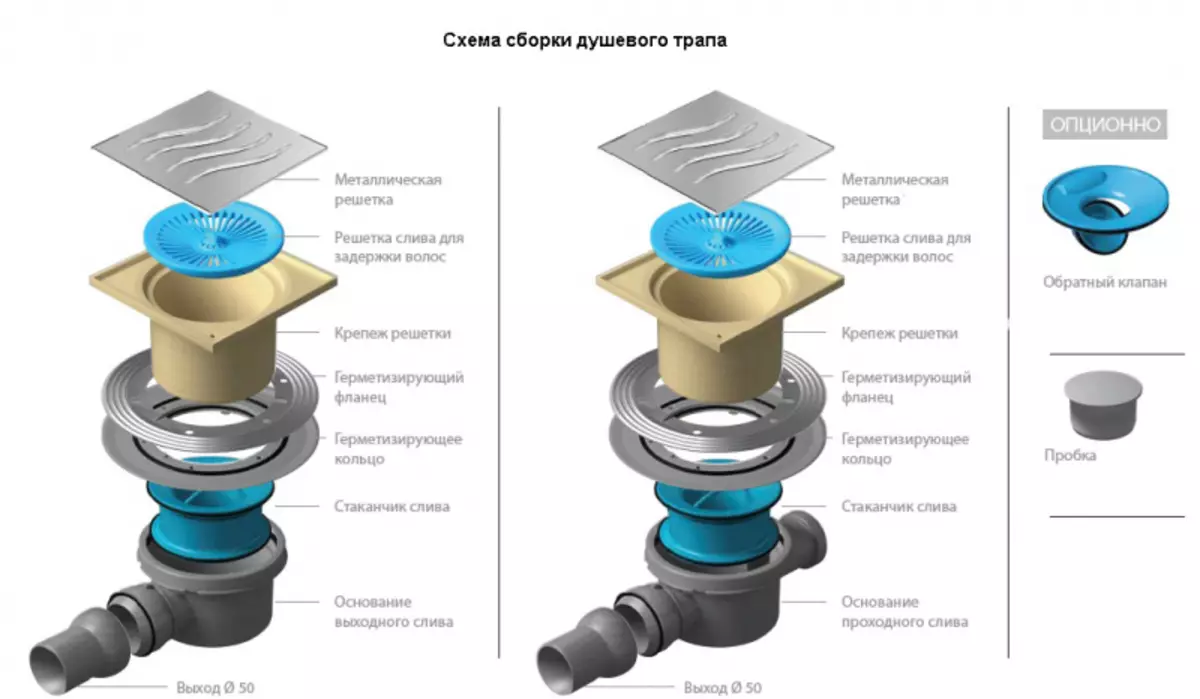
Scheme of the assembly of a shower route.
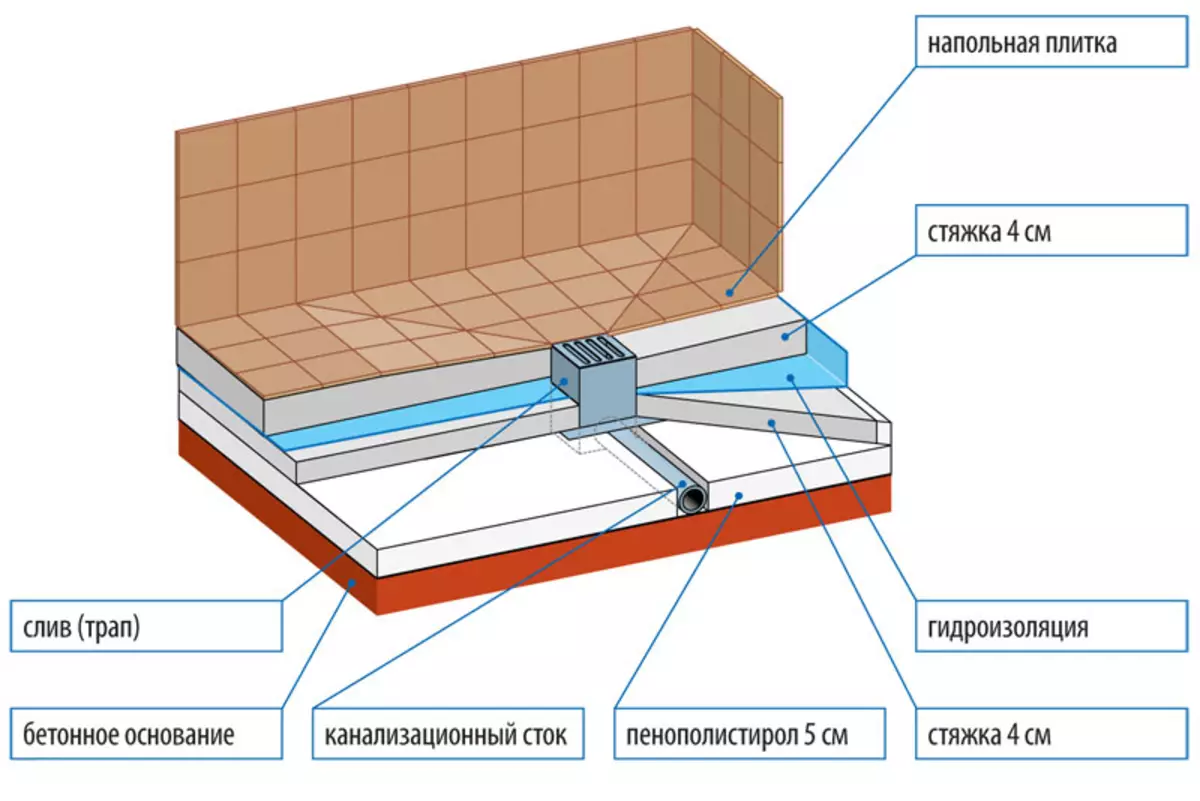
Installation of a ladder for draining in the shower requires lifting of the floor and creating a slope in it towards the drain. The rise should be at least 15 cm. The installation involves the monolithic toasting of the ladder with drain in the floor so that the grill does not perform above the tile level. If the concrete base of the floor lies on the cold soil, then you will need to perform thermal insulation, since the difference in the temperature of the cold soil and hot wastewater can lead to the deformation of the concrete screed and, as a result, its destruction. For thermal insulation, you will need foam sheets, the density of which is 35 kg / m³.
Before starting the installation, you need to determine the thickness of each of the following flooring layers and determine the correct location of the trapping itself. In many respects, it depends on the thickness of the drain route, it is necessary to take into account that it does not have to speak for the tile. Determine the highest and lower points of the floor under the tilt can be based on the height of the ladder and the slope should be at least 1 cm / m. With a smaller slope of the water, the water will be difficult.
For the correct placement of the ladder, it is necessary for it to defend from the wall to a distance that is multiple of the size of your tile, you need to consider the seams between the plates that make up about 2 mm. By installing the ladder in this way, you will reduce the amount of the tile cut and your floor will be beautiful. When choosing a drain model model, it is better to abandon the round shape, since it will take a complex cutting of the tile to install such a model. It is desirable that the sliced tile has a minimum amount. Tile laying is recommended to start from the ladder to the wall, then the sliced tile will be under the wall and will not rush into the eyes.
Article on the topic: Patchwork master class: do it yourself, video patchwork sewing for lazy, embroidery, new products, samples, photos
Before laying the tile, it is recommended to cry for all angular joints of the walls and the floor with a special sealing ribbon of sufficient width - this will protect the floor from waterproofing disorders.
Frapp setting sequence
The sequence of action during the installation of a drain route must be clearly defined. Therefore, familiarize yourself with the recommendations on this.
First of all, determine the position of the route relative to the walls, taking into account the location of the sewage and so that the distance to the walls is multiple the size of the tile. With the help of draining, the ladder must be connected to the sewer. The joints should be strengthened with the help of sealant (preferably on silicone basis). On the concrete base of the floor you need to lay foam sheets with a thickness of 5 cm. This will ensure heat and sound insulation.
Mounting scheme of shower ladder.
Polyfoam is flooded with cement-sandy solution, which is prepared in proportion of 1: 3. The solution is carefully compacted. Please note that all empties must be filled with a solution, it usually concerns space near the casing and under the flange. Also carefully make sure that the flange and guides are installed at one level. This will determine the level of a concrete screed. After the fill of the concrete, it needs to be divided by the rule.
Since the floor in the shower is mounted with a slope, you need to determine the level of its upper point. Taking into account the new layers of the floor and the minimum bias - 1 cm / m. For the flange, it is necessary to cut the strip-apron, make it necessary from isoplast. The laying form must be square and significantly play the flange, along the inner diameter of the flange in the gasket you need to cut a hole. Install the gasket so that the response part of the flange is hermetically planted on the gasket. Screws in the response part of the flange screw over the entire perimeter. Please note that it is impossible to press the gasket. Under the flooring of the insulating layer in it, the hole is cut out, which in size will be larger than the flange and the gap will be overlapped with a gasket.
Article on the topic: Bronnoscope on a cylinder lock: Protection in detail
For high-quality installation of the waterproofing material, it is necessary to connect it parts of the brass, while the material should be heated and press, then the material will ensure sealing. The most attention should be paid to waterproofing walls of wall and floor interface. In the casing, you need to install a siphon with grille.
Next you need to hold an inclined screed. To do this, install guides, bevelled at an angle (the same as the gender of the floor). The height of the guide in the siphon should be reduced to the thickness of the tile. In accordance with the established guides, cement-sandy mortar is poured and smash it. The angular joints are sampled using a waterproofing tape, and the grooves that are formed on the place of remote guides are closed with a solution. Then the tile is stacked. Thus, it is possible to install a drain gear on your own, if you do all the work neatly.