
One of the main places in the design of modern cuisine is caring. Its role is to ensure the conditions for initial processing of products, cooking and washing dishes. Therefore, the installation of washing in the kitchen should be provided:
- Convenient summing up communications to it: water supply and sewage;
- tightness of the compounds;
- Hygienic installation.
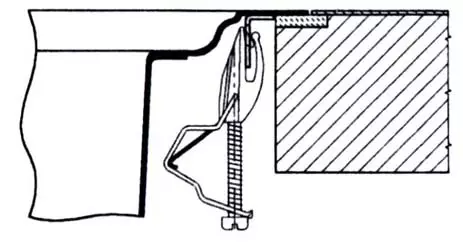
Scheme of standard car wash attachment to the tabletop below.
The choice of new kitchen sink should take into account not only an external aesthetic appearance, but also the way to install it with their own hands. There are several of them:
- Installation on brackets: by mounting to the wall with metal holders;
- Overhead: installation of the panel for a special standard without tabletop;
- Installing a mortise, integrated washing: The panel is mounted in the opening of the table top or under the stove of the table top.
Mounting will correctly help the next instruction on how to install the kitchen sink in different ways.
Preparatory work
Before performing work in the kitchen on the dismantling of the old sink and installing a new one, it is necessary to overlap the water supply from the risers of hot and cold water supply.Remove the old sink: disconnect the fitting nut of the mixer, eyeliner, remove the mixer; Disconnect the siphon from the drain hole, then from the sewer tube, the hole of the pipe to shut up with appliances; Remove the sink.
Installation on brackets
Installation of washing in the worktop.
Tools and materials that will require installation:
- building level;
- Perforator;
- screwdriver or screwdriver;
- self-tapping screws with plastic dowels;
- Brackets for fastening washing.
Step 1. Make marking. Mark the horizontal line at a convenient height. Horizontality is checked using a construction level.
Step 2. Turn over the sink upside down, put the brackets as they will stand when the washing is installed, measure the distance between them. Made the resulting measure to the wall, mark the future location of the brackets. Brackets are applied to the wall according to the labels and mark the locations of the holes for the fastening.
Step 3. Remove holes for fastening by tags. In the holes to score a plastic dowel insert. Attach the brackets with screws.
Step 4. Install the sink, secure according to the design. Connect the mixer and siphon to the washing. The instructions for their installation are usually included. Connect to water supply and sewage. Turn on the water, check the tightness of the connections. If the leaks are detected, unreliable items to disassemble, dry and collect again, using additional sealing of silicone, carefully installing gaskets included in the kit.
Article on the topic: Blooming shrubs for giving - titles and photos of plants
Installation of the overhead panel
Schemes of the sink in the worktop.
Overhead washes are mounted in specially designed to do this for this, often without internal structures, in order to not create interference when connecting water and sewer pipes. The tabletop in such a tumba serves the washing panel. Therefore, the assembly of the cabinets should be carried out as securely as possible and correctly. Inside the cabinet, if necessary, additionally install fasteners for jumpers giving stiffness of the structure. They can be made of planks or segments of the board and use as small shelves.
Tools that will be needed for work:
- screwdriver for assembling the couch;
- Electrolovik or hacksaw - to cut holes in the body for communications, if required;
- Entering key - for mounting eyeliner.
When choosing a place to install the stands, it may turn out that the existing conclusions of the water supply and sewage in the kitchen are located on the side of one of the sink walls, and it is impossible to carry them to the place from the rear side of the open side for some reason. In this case, the installation of the washing will require preliminary markup and cutting holes in which communication can be summed up (Fig. 1 A) and b)).
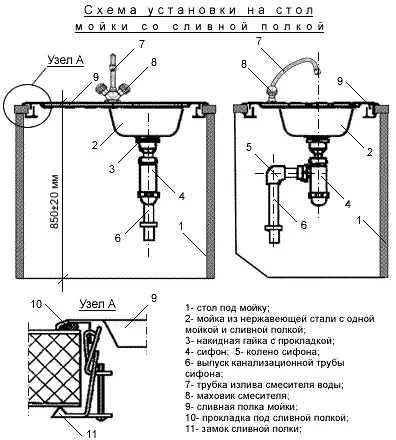
Mounting scheme of the sink.
The sink panel, which is installed on the end, can be actually overlaid or move from the front side. In the second case, there are grooves for curved "Salazok" of the panel for which it moves until it stops.
When installing the sink panel, a brief instruction will help to avoid errors to avoid the error:
- Mark the position of the lower edge of the sink, pre-placed on the sink panels and at the level of the label to consolidate the support bars for additional maintenance of the shell filled with water.
- Apply a layer of sealant on the upper perimeter of the cabinet and install the sink panel to the regular place.
- Installing the mixer and connect it to tap pipes with a flexible or rigid liner. Install the siphon and connect it to the sewage pipe. Check the tightness of the compounds, putting water. Review the deficiencies of the installation and eliminate the leaks.
Article on the topic: Paper Wallpapers Painting: What paint to use
Installation of integrated shell
The washing purchased for installation by knocking into the worktop should be selected with the template included in the kit. Otherwise, the markup and cutting of the holes under the sink can cause difficulties and be not accurate enough, which will lead to the penetration of moisture under the sink and spoil the wooden countertop.
Making holes for washing in a tabletop made of artificial stone will have to be entrusted by a specialist. It is difficult to do it enough without the presence of the necessary tool for processing such a material.
Tools for work:
- Electrolzik and drill;
- Entering or gas key - for montage of communications.
- Step 1. Carefully cut down the contour template for installing kitchen sink. Determine the place on the table top, where the installation of the mortise washing will not interfere with the elements located under the tabletop. Locate the template on the table top and thoroughly align it in parallel to the edge, secure and circle a pencil along the contour.
- Step 2. The surface of the table tops along the contour to crack painting scotch. This is done in order to protect her surfaces from damage to the jigsaw housing when drinking holes.
- Step 3. Drill a drill hole for the blade of an electric bissing. Cut the hole exactly along the contour. It is necessary to do this without pressure on the jigsik, otherwise it will be a blade, and the cut will be uneven or oblique, will deviate from the contour line. In any case, it will require additional refinement of the slicer with the shrybelham, a file, and the like. Cut a hole for sewer output and water pipes, if necessary.
- Step 4. Surface surfaces carefully treat silicone sealant. To withstand the time it is necessary. Tracing washing.
- Step 5. Install the siphon selected design on the sink. Install a tap for drinking water on a tabletop (if necessary). Using a template to place holes on the sink panel to install the mixer. Drill holes. Fix the mixer with a flexible liner on the car wash. Set fasteners for washing included in the product kit. With insufficient reliability of them. You can make your own hands fastening from a metal mounting tape, traveled to the holes of the mounts.
- Step 6. The edge of the table top is to cry the rubber seal or apply the sealant layer. Install the sink panel. On the bottom side, inside the cabinet, fasten with the tension of the mounting tape using the screws to the details of the couch. On the perimeter of the installed panel, apply a layer of transparent sealant (its excess can be cut after frozen).
- Step 7. Connect communications inside the cabinet.
Article on the topic: Bath projects with a gazebo and barbecue - features of structures
A more complex option for installing your own car wash in the kitchen is the installation of the worktop panel. To do this, after cutting the hole by the template, an additional sample of the groove is performed around the perimeter of the cut-out from the back side of the table.
- Step 1. Make a template that will repeat the sizes and contour of the sink surfaces and the "wing" panels that should be open. Apply the contour by the template on the top side of the table top.
- Step 2. To cut the hole along the contour, handle the grungy edge of the table top with a file, polish. Turn the table top.
- Step 3. From the reverse side, choose a groove so that the tabletop panel is free.
- Step 4. In the resulting groove, apply a layer of glue from the modified silane and put the washing panel there (install the washing in the "upside down" position). Press the panel around the perimeter with hands, then through the substrate to pull the clamps in several places and leave for solidification of glue by 12-24 hours.
- Step 5. After soaring the shell glue is additionally fixed by a two-component epoxy resin. The composition is prepared according to the instructions and is poured into the gap between the panel and the casing of the table top. After hardened, the place of connection of the countertop and washing is sick with aluminum scotch.
- Step 6. Turn the table top with a kitchen sink, install on the end. Surplus glue around the shell gently cut. Water and sewage connection.
Installing miles in the kitchen is not as complicated as it may seem at the beginning. The main requirements are the accurate performance of work on the sealing of all possible places of water penetration and accurate fitting for the mounting of the mortise shell.