Photo
Selection of mounting for heated towel rail
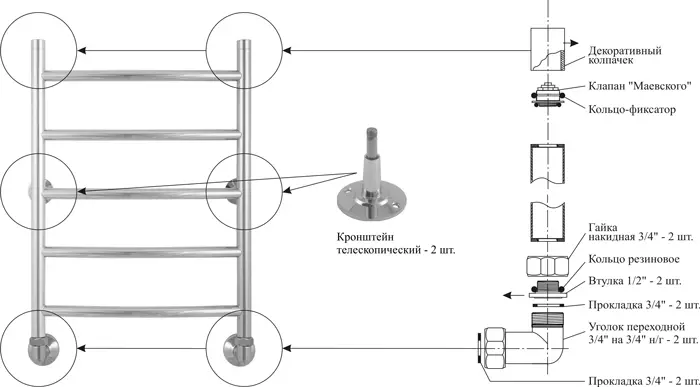
When repairing the bathroom or simply when replacing a heated towel rail, with their own hands, the question arises: how to fix the heated towel rail? Modern dryers are usually equipped with two fasteners. If, when purchasing it, the fastener is missing or there is a need to make fasteners more reliably, you need to get the mount separately.Fastening diagram of a towel rail.
Fasteners can be size in ¾, 1 and 1 ¼ inches (28, 32, 38 mm, respectively). Depending on the diameter of the drying pipe, the suitable mount is selected for the heated towel rail.
Also, when acquiring it is necessary to pay attention to the material from which the fastener is made. It can be polished stainless steel, chrome-plated or enamel steel, chrome brass, also molding can be made of two metals - case material - chrome brass, ring and rod are made of chrome steel. Accordingly, the material from which drying itself is made, the mount for the heated towel rail is selected.
I would like to note that steel products - the product is domestic and stronger and reliable.
They are made in accordance with GOSTs and are well suited for our systems.
Fasteners for drying there are two types:
- Bracket is simple.
- Bracket telescopic (in-point and detachable).
Telescopic fasteners are more functional (allows you to adjust the distance to the wall) and aesthetically more attractive than a simple mount for the heated towel rail. But it is 2-3 times more expensive.
It is better to choose fasteners in specialized building stores, preferring products of well-known manufacturers.
Mount for heated towel rail, installation technology
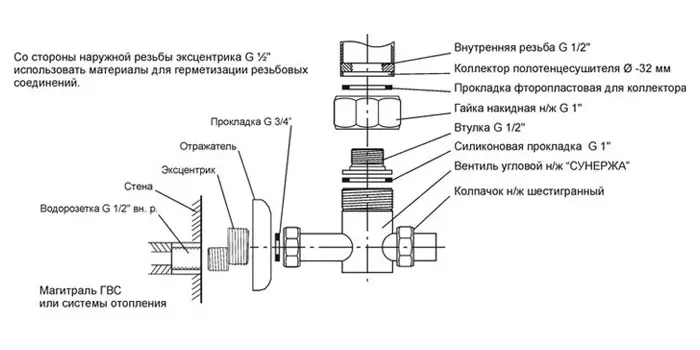
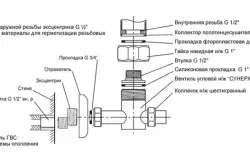
Connection diagram of the valve of the towel rail.
- When the fittings are already installed, the drying is bent, adjust it in height and tighten the nuts from the hand. At the same time, you must check that the thread is clean.
- The marker is tagging through the holes of the place of place, where it will be necessary to drill holes for a dowel-nail.
- Remove the heated towel rail. Kerner or a self-tapping screw with a wall, retreating 3 mm in the direction of fittings, because when tightening nuts, rubber gaskets are too much and drying will shift.
- Using a drill or perforator (the latter is preferable - it is easier to make a hole in the wall) drill holes with the drill of the desired diameter. Tile must be drilled, after they put the perforator in the battle mode.
- Dowels insert into the finished holes, finish them with a hammer. In order for fastening tightly to the wall, the protruding tails are cut off with a knife.
- Put back drying, evenly twisting the upper and lower nut, be sure to check for the presence of sealing rubber rings. Spin the nuts first with their hands, then with the help of the key, throwing the rag on them (in order to avoid scratches). Press gradually to avoid skew.
- Include water and check on the absence of leaks (hands or toilet paper).
- In a dowel inserted nails, just not clogged, but twist them with a screwdriver.
Article on the topic: Summer house do it yourself
Finished, mounting for a heated towel rail will be reliably to keep the product, withsting the necessary loads.
Tools and materials:
- Actually, fasteners itself - 2 or 4 pcs.
- Perforator or drill with a drill.
- Kerner.
- A hammer.
- Marker.
- Dowel-nails (required quantity).
- Screwdriver (screwdriver).
- Gas key (crocodile).
- Rag.
- Toilet paper.
Note: Connecting attachments for a heated towel rail can be screwed to drying the drying than it is convenient.
Modern and high-quality drying is one of the most important functions of the heated towel rail, so it is necessary to choose to choose, and how to choose it for him, should be taken seriously.