
In addition to choosing a suitable material of pipelines, a floor covering, the correct calculation of the heating system and its qualitative device with compliance with all rules and rules, a very important role plays how correctly the fill of the warm floor will be performed. In case of violation of elementary rules, all your plans and works will be reduced, bringing only disappointment. Even if third-party workers are engaged in the heat-insulated floor, you still need to know the fundamental basis, because It is possible that people who call themselves professionals may not be such. Having understood in the order of pouring a warm floor with their own hands, you can follow the workers, show them your competence in this matter, and they will no longer be able to smear or do something poorly. But if you do not want to spend money on the services of third-party specialists, we understand in the technology of filling the warm sex with your own hands, there is nothing complicated.
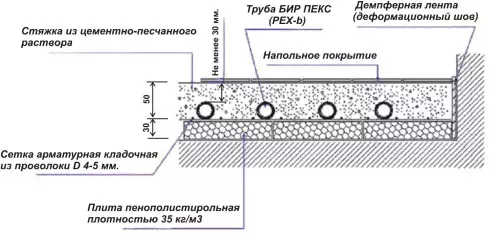
Water Heat Filling Scheme.
Causes and materials for filling a warm floor
The filling technology of a warm floor with their own hands provides a screed device. It serves as the basis of the floor. It is on her that accounts for the main part of the static loads from furniture and equipment installed in the room, as well as dynamic loads from the movement of interior items and people. The screed fixes the pipes of warm water floor and provides a flat surface, from which the general view of the room and the quality of the installation of the selected finish floor covering directly depends.
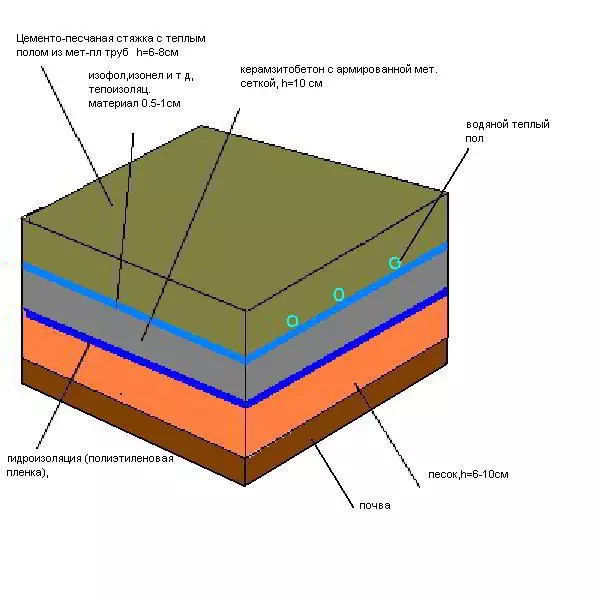
The scheme of the cruise of a ceramzite concrete to the ground under the warm floor.
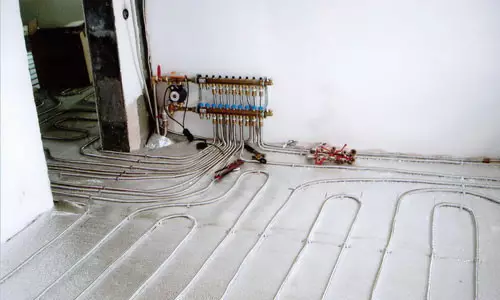
Pouring is performed after the installation of heat water floor pipes will be completed. It is important that the pipes are released above the planned fill level, i.e. They must have a stock. In the event that the tubular system of warm water floor is completely mounted, you can start filling the space between the pipes with a special solution.
Article on the topic: How to choose Linoleum: For an apartment or home, the right and high-quality for an entrance hall, a good corridor and marking
As a rule, the fill is performed by an ordinary cement mortar with a placeholder, which allows to reduce cement consumption and increase the strength of the finished fill. Technology allows you to use sand and rubble as aggregates. If you add to the solution to fill the warm water floor of sand, then the cement-sandy solution is obtained. You can add rubbank to it, and then a more durable concrete solution will be obtained.
As a rule, a conventional cement-sandy solution is used to fill the warm floors.
Technology provides for the use of 1 part of cement and 3 parts of sand, as well as water. Sand is predominantly quartz.
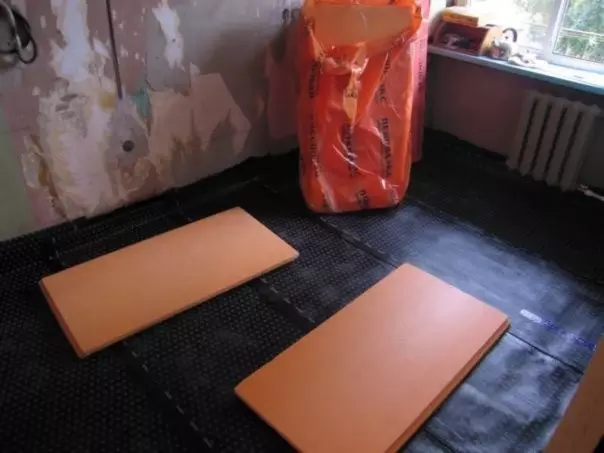
Penoplex takes great popularity.
Often, a variety of finished compositions are used to fill warm water floors. Their characteristics are similar to the characteristics of a conventional cement-sand mixture. The use of such compositions is very convenient when performing large volumes of work. All components of the finished mixtures are balanced and do not require additional mixing. It is only necessary to add the amount of water specified by the manufacturer and mix a slight solution with a mixer or a drill with a special nozzle. In order for the solution to be more plastic and could penetrate the most hard-to-reach places, various kinds of plastifiers are added.
No less often, self-leveling mixtures are used to fill the underfloor. Such formulations apply to the level without additional effort from a person and significantly simplify the finishing alignment of the fill before mounting the flooring.
What do you need to know before starting work?
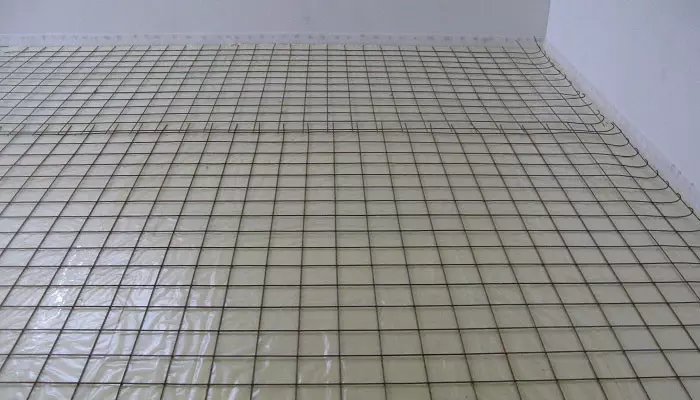
The reinforcement grid is necessary for fastening pipes of a warm floor.
Before starting to perform the fill, you need to learn about the main nuances and the rules of this work. Performing simple recommendations, work will pass faster, and the quality of the finished fill will be at the highest level.
The most significant difference in the fill for water floor heated from a simple screed is the mandatory presence of deformation seams. In rooms in an area of up to 10-12 m², these seams are made according to enclosing structures. To do this, at the bottom of the wall, the depreciation band is stacked. In the future, it allows you to compensate for the expansion of the fill under the influence of high temperature.
Article on the topic: How to make a rack? Several options for making rack
In the event that the area of the room exceeds 10-12 m², additional seams are created. In addition to the compensating function, the damper tape provides thermal insulation from the walls, because It has a thermal foil foil coating.
The main stages of installation will be discussed below. However, in addition to the main techniques you need to know and auxiliary, but no less important moments. So, before proceeding to the pouring of a warm floor, be sure to check the hydraulic density and correct operation of the system pipelines. If you perform the fill without configuring the existing flaws, then after a certain time, they definitely manifest themselves, and you will have to get rid of the old fill and do everything again.
Under the system of pipes it is necessary to put the heat-reflecting material that will reduce heat loss from the room with a warm floor.
Step-by-step instruction on the pouring of warm water floor

Warm floor laying methods indoors.
Pouring technology provides for the use of the following tools:
- construction level;
- Drills with a nozzle mixer;
- spatula;
- workman;
- rules for performing plastering;
- Buckets or other suitable tanks for the preparation of the solution.
Before filling, take a water level or a simple level rack and make sure the roughness of the draft coating. Professional builders recommend starting to the next stage only after all serious defects are corrected, and the height drop will not exceed 4-6 mm by 2 m².
You can turn on the warm floor at any time.
In case of detection of serious shortcomings (cracks, irregularities, etc.), it is necessary to align the base with the help of a special solution. At the same time, it is necessary to take into account the characteristics and features of the composition of the draft surface. It is possible to move to further stages of work only after the applied layer will dry. Follow the technologies installed by the manufacturer of the mixture or the same regulatory documents.
Article on the topic: Choose an electric cultivator for giving: species and reviews
After all the surface flaws are eliminated, it is necessary to apply a layer of hydro, and then thermal insulation. The special grid is mounted to which the pipe system will be attached. Next, the damper tape is paved, the heating circuits are connected and their integrity is checked.
Directly the fill can be started only after the heating system is verified and tested according to special technology. For pouring, solutions of a certain class of strength can be used. In most cases, it is recommended to fill with homemade cement-sandy compositions or professional mixtures whose characteristics would not be lower than similar characteristics of the M300 brand concrete (class B22,5).
Pay special attention to the thickness of the fill layer over the pipes of the warm floor. It is impossible for it to be less than 3 cm. The most optimal thickness is about 4 cm. Pay special attention to the fact that in the case of the use of traditional building materials (cement, concrete) you will have to wait about 28-30 days until the fill dry completely. And only the field of this can be used the heating system in full force.
Fill the mixture, align and take patience. To dry out a thick layer, it may be needed even more than 1.5 months. It is impossible to lay the finishing floor covering until the fill is completely dry. Bulk floors in this plan are more convenient due to its relatively fast drying.
Now you know how to pour pipe water field yourself. There is nothing complicated in this. It is only necessary to responsible and carefully approaches the choice of materials for the fill. In particular, this applies to cement. It must be purchased before starting work, because If you purchase it in advance, it can be restarted. Good job!