
Repair of almost any room involves the installation of a plinth. Without it, the interior will look unfinished. Plinth, although it is not the main component of the design, but errors when it is selected and the installation immediately become noticeable. This product must match the overall style of the room and differ in good operational qualities. One of the best options are the ceiling plinths from polyurethane.
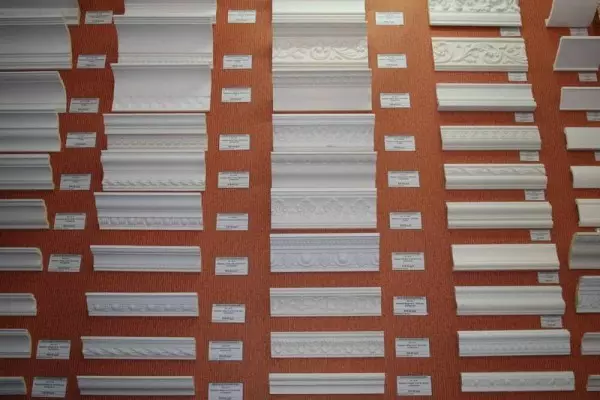
Types of plinths of various widths and with different pattern.
Recommendations for the preparation for installation
First of all, prepare the tools with which the installation of polyurethane plinth is carried out, namely:
- Capacity (bucket) for the preparation of putty;
- putty knife;
- mounted knife;
- gun for glue;
- Handsaw for metal.

Scheme calculation of the amount of ceiling plinth.
Previously decide on the type of polyurethane plinth. Take into account the fact that wide products will visually reduce the length of the room, so narrow models are best suited for rooms. Before going to the store, count how much material will be needed to finish your room. To do this, it is necessary to determine its perimeter. For example, if the length of the room is 5 m, and the width is 4 m, the perimeter will be 18 m. Standard ceiling plinths have a length of 2 m. To determine the required amount of products, divide the perimeter of the room for the plinth length. In the example, the example it turns out that it will be necessary to buy 9 products. Be sure to add at least 1 product product.
Be careful in the process of transporting the plinth of polyurethane. On the surface of the product there should be no bends, dents and other defects.
Before starting the installation of products, leave them in the room, in which their installation will be performed about a day.

For trimming wallpapers on the ceiling or wall, use the knife and spatula.
This will allow the material to adapt to the surrounding conditions.
Installation of the plinth can only be carried out on a flat, dry and pre-cleaned surface. By this moment you need to completely complete the decoration of the walls, gender and ceiling. Typically, the wallpaper will not be flushed to the ceiling. It is this gap that will help to hide the plinth.
Article on the topic: Kanzashi for curtains do it yourself: Masters Tips
After the surface preparation is completed to the installation of the plinth, the material will need to be placed. First, take the plinth, place it along the wall, measure with a roulette and make marks where the plinth will need to shorten. To prevent errors during markup, take a piece of polyurethane plinth and attach it to the wall and the ceiling as closely.
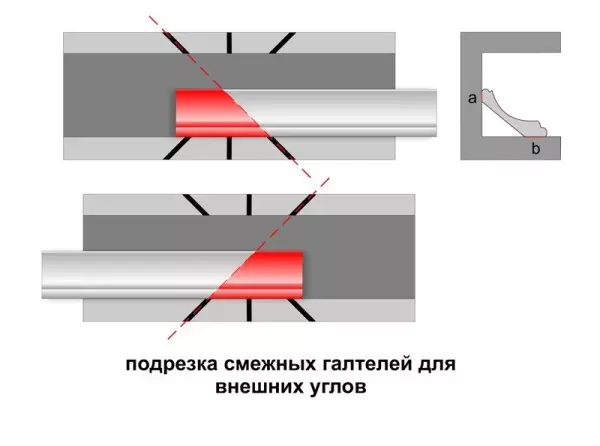
Circuit tiles circuit for angle.
Then take a pencil and draw a line near the corner of the ceiling and the wall so that the intersection of this line and the traits from the adjacent plinth under the desired angle. As a rule, this angle is 90 °.
Next, you will need to take a raner knife or, if there is no, pencil and make on products for sawing for sawing the desired angle. Put the mark in strict accordance with the previously performed markup. Make them from below and on top of the product, otherwise the junction will be uneven.
How is the plinth cut?
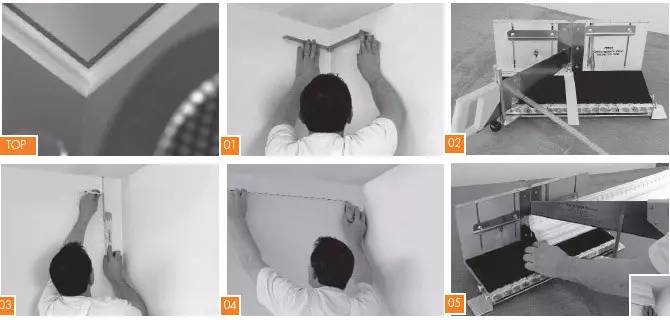
Stages of mounting the ceiling polyurethane plinth.
In some rooms there are not only internal, but also external angles. It is they who deliver the main inconveniences and difficulties in the installation process of plinth. You can buy special corners that are fixed to the corners of the room. This installation method is the easiest, because He will relieve you from the need to saw the corners.
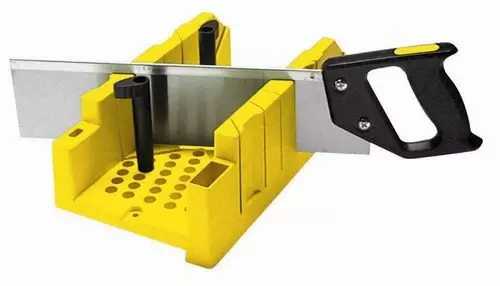
If you do not look for easy solutions, you can use one of the existing methods of cutting the ceiling plinth. To do this, it is recommended to use a permeable saw to get a smooth and beautiful cut. If there is no saw, use a carpentry stub with a set of stencils.
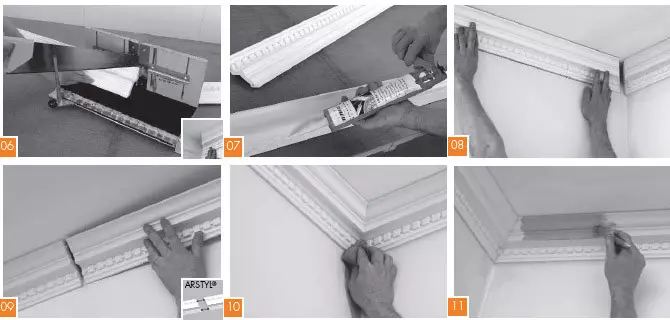
Stages of mounting the ceiling polyurethane plinth (continued).
Next you will need to take the plinth and insert it into the stub. Insert exactly how the product will be installed on the wall, and then select the desired angle on previously made markers. In the case of the use of the material of a complex form, it will be more convenient to work with a two-plane stouch. Carefully sanding the area cut the fine-grained sandpaper.
Article on the topic: Window opening in a brick and wooden wall
Inexperienced workers often allow one typical error - incorrectly calculate the length, cut off first the length of the polyurethane plinth, and after that angle. As a result, the length of the resulting segment will be insufficient. To avoid this, remember the simple rule: you first need to cut the angle, and only then the length.
Step by step instructions for sticking polyurethane plinth
For cutting the ceiling plinth used stublog.
After cutting products to the necessary pieces you can start their installation. The plinth is attached to the ceiling with glue. Use such a mixture, on the package of which the color is designated white-white. Those adhesive mixtures, as part of which there is a solvent, are not suitable. In order to prevent the formation of cracks, process the joints of the joints using a special docking glue. It creates the effect of melting and allows you to ensure a uniform distribution of the load on the polyurethane plinth during shrinkage. This makes it possible to minimize the probability of breaking connections on the joints.
Installation starts from the corner of the room. The reverse side of the polyurethane plinth has special grooves (shelves) under glue. Split the shelves and joints with glue, and then press the plinth tightly. Keep until the glue mixture is grab (usually about 20 minutes). The glue completely dries in about a day. In order for the polyurethane plinth to be installed as soon as possible, if possible, press it with something heavy. In the case of the installation of the ceiling plinth, this is, of course, problematic, but when installing the floor is quite possible.
If the surface has irregularities, they will provide themselves with slots formed between the plinth and the surface itself. To fix this defect, bring the product to the wall with carnations, but not until it stops. After the adhesive mixture dries, the nails will need to be carefully pulled out. The holes are plotted with fine-grained putty. Additionally, you can nail the upper corners at the joints. It will improve the clutch.
Article on the topic: Lattices on windows with your own hands: how to make and install at home
Excess glue is removed using a fine spatula or wet sponge. Make sure that in the process of removing the excess glue, the spatula has not in contact with the ceiling or wall, otherwise the film will appear. After mounting all the planks, you can notice small intervals between them. They should be sealed using silicone sealant white. Carefully process all the joints using acrylic putty.
How can you separate the plinth?
Polyurethane plinth can be painted. It is best to do this even before it is installed. In this case, painting will be better, and the walls will remain clean. For painting suitable water-emulsion and acrylic paint. You can use various formulations for artistic painting. Gleasses are remarkably suitable - these are tonic compositions, allowing the most diverse textures - stone, wood, gold, etc. polyurethane plinth.
Various decorative coatings in the form of an aerosol are available on sale. They are very convenient in applying. When choosing paint color, consider that it should be the same color as the ceiling, or 1 tone is darker. Consider the color of the platbands and the door leaf so that the harmonious ensemble is in the room. In the event that the walls are sealed with various ornaments, it is best to use plinths without any drawings.
The glued plinths can also be painted, however, before this it is necessary to wait at least 24 hours. Before applying a color decorative coating, cover the material with dispersed waterproof paint per 1 tone lighter.
Before attacking the painting of the already fixed plinth, take the space around it with a withdrawal paper or paint tape by approximately 30-40 cm so as not to spoil the walls. It is convenient to use a spray gun for such a job. The coating can be applied to one or more layers. It depends on the requirements of the manufacturer's company, so before starting painting, be sure to read the instructions. Good job!