
Any Russian man loves to go to the bath. Nowadays, people in all seek to comfort and comfort. Therefore, public baths gradually canno in the fly. And right, because it is nonhygienically and unethical. There is a pleasant alternative - own bath.

The entrance door to the bath must be maintained and protected from purge.
After the construction is erected, small additions are needed. If you yourself erected this construction, then the door to the bath with your own hands will not be much labor. And yet it is one of the most complex work processes. A pair of errors - and in your bath there will be a javar, and you will have to redo all the work.
If we are talking about the door to the bath, then you need to choose either cedar or larch, you can apply a liquip or oak. These are the best and widespread materials for bath doors. Please note that the door height should not exceed 170 cm, width - 65-70 cm, the height of the threshold should be at least 15-20 cm.
Required tools and materials
How to make the door to the bath? This is a difficult and time-consuming process, it requires certain skills to work with woodworking tools, but if desired, everything is possible.

Wooden door for a bath.
Required tools:
- Manual circular saw;
- roulette;
- kiyanka;
- screwdriver;
- clamps (tool for fixing parts at the time of processing);
- mill;
- building level.
Necessary materials:
- tipped floorboard;
- boll for strapping;
- self-tapping screw;
- lining;
- loops;
- simple pencil;
- PVA glue;
- List chipboard.
Stages of mounting doors
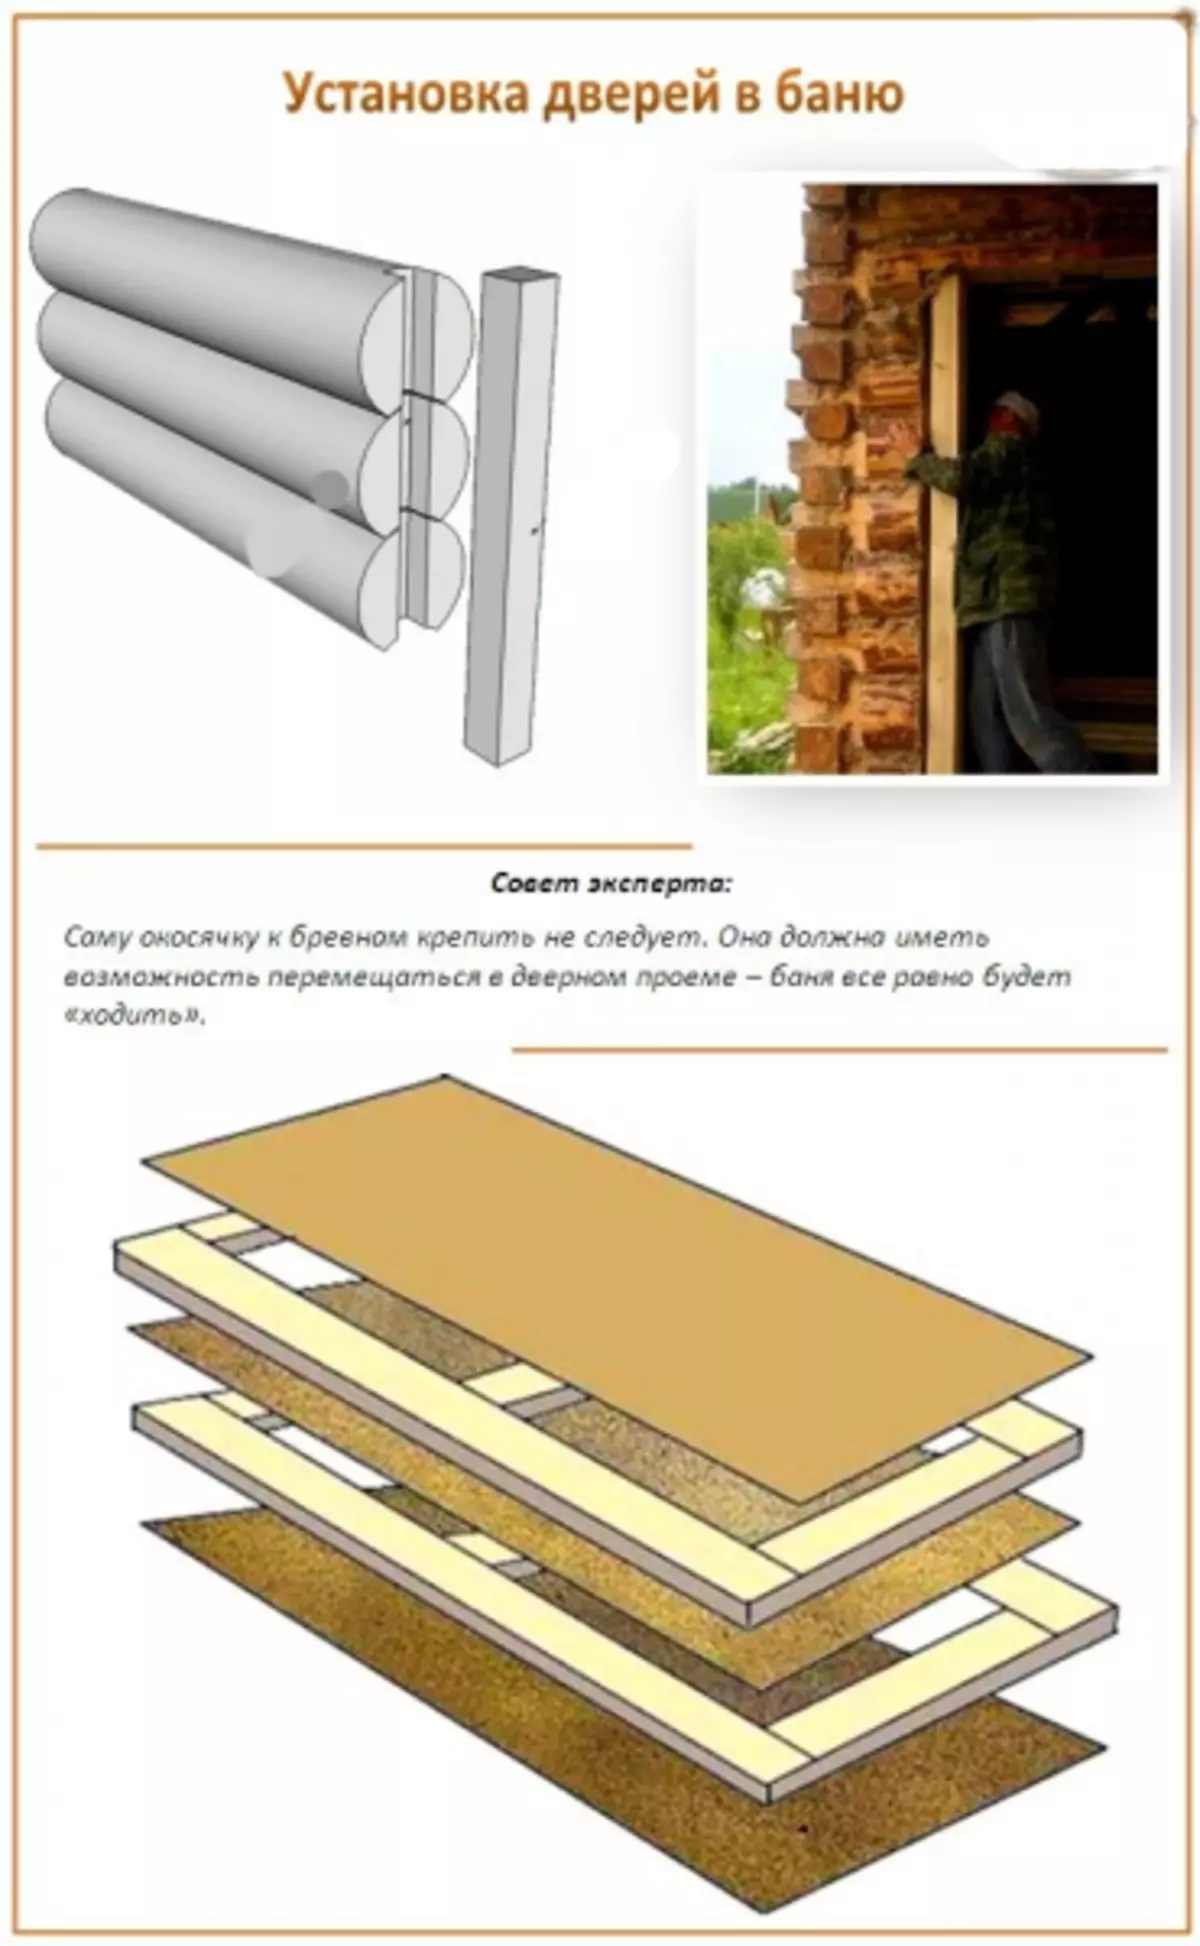
Installation of doors in a bath.
- Crop the punch board to the required length. Do not forget that the door height is folded not only from the length of the canvas, but also from bars for strapping. Here you need to make an accurate calculation.
- The surface of the floorboard is placed on both sides, here you need to get a perfectly smooth surface. In the usual case, it is enough to remove three mm to get an excellent result. Task number one - get boards with a thickness of about 25 mm. They, of course, should be smooth and smooth.
- Assembling the canvas. A spike of one board is inserted into the groove of another, the maximum dense connection is important here. As a result, the canvas can get wider than necessary. It is easy to fix. It should be cut off a bit around the edges from extreme boards.
- After the necessary size is measured, you should mark it with a pencil on the boards and remove extreme. Disc saw sliced excess. Make sure not to trim on an extreme boards with a groove and spike.
- Connect the boards into a single and whole design. Here you will need a smooth surface. The workbench is perfect. The spike of each board is inserted into the groove of the previous one. It is important to mark PVA glue. To achieve a greater density of the board be bought by Cyan.
- The door for the bath must be left for drying for three to four days, fixing on the workbench. To do this, there are several wooden sticks on it on the edges, the door canvas is stacked between them. It is covered with a sheet of plywood and tightly pressed the fixture for fastening.
- After complete drying, it is necessary to test it for the presence or absence of small defects, such as curvature and gaps. If such are available, close the mixture of sawdust and glue. Rights smooth the planer.
- The door is processed by a special solution that protects the door leaf from the negative effects of mold, fungus and, of course, from rotting.
Article on the topic: Instructions, how to fill the liquid floor with your own hands
Warming a bath door
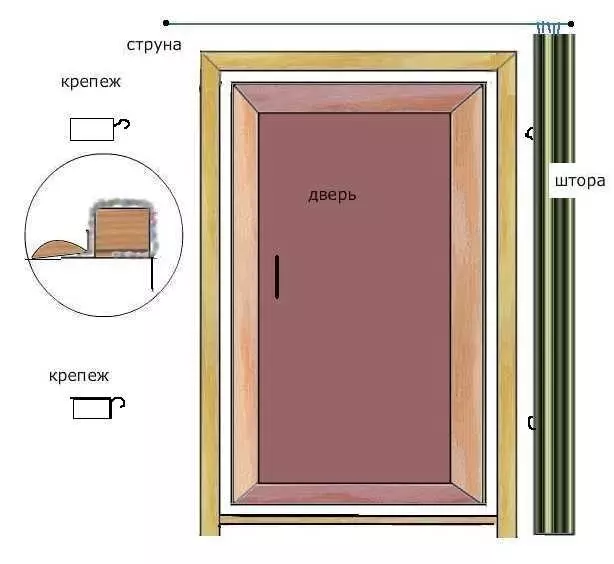
Warming doors with a thermal curtain.
If you neglect the insulation of the input to the bath, you risk cold and get sick, going to the pre-banker from the hot steam room. Therefore, the insulation of the door plays a significant role. For insulation, there are three basic methods:
- heat curtains;
- ENERGOFLEX;
- Insulated frame.
Warming Door Thermal Curtain
It is a good and most reliable option to insulate the doors for the bath. To do this, it is worth cooking a sealing frame. The seal is cut into 4 strips and nailed around the bath door with small nails 20 mm from the perimeter of the door.
Next, four bars are harvested and the insulation is nailed. After that, the bars wrapped in the insulation, the surplus is neatly cut off, and the edges are pressed against the outside. Thus, it turns out a rectangle with insulation.
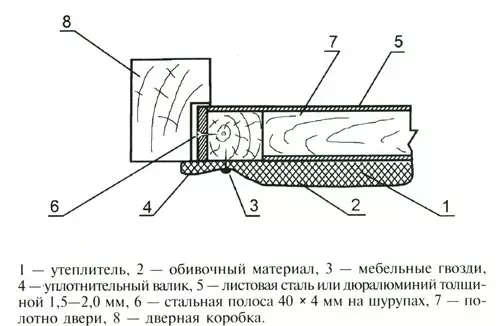
Door insulation scheme.
At the next stage, fabric with a very high density, such as leather or dermatin, from them is created with shirma. The fabric is sewn with the calculation that the bar will be inserted there. We enter it and fix it. The right side of the bar of 10-15 cm from cash is attached to the wall, attached well, the edge is covered with a rail. To the upper edge you need to sew 8-10 rings.
At the distance of one diameter of the ring, over the rail, screwed up screws. The wire is attached a wire length one meter. On the left, in several places, several springs are recorded. Opposite them, the rings need to be seeded to Shirma. Shirma moves out the door. This is a cloth in non-working condition.
In order to protect the bath from the penetration of cool air, the screen must be pulled off to the left and fasten on the springs. The fabric will move very tightly to the sealing frame.
Warming with energy flow

Making a door frame.
Warming with this method is the simplest and more fast, but this is not less reliable. For this you need a heater for pipes from the energyflow. It is pressed strictly along the edge of the door. You need to press not much, to avoid problems with closing and opening the door. The material is fixed with a construction stapler.
Article on the topic: How to choose a grout color for tiles?
The next step is the screwing of metal plates so that this design is as reliable as possible. This work will take 15-20 minutes.
Insulated frame for thermal insulation bath
The entrance door is removed and stacked on a solid and sustainable base. The perimeter of the entire door leaf is rude by wooden storage. It is necessary to do this so that their edges certainly performed beyond the boundaries of the canvas by 15-20 mm. To the frame with nails, you need to beaming the insulating material, rolled up input and protruding the frame edges by 20 mm.Next, the insulation is laid on the entire surface and the canvas and is covered with a sheet of plywood of a similar size. The final coating is attached to a wooden frame with nails or screws. The door will become much warmer, and in the closed state will be provided with excellent sealing due to the curved insulation, which is nailed with due baby.
Accessories for bath doors
Accessories in this business plays a very important role. This needs to be paid special attention. It is suitable from materials with low thermal conductivity and immunity to moisture.
It is not necessary to apply a tape from metal, there is a big danger to get burns.
Therefore, it is better to use a tree for the handles and a short, and the loops will fit and brass, but they need to be painted paint protecting against corrosion.
Installation of a bath door

Mineral wool insulation scheme.
- After all the preparations are made, you can move directly to the installation. Remember that the bathroom doors should open only out.
- You need to arrange grooves in the opening, making them 15 mm wider than the box, then in the installation process it will be easy to make adjustments in the vertical position of the door. The box is installed in the groove.
- It is required to get a horizontal element and pour the bars, and then lay a timber that will perform the threshold function. To track the correct position of the box, you need to use the construction level. Between the box and the wall are wedged, they will fix the design in the desired position.
- Loops are placed. The first door loop at an altitude of 25-30 cm from the top face of the door, the second - in 50-55 cm, the third is 25 cm from the bottom. Non-uniforms in the distribution of loops will save the door from the distortion.
- Put the door on the loop. If you saw that the lumens formed, take it out.
Article on the topic: How to make a two-tie roof: step-by-step instructions in photos and video
When the door for the bath with his own hands is performed and successfully installed, you can make small but important additions. For example, improving the appearance of this design, although the tree in itself is a very attractive material.
Outside, you can cover the door to paint or varnish. Inside it is unacceptable, such an action is extremely negatively affecting the health of people visiting this bath. Be sure to impregnate the door to the protective composition, which will significantly increase the service life and will retain its attractive appearance.
Tips for making a bath door
- It is desirable that the entire bath is made of one material. If you have a cedar sauna, then the door must be performed from this tree.
- Small defects in the door canvas are quite acceptable, given the fact that the door will be inhabit a special trim.
- The most popular breeds of wood are Lipa and Aspen, but the bath from oak, of course, is better.
- The door should be made only from one tree of wood to avoid deformation.
- It will not be possible to save on this issue, with the purchase of a cheap material, your bath does not last long.
Following these ordinary tips, you can achieve an excellent result.
The process of manufacturing the bath with your own hands is complex and long. It is necessary to take into account the many nuances, but the result will please you. Your building will cause envy and admiration. The steam room is a great way of relaxation, such a procedure causes a tide of strength, cheerfulness and energy, as a hand removes the accumulated tension, fatigue and irritation.