
The deaf fence is needed to protect and protect the private territory of the land or dacha. Naturally, the fence must have an input. At first there was enough wicket, then the gate was required for the crew, and in consequences for the car.
Metal gates and gate will provide entry / entry into the courtyard and guarantee security for residents of the house. Previously, the iron gate was sheathed with sheet metal 3-5 mm, in modern conditions a professional flooring is popular.
By the method of opening, all types of gates from metal / tree can be divided into two groups: swing and sliding.
By type of device wicket: built-in (inside) and separately standing (nearby).
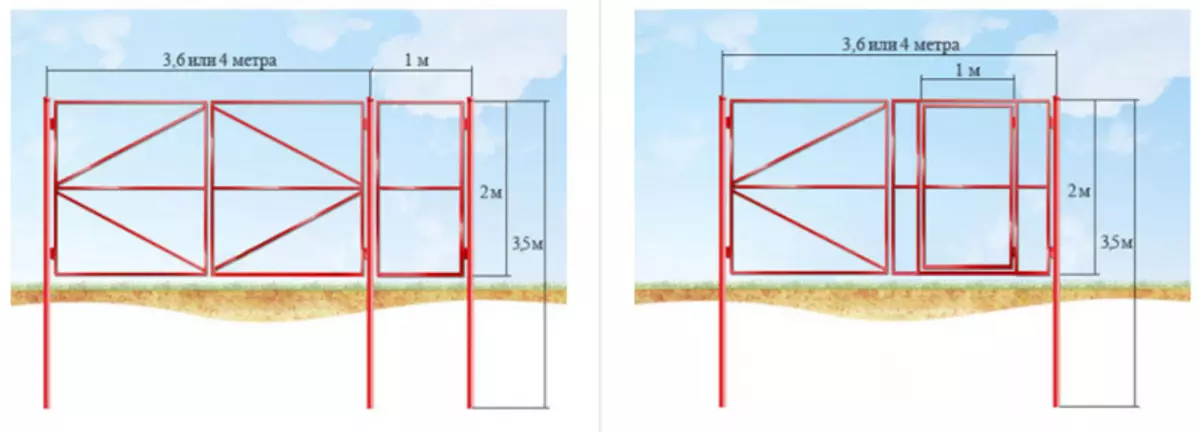
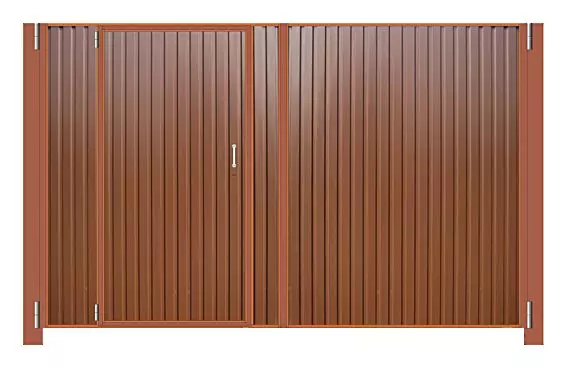
Scheme of swing gates from corrugated floor with built-in and separate wicket
You can buy a ready-made gate from the professionalist, order the manufacturer in size or make it yourself. Let us consider in detail the last option - homemade gates, like a cheap and affordable option.
Since swing, are simpler in the manufacture
Design, we describe how to make a swing gate from professional flooring on your own.
The strength and aesthetic properties of the professional sheet, as well as the ratio
"Price / Quality" allows you to talk about the feasibility of such a cladding.
As for the wicket, we describe two variants of the device.
The gate from the professional flooring do it yourself -
step-by-step instruction
Stepped construction manufacturing technology with a separate gate.
1 stage - the size of the gate from the professional flooring with the gate and without
Note that the installation of the swollen gate involves the accounting of the planning of the area / courtyard.Width of the gate of the corrugation
The width of the opening for the gate is determined based on the width
Car (including mirrors) Plus one meter additionally, reserve.
The width of the support pillars (column) is also taken into account. With the method of setting the gate with a separate gate, there will be three columns. In addition, it is necessary to take into account the magnitude of the gaps between the support pillars and the frame frame. As well as the size of the gap between the sashs of the swollen gate, taking into account the parameters of the fittings.
- The optimal width of the opening for the gate is 4500-5000 mm.
- The standard width of the wicket from the corrugated floor is 1200 mm.
Council. Since, you can't cost one sheet on the sash,
It is advisable to calculate the width of the sash based on the width of the sheet of professional flooring.
The table shows the dependence of the width of the goal sash from the width of the proflist.
| Type of professional flooring and wave width, mm. | Note | |||
| Number of sheets | PS-8. (1 200/1150) | PS-10. (1 200/1180) | PS-20 (1 150/1100) | |
| one | 1 200. | 1 200. | 1 150. | Total width of sheets |
| 1.5 | 1 775. | 1 790. | 1,700 | Half working width + total sheet width |
| 2. | 2 350. | 2 380. | 2 250. | Working Width + Total Sheet Width |
| 2.5 | 2 925. | 2 970. | 2 800. | Fewer width + total sheet width |
Material prepared for site www.moydomik.net
The height of the gate from the professional flooring
The height of the swollen gates from the proflist is 2200-2500 mm.This is explained by the standard length of the sheet of professional flooring - 2,000 mm. Although
The manufacturer can offer any length with a discreteness of 50 mm.
In addition, the clearance is taken into account from below (between the flaps of the gate and
land), which is necessary to ensure the functioning of the gate with
Forming toes and high snow cover. Clearance at the goal is
150-300 mm.
At the height of the gate affects the presence of decorative elements
from above. For example, the use of forging allows you to increase the height of the gate from
professional flooring and decoratively decorate the design, resulting in the entrance
The group looks more respectable.
Council. If the gap from the ground seems too big, you can
Install the bottom of the gate removable bar that you need to shoot at the beginning of winter.
2 Stage - Drawing of the gate of the corrugated
The diagram or drawing of the swing gate is required to simplify
calculation of the amount of material and evaluation of stiffness of the structure.
Two ways to make swing gates:
- with one big sash (single) . Disadvantageways can be considered what a lot of space is needed for the gate maneuver, as well as them
Large sailboat. Reducing sailbo at the expense of additional parts
The framework leads to an increase in the load on the loop, which in turn leads to
Locking sash. This method is suitable only for the gate with a small width.
opening or for the device wicket;
- With two sash (duplex) . Excluded everything
The disadvantages described above, but the cost of manufacturing is increasing due to
Add loops and frame elements. It is possible a device with the same or with
Different in the width of the sash. There are advantage of bivalve swollen gates
They are more resistant to wind load.
Article on the topic: Adjustable lags: Anchor for floors from plywood, do it yourself Installation of DNT, bolt and rack on legs and studs
The circuit of the swollen gate from the professional flooring should contain:
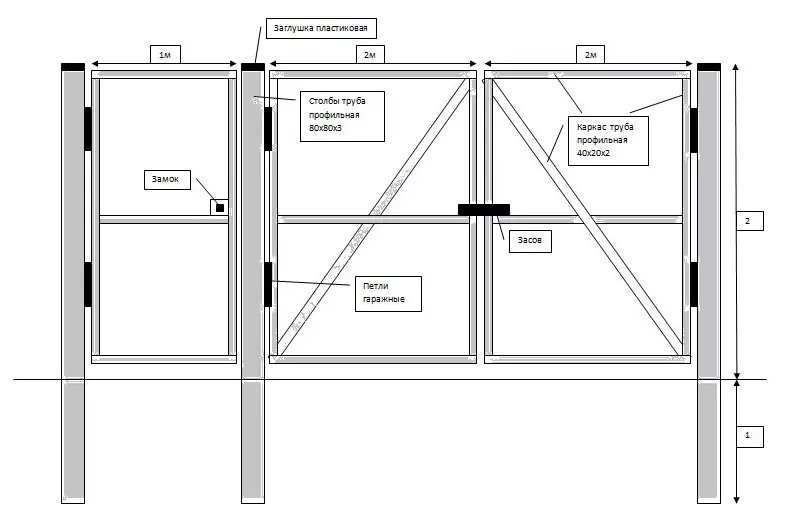
The circuit of the swollen gate from the professional flooring
The circuit of the swollen gate from the profile with dimensions
- The overall width of the opening. It will be needed if necessary
Make a maneuver - with increasing gaps or changing the size of the accessories;
- the width of each sash;
- the amount, the width of the racks and the depth of the racks;
- Configuration of the frame with the width of the components of it
elements;
- Area information and width of wicket. This is an important aspect.
Making the wicket from the professional flooring simultaneously with the frame for the gate will allow
Reduce the implementation period of the project. And if the wicket is located inside the frame
Gate, the drawing will allow you to take into account its location when markup and cutting
billets;
- Place installation loops;
- place and method of installing the castle;
- Location of the internal door lock
(vertical spinlet).
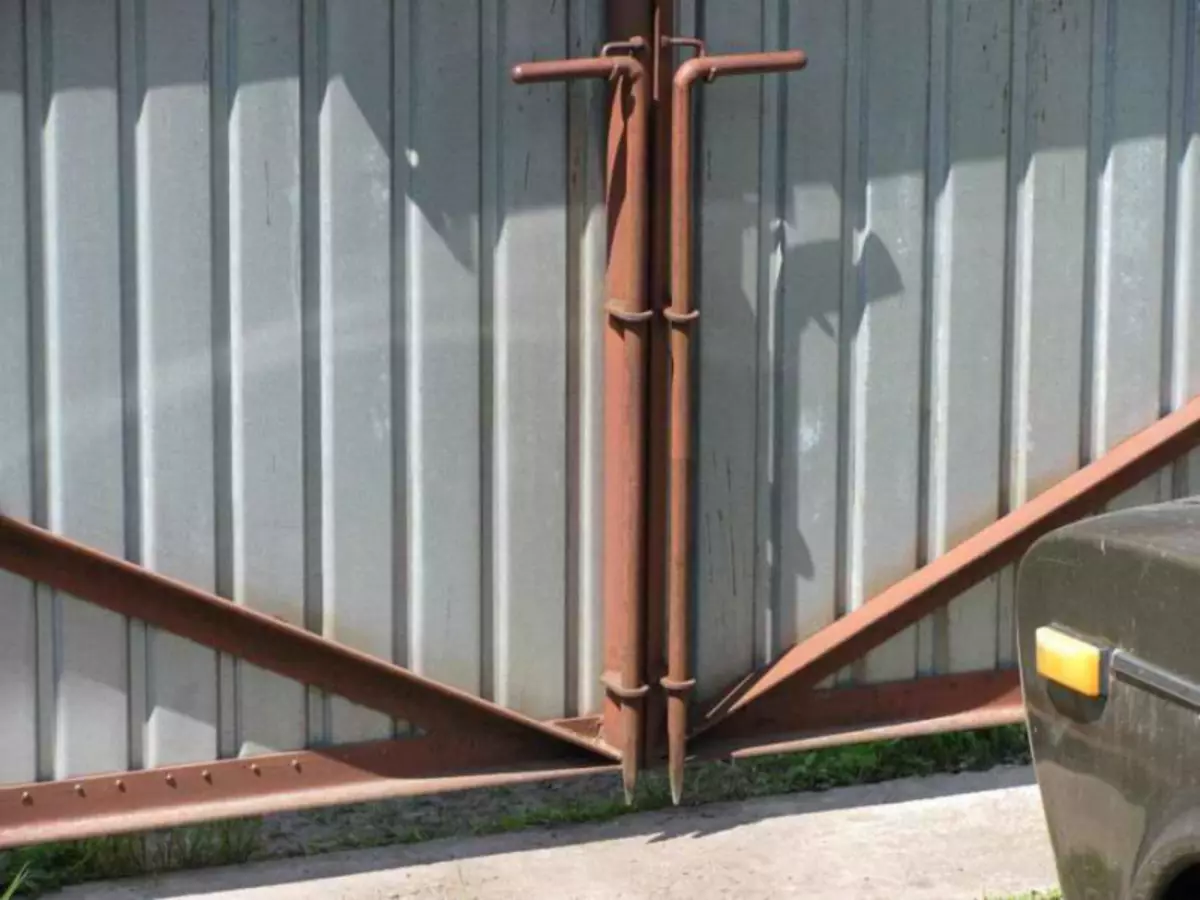
Gate Fold Clamp (Vertical Sewing)
Fixer of swing gates from corrugated
The drawing of the gate from the professional flooring is obligatory elements of the routing of the frame. It is the visualization of the future gate that allows you to understand which of the elements to use and determine the place of its installation, taking into account the wind load.
Ways to strengthen the gate of the professional flooring:
1. Navigar the corner for rigidity.
This method is suitable if the width of the flaps is insignificant
(up to 1,500 mm, each). Corner can be solid (cake) or in the form of an angular jumper (strut). The wider the corner or the closer to the center the jumper is installed, the tougher the gate frame will be.

Strengthening the frame of the swollen gate from corrugated corners
Strengthening the frame of the gate from brawlings with brazers
2. Make a frame inside the frame or above it.
The welding of the frame inside the framework of the top of the first case of the billet of a smaller cross section is placed in the frame of the frame, and stick to the welding in a step of 200-300 mm.
The solid seam is not allowed to exclude the deformation of the metal due to heating (so as not to be bored and did not twist).
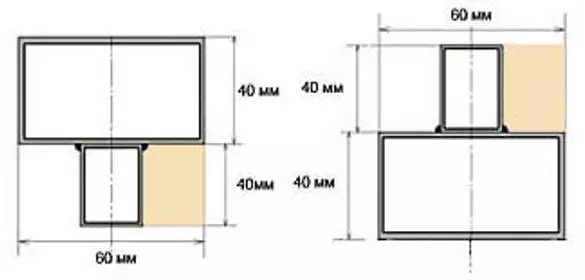
The welding of the frame outside the frame is the second, the pipe of a smaller cross section is welded above the main framework. The figure shows the top view of this amplification.
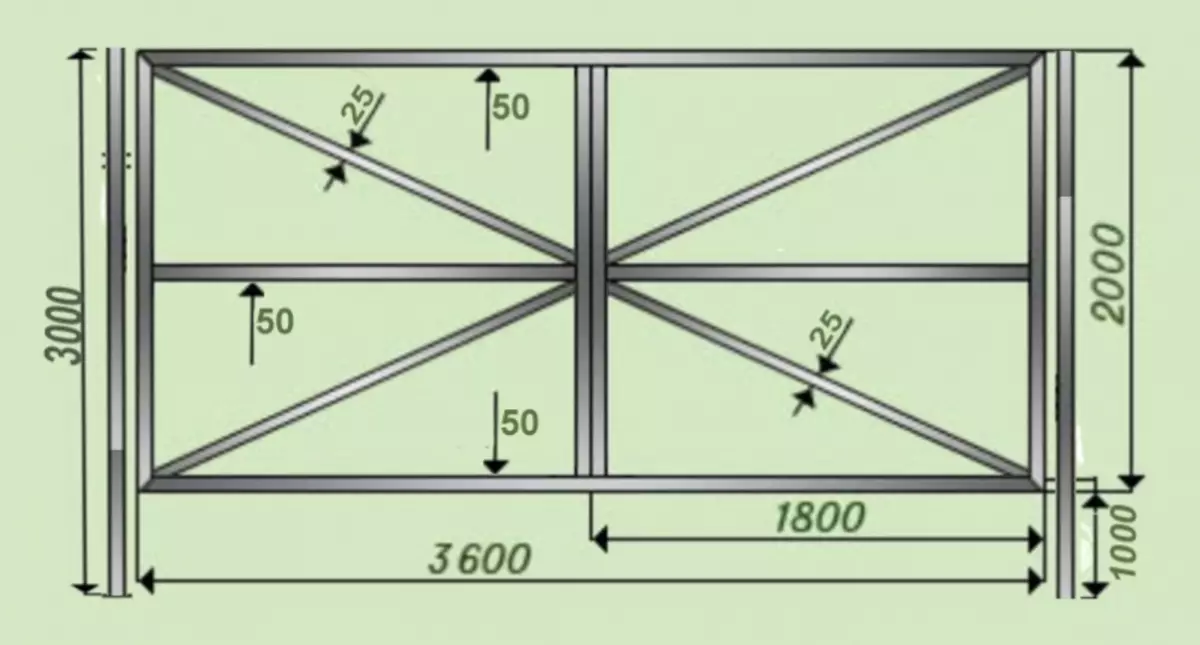
3. Install transverse or diagonal jumpers.
It is important to install jumpers correctly. If Kitka
from the professional flooring has a slight sailing and enough to install
one transverse jumper perpendicular to the long frame elements, then
The goal is more complicated. In this case, it is wiser to use diagonal
jumper.
Methods for installing jumpers on the gate from the professional flooring are shown in the photo.
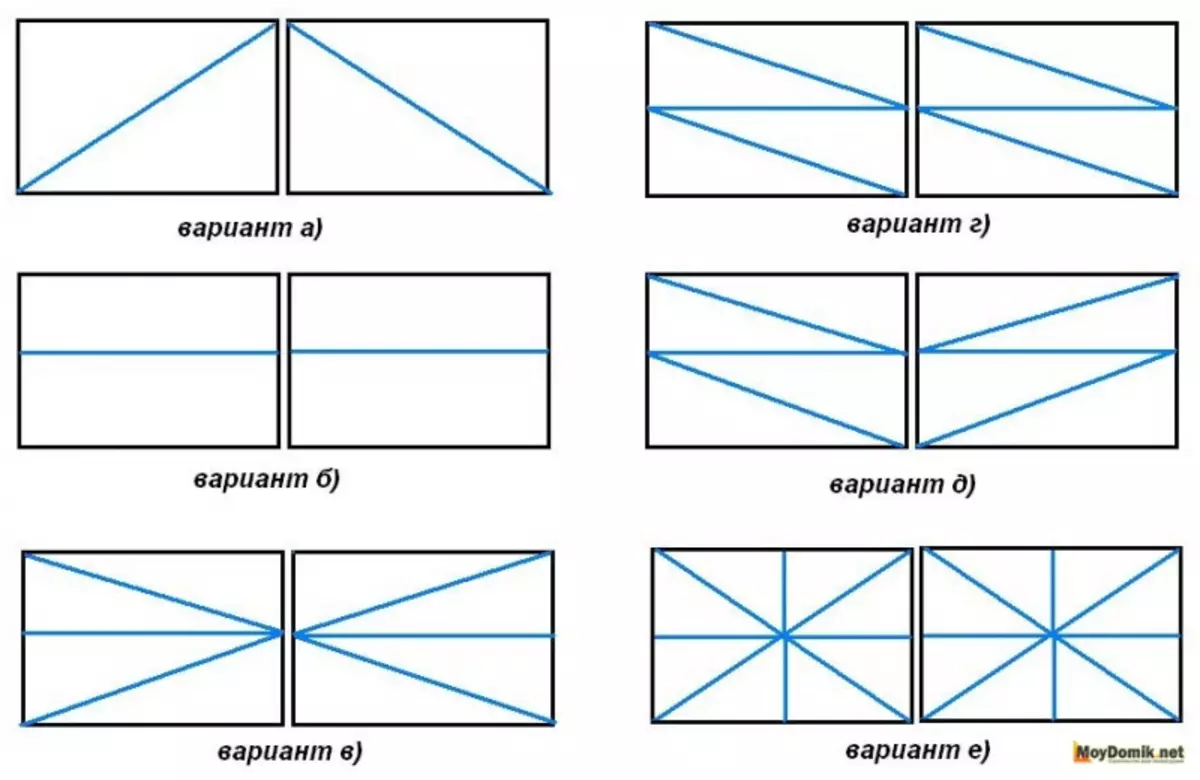
Variants of the installation of jumpers (rigidity edges) on the gate of the professional flooring
Ribbing ribs - location options:
but) Despite the seeming simplicity, this option is enoughThoughtful because it guarantees the integrity of the gate sash. One side,
It will be held with loops, the possibility of deformation is excluded from above.
Thanks to the amplification of the corners. Horizontal clamps will hold it below
(spivelights);
b) It is the most economical of the presented options, but he
Creates gain only in the middle of the frame. The only dignity is that
It allows you to set the lock on the jumper.
At the same time, the options "A" and "B" cannot be considered reliable when
The width of the goal sash is more than 1,500 mm.
in) Lack of this option in a weak strengthening of the upper
Inner corners. Strong wind can deform the sash;
d) In this case, there is no amplification of the left inner corner;
e) In this case, there is no amplification of both internal angles;
e) perfect option. The locations of the lock, the installation of the loops, the lower locks and the upper corners are reinforced. This method eliminates the cutting of the frame.
Council. The wider the sash, the stronger the framework.
3 Stage - Tool and Material for Gate from Profile
The drawing of the gate from the professional leaf is a visual manual for
Calculation of material. For the manufacture you will need:
- Professional flooring - for the trim. It is preferable to take a wall,
Because It has a large working width.
- self-tapping screws or rivets for fixing the proflist;
- Metal pipe with a cross section from 60x60 mm and above - for
reference pillars;
- Pipe with a cross section of 40x40 or 60x20 ... 60 mm. - for frame elements
sash (frame);
- Pipe 20x20 to enhance the frame (if necessary). 20x20
Suitable for a frame made of pipe 60x20. 30x30 - if
A tube 60x30 was used.
Masters advise to buy all pipes with a thickness of 3 mm, and not 2.
Their price is somewhat more expensive, but novice will be much easier to cook them. Metal
Slowly heats up and not so quickly deformed.
Article on the topic: How to cash out doors do it yourself
Studying recommendations, how to make the gate from the professional flooring, you
You will not find suggestions to use wood for a frame, because Wooden frame
It is not able to level the flexibility of the professional flooring.
- Metal sheet to form slaves (with
need);
- Loops, locks (latches, valves, plugs), bottom
clamps;
- primer for metal and paint;
- Decor elements (forging).
From the tool you will need: welding machine, Bulgarian,
Screwdriver (drill and riveter), roulette, level, plumb, scissors for metal,
Tassels and consumables to the tool.
4 Stage - Installation of support pillars for gates from professional flooring
Installation of the gate from the corrugated floor begins with the installation of support
Pillars. The most common way to put the columns of the gate is to execute
Point with subsequent concreting.
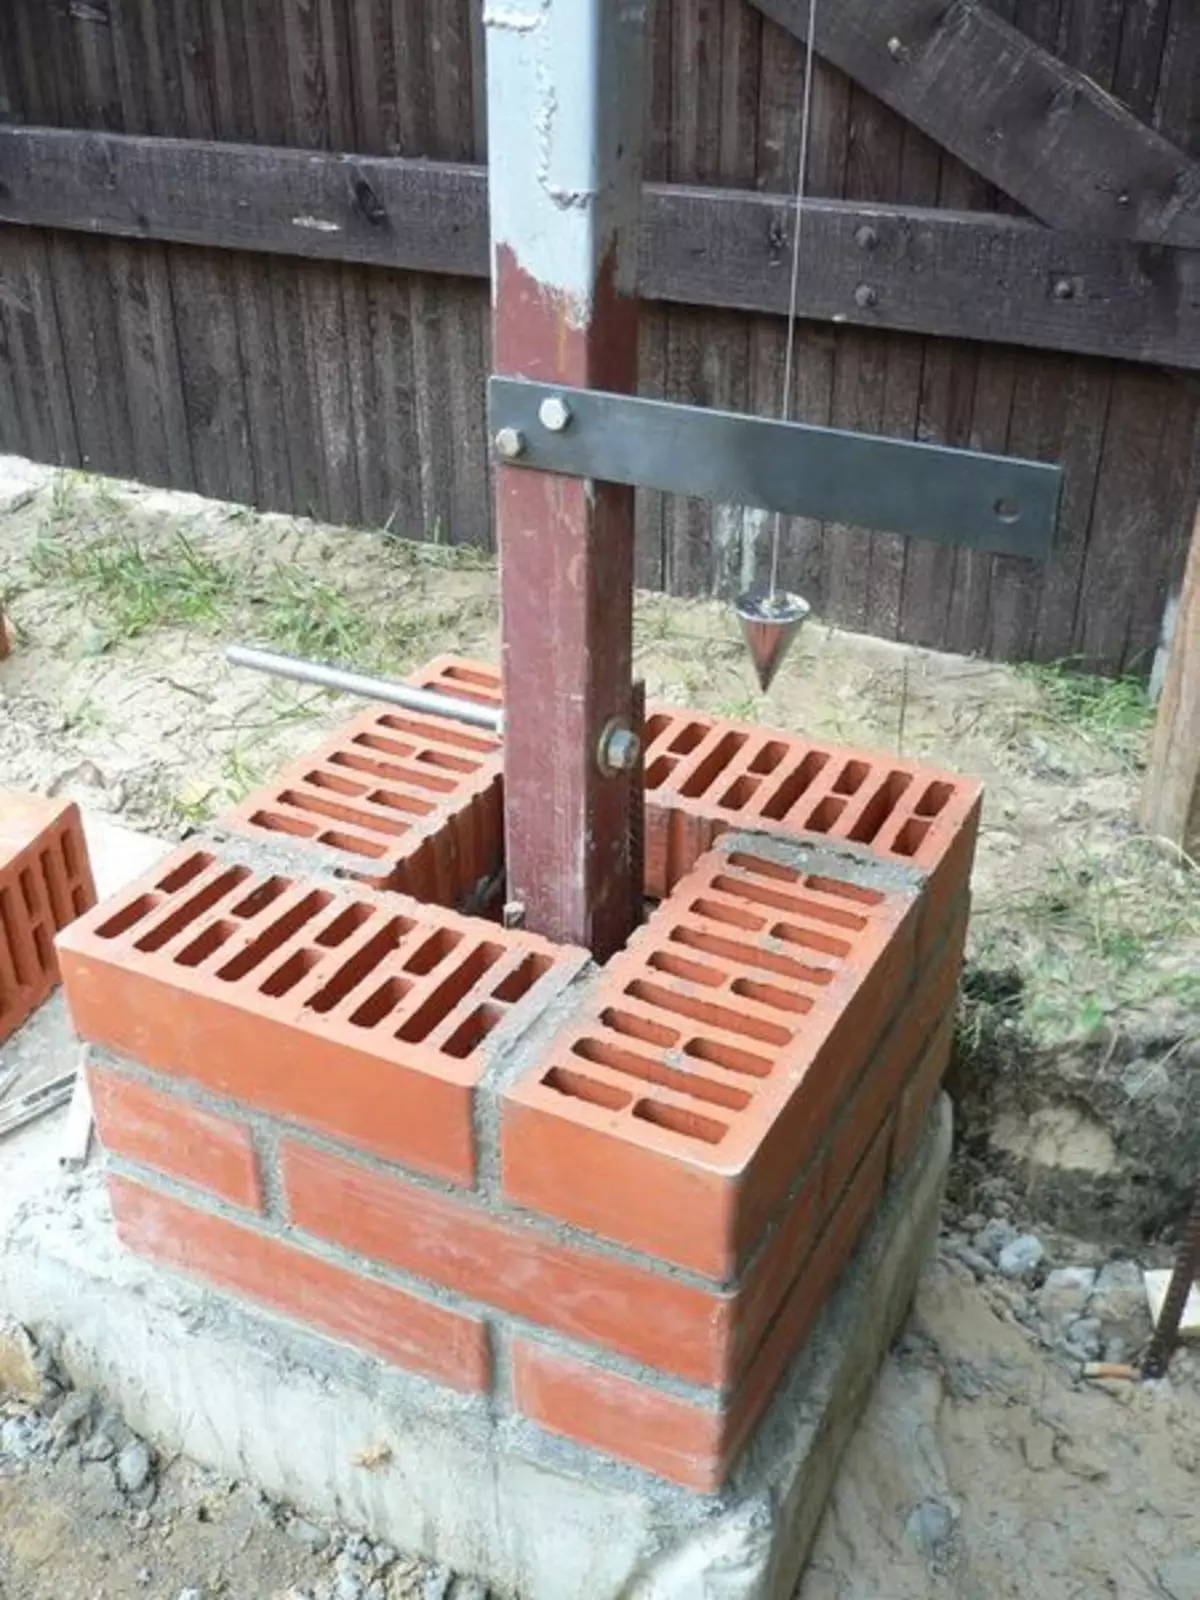
Installing brick support pillars for gates from professional flooring
Handful column for gates from the proflist
How to install columns for gates
- Drop the deepening garden brown. Use shovelIncreases concrete consumption. The greater the diameter of the support, the greater should be
Diameter of recess. For pipe with a cross section of 60x60, the diameter of the borax should be 120
mm.
What depth to dig posts for the gate? Depth
Installations is 1/3 from the length of the support
- Pour a mixture of rubble and sand into the recess. Pillow thickness -
150-300 mm. The pillow is designed to prevent the influence of frosty powder and
ensure the outflow of water from the base of the support, thereby slowing down its destruction;
- Prepare support (coat of corrosion primer);
- Install the support strictly vertically. The slightest deviation
will lead to the distortion of the whole design. Correct installation check with a plumb
or level;
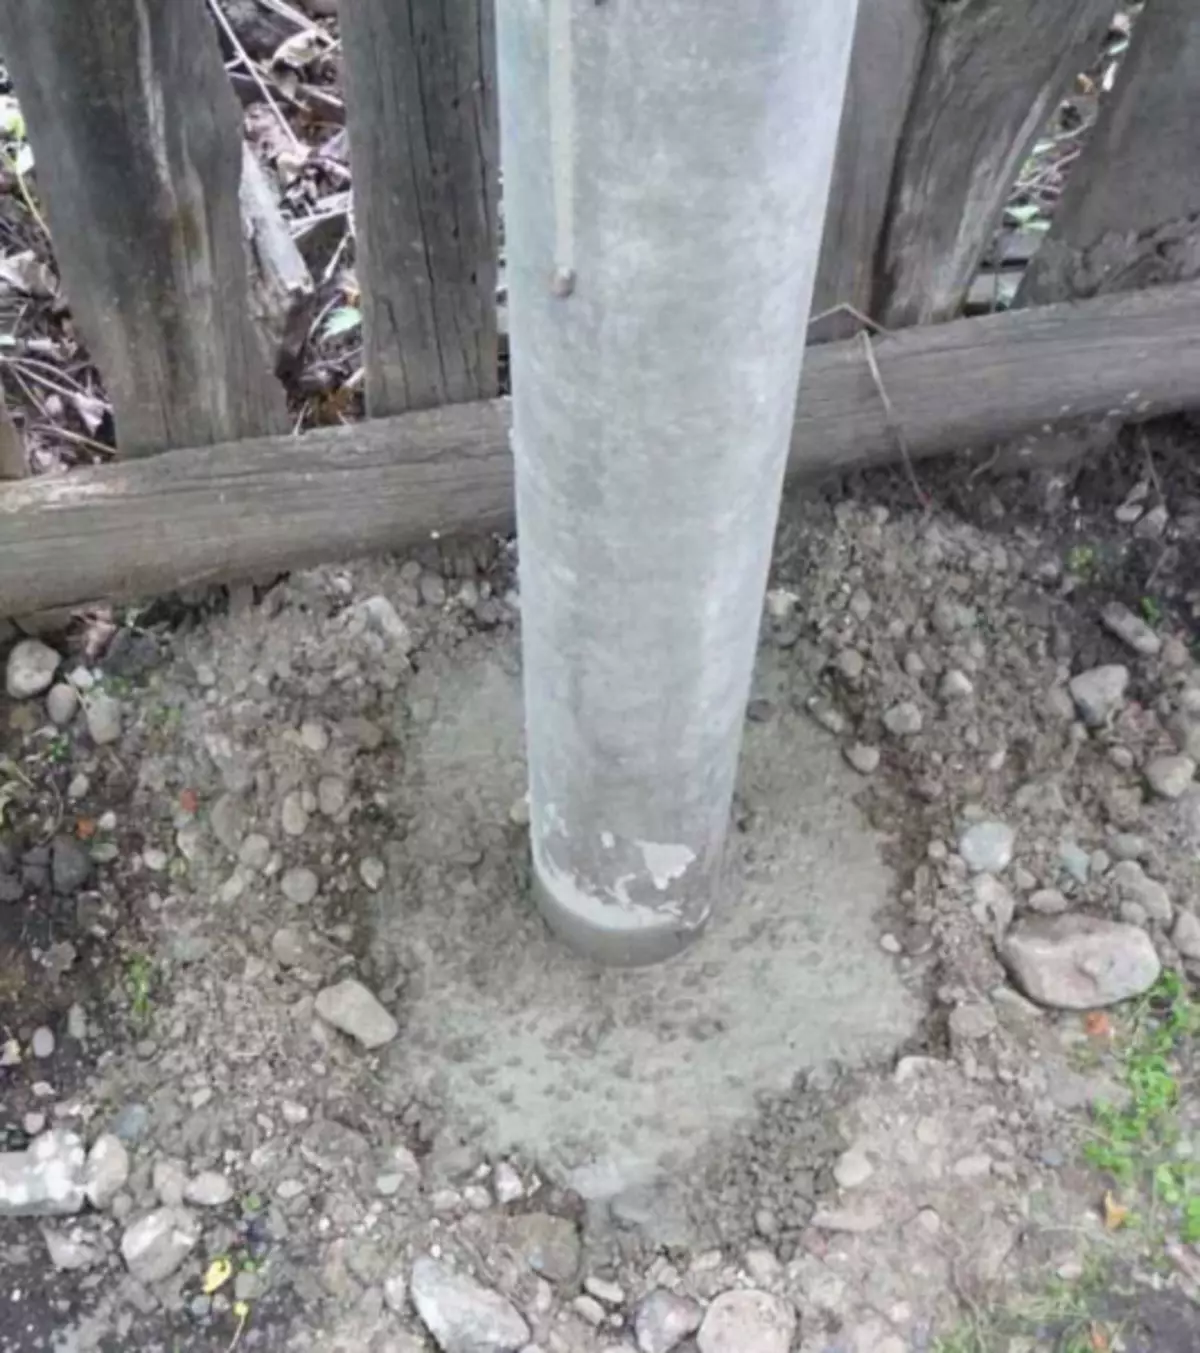
- Relieve support. While concrete will be captured, you can
proceed to the manufacture of frame;
- close the top of the support with a metal overlay or
Special decorative element. In the extreme case, pour into the rack of concrete
(Relieve from the inside) to avoid entering the water and thereby
Prevent column destruction.
What poles for the gate from the professional flooring can be used?
In addition to supports from metal pipes, you can install a concrete
Pole or use piles. Beautifully look at the supports, decorated
(lined) brick or stone (brick pillars). When calculating width
The opening of the gate should take into account the material of manufacturing and the width of the support.
{Banner_advert_2}
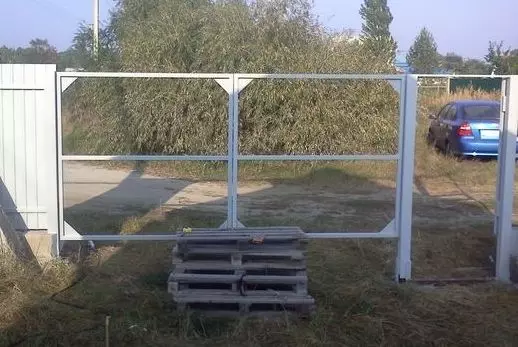
5 Stage - Production of frames of flaps for gates from corrugated
Before starting the manufacture, you need to measure the width again
The opening of the gate and wickets to make changes in the sizes in time.
Manufacturing technology:
- Metal is dismissed on the workpiece. Aggregate to do under
An angle of 45 ° for a more reliable fastening. Although the welding of parts is found
Job is so easier to cut the blanks and weld them;
Council. Masters advise to weld upper corners at an angle in
45 degrees, this is allowed to avoid watering in them, and the lower can be joined.
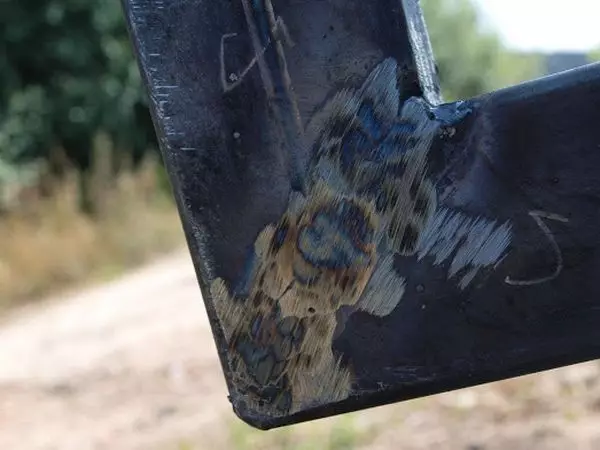
Welding of the upper corner of the gate from the professional flooring at an angle of 45 degrees
Welding of the inner corner of the gate from the straw
- Each billet is cleaned of dirt and rust;
- Weld the framework elements among themselves. And first
The billets are bent, and after checking the geometry is welded with a solid seam;
- The frame is enhanced (if necessary);
- Welded seams are carefully cleaned;
- Degrease the framework, cover with primer and paint places
welding. After the paint dries - paint the frame completely.
Council. Production of the gate from the professional flooring requires a big
Accuracy in size compliance. When making a frame of a sash better to do
The frame is slightly less than more. In the first case to eliminate the gap between
Solders of the swollen gate will sufficiently welcome the nickname on one sash
Rama, where she is adjacent to the second. In the second - you will need to cut the framework,
and reduce its width.
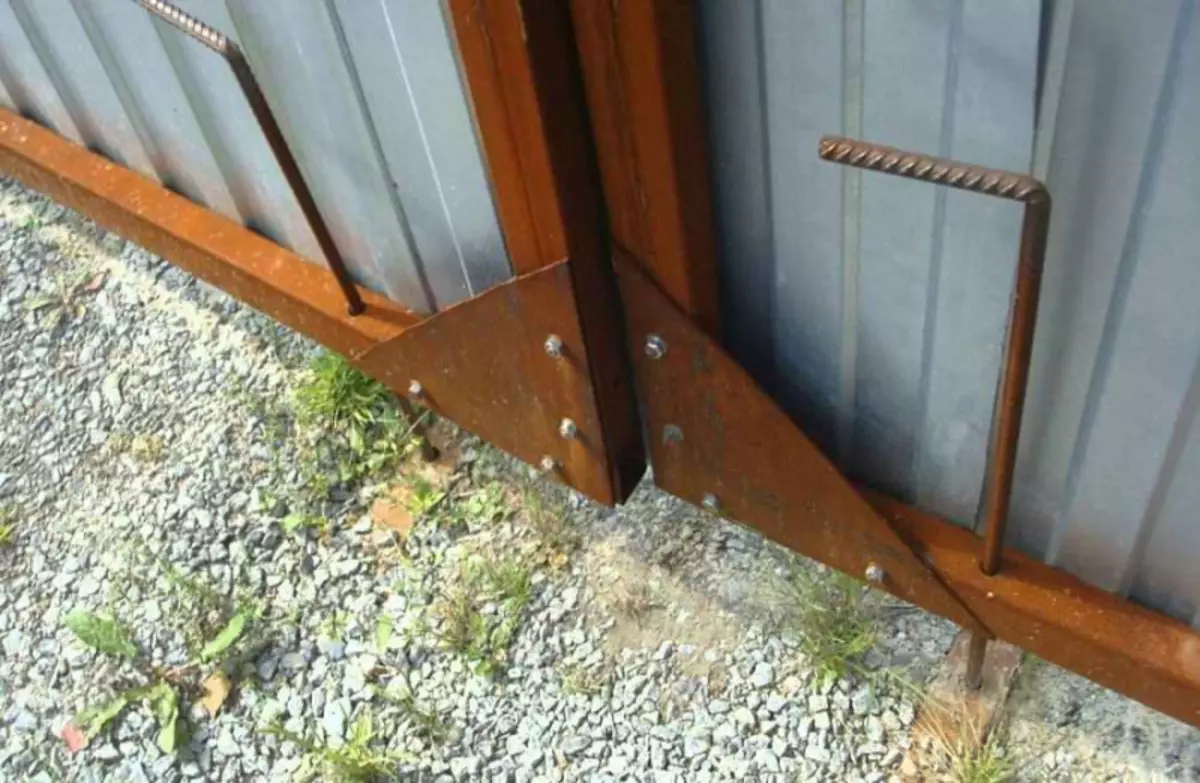
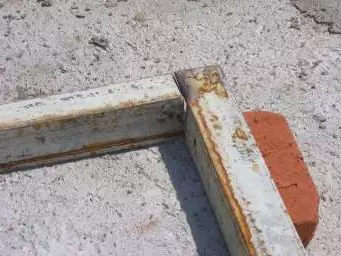
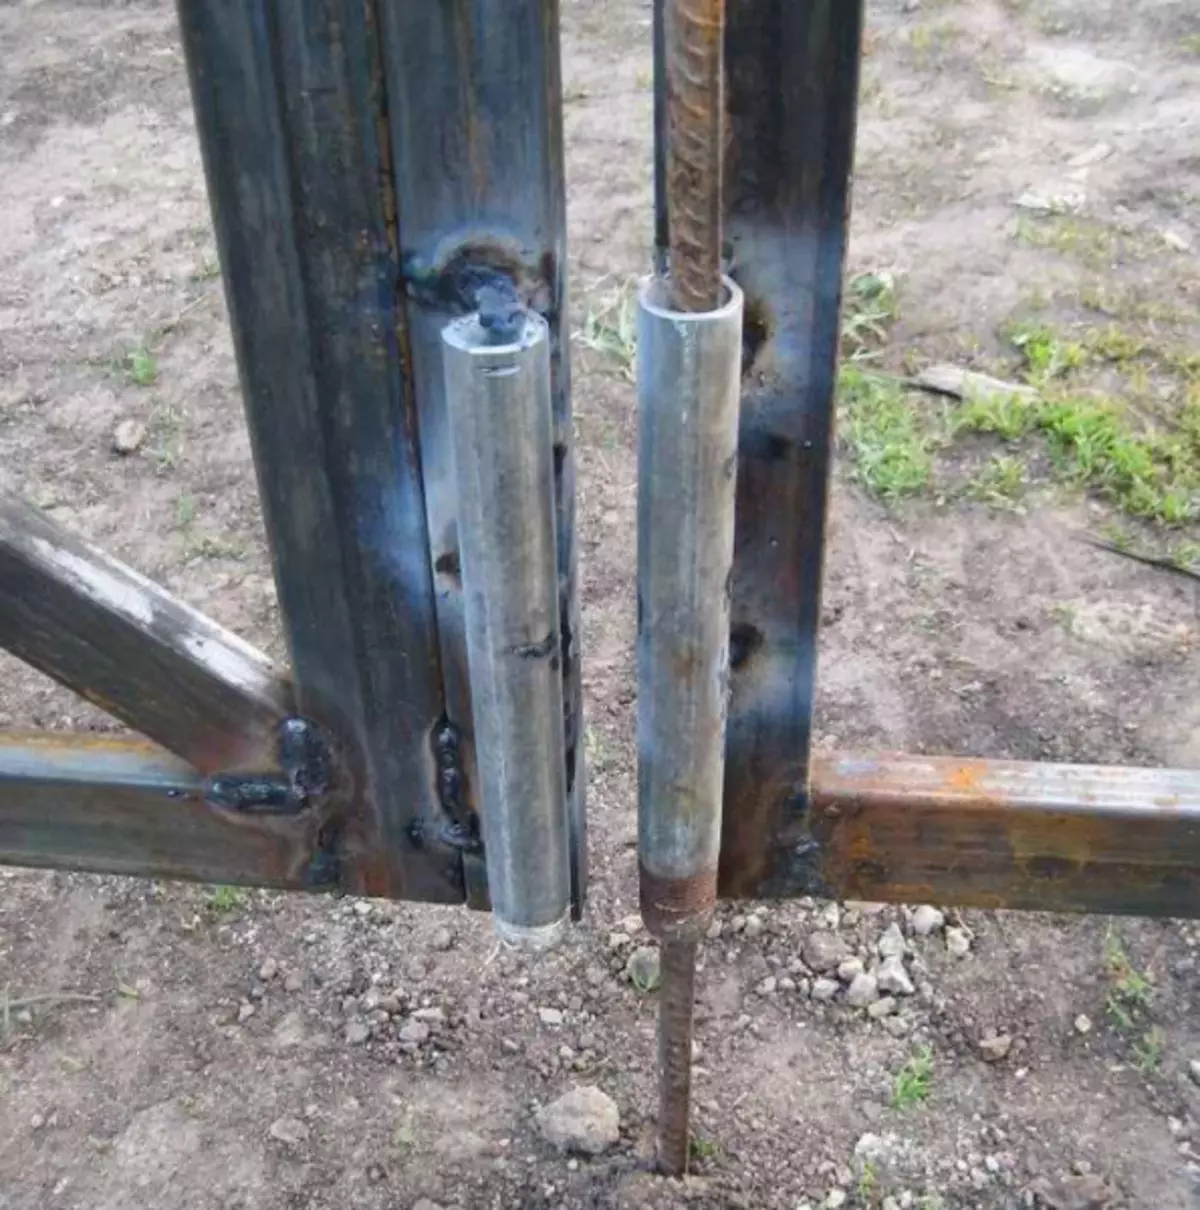
6 Stage - installation of hinges for swing gates from corrugated
Garage loops are used to install the garage hinges.How to reveal the loops on the gate from the professional flooring?
First, the loop is welded on the support rack, then on
Gate frame at a distance of 200-300 mm from the edge of the sash frame. Note,
The location of the loop affects the position of the door in the open state. If a
It is necessary that the gate be opened in both directions, the loop is welded to the conjunction of the jack.
If only in one - the loop is imposed on the frame. So that the sash did not take to
Fence, install limiter.
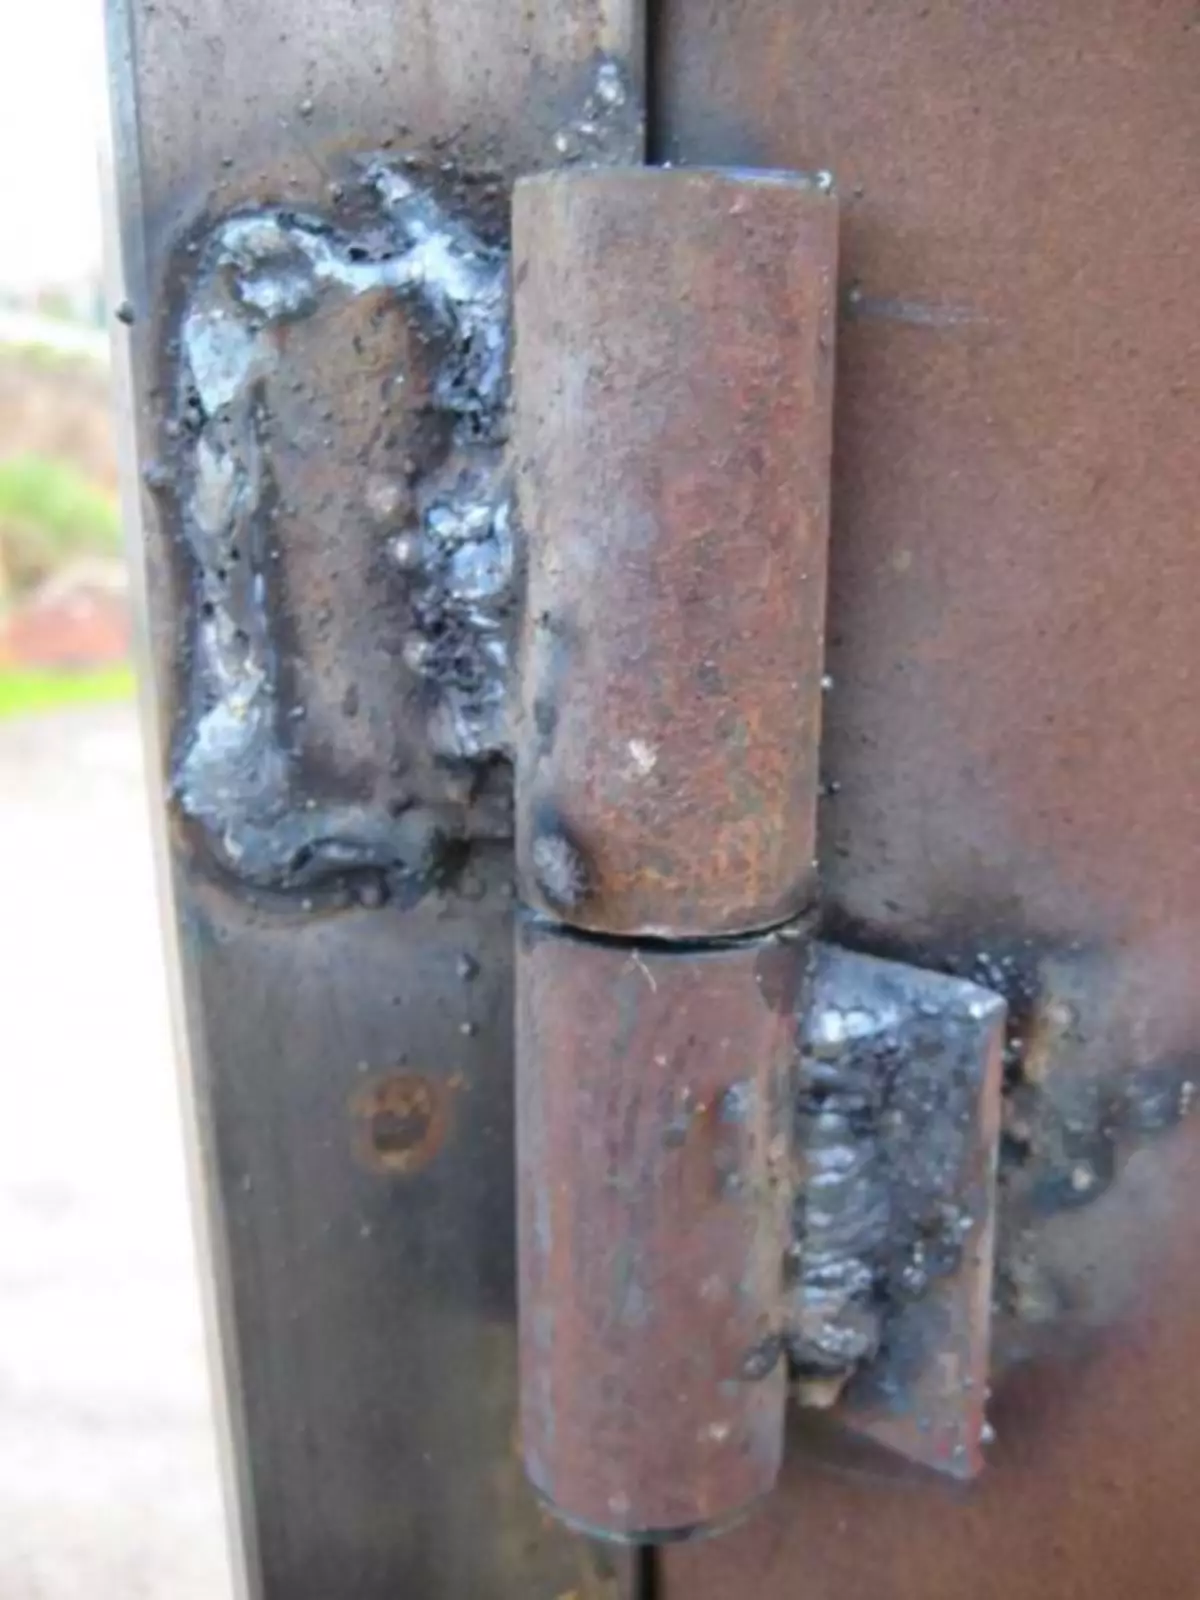
Welding loops for swing gates from corrugated
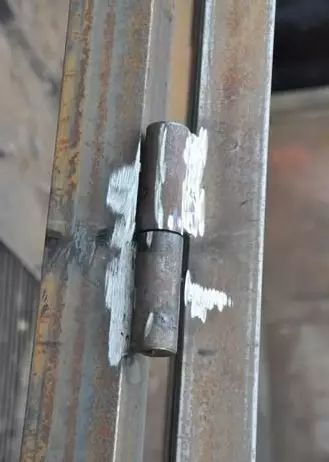
Installation of hinges for gates from the proflist
How many loops to fight on the gate?
If the gate is reinforced, it takes three loops for eachsash. If the lungs are enough two.
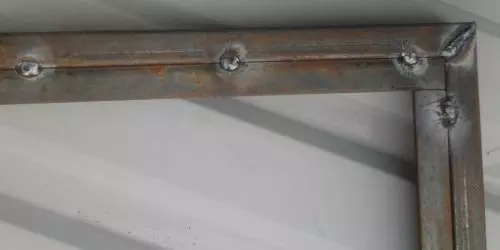
7 Stage - Installation of corrugated flooring on the gate
Professional is mounted with one or two sides of the frame.
Mounting rules are not difficult, but their knowledge and compliance will help to establish
Professional flooring on the gate correctly.
Article on the topic: How to install a flow water heater in the bathroom
In general: you need to ensure reliable fastening sheet to
Frame, fixing a professional owl through one left wave of sheet. At the same time K.
diagonal or perpendicular jumpers profiled sheet also
screwed. And two sheets are connected to each other at the top of the wave (on
ridge).
Rivets or screws are used for attachment. Rivets
look elegant (especially chosen in color proflist), self-tapping screws exclude
The possibility of watering water into place of installation. Of course, this is not so critical
As on the roof, but the appearance with the time of rusty outers can not be avoided.
We recommend a detailed description of the installation technology
Professional flooring on the gate / fence / wall with their own hands.
8 Stage - Installation of accessories (components for the gate)
Additional elements:
- Castle for swing gates from professional flooring. Installed
Already after the sash are naked.
Types of locks and how to embed / put (installation rules):
- Hinged. It is necessary to provide loops for the lock when welding
Frame and fastening sheets of professional flooring;
- overhead. Installed on the transverse jumper more often
A total of an additional wired flat sheet of metal. Or screws it
Hardware directly to the frame. Use welding for mounting lock design
The mechanism of the master is not advised, because The castle needs to be careful;
- mortise. The lock is crashed into the plane of the pipe to
Hide / decorate installation location use metal pocket.
- Nizhny Fixtur Fold Swing Gate - Need to
redistribute the load from the lock and additionally fix the lower part
Open / closed shutters from wind (wind load).
Bottom Fixtur Swing Gate

Swing Gate Fold Limiter
- Latch on the gate (Casov), designed to close the gate
From the inside (blocking). The latch is more suitable for the wicket, but for swinging
The gates use constipation (CASS).
- Automation for swing gates. Allows you to open the gate
remotely, which is very convenient when it is cold, it is raining or dark.
- Security system: outdoor surveillance chamber, signal
Lamp, alarm.
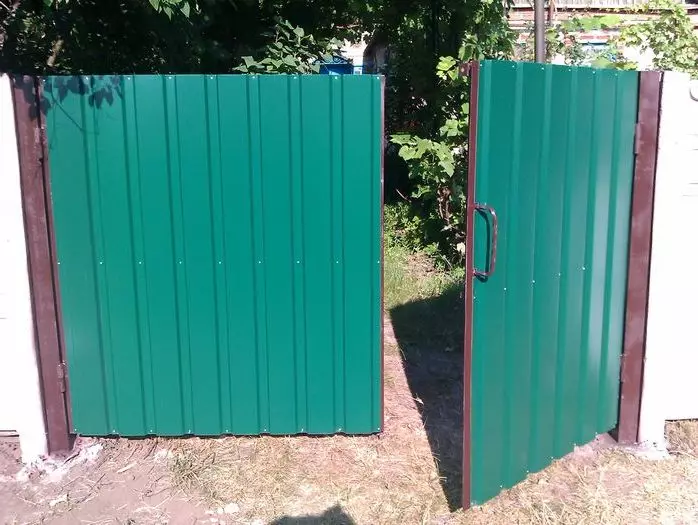
Swing gates from a professional flooring with a built-in gate
Separately, tell about how to make a swing gate withThe gate of the professional flooring. This option is used when the opening is not enough
Wide to set the gate and separate wicket.
{Banner_Link_1}
Location options for gate at gates
Accommodation places:
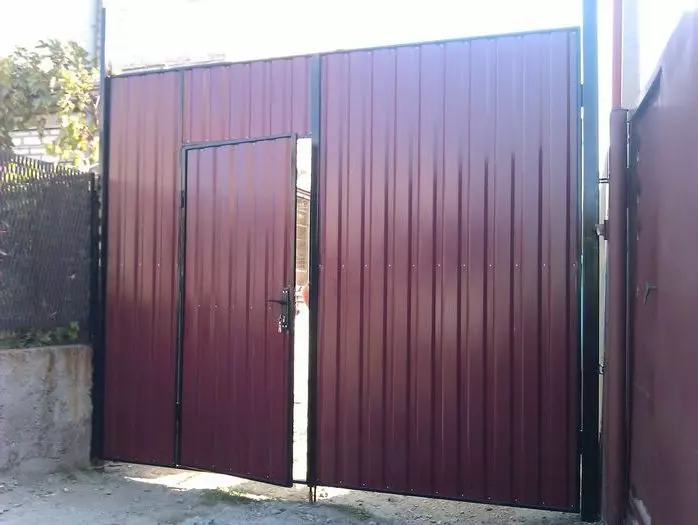
Rate sash as a califry of making frames of sash, they are made of different sizes. Then a narrower sash serves as a gate.
This is the best option, since the load is increasing only on one gate rack, which will require the installation of an additional loop and the routine of the frame. In general, costs will decrease.
The location of the wicket in the middle of the middle of the goal sash. The option with the location in the middle is good because the wicket frame performs the function of the wave frame amplifier. And the installation of the loops is not in the center, and closer to the top and the bottom of the gate will allow you to further strengthen the design.

The location of the wicket closer to the support poleblace to the support post. In this case, the main load falls on the support pillar, because the gate frame is based on it, and the gate frame.
The location of the wicket closer to the inner edge of the sash closer to the inner edge of the sash. This design is the most "hip", its weak link is a joint place of two sash and wickets.
In the last three cases, in the process of manufacturing a frame, an additional framework for the wicket is provided. Moreover, it is done more enhanced than for separately worthwhile, since it accounts for a wind load, which acts on the sash of the gate of the corrugated floor. Consider, the wicket will strongly overload the framework, which means that additional loops will need and enhance the frame frame.
In general, the technology of manufacturing the gate from the professional flooring with
The gate inside is performed similar to the manufacture of the gate with a separate gate.
All nuances are thinking about the process of creating the drawing.
Council. Lower fixator for such models of swing gates from
The professional sheet is obligatory.
Advantages and disadvantages of swing gates from professional flooring
Advantages (advantages):
- Comparative simplicity of design and manufacture;
- low, compared to the sliding gate, cost;
- ease of operation and care;
- availability to install automation;
- Minor load on fence support.
Disadvantages (minuses):
- Requirements for free space for maneuver (openingwill require the liberation of the area equal to the width of the goal sash);
- the need to account for wind load;
- the need to foresee the attachment of the open gate to
avoid their unauthorized closure (lock, focus, locking devices);
- Installing the limiter so that the open gate does not damage
the fence canvas, and did not block access to the gate;
- The difficulty of leaving the winter season, which is
Necess to remove snow at a significant area.
Approximate prices for swing gates from professional flooring
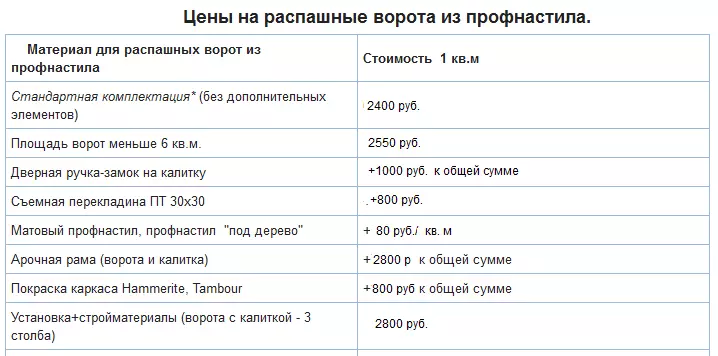
Prices for swing gates from corrugated
Conclusion
As you can see, applying some efforts in 1-2 weeks
make and install the swing gate from the professional flooring with your own hands, which
Decorate the entrance group and will reliably serve as a beautiful business card of a private house.