
Table of contents: [Hide]
- Preparatory stage assembly
- Assembly and installation of frame
- Installing pillars for frame
- Seat assembly for swing
- Assembling all design details
Beautiful and reliable wooden swing do it yourself quite simple. This work will not take you a lot of time, and the resulting design will delight your child for many years. You can install the swing in the yard of your own home, on the playground or in the country.
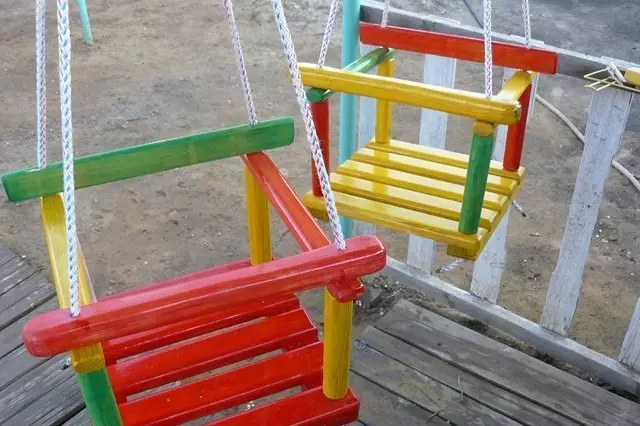
Children's swing from wood are original and reliable, they are also easy to make them hands.
Preparatory stage assembly
The drawing of the structure is shown in the image 1. Such wooden swings made in the form of an airplane are intended for a child aged 1 year to 5 years.
Their seat is designed to ensure the kid comfort and complete safety.
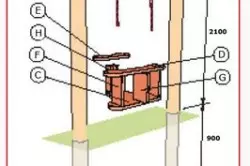
Image 1. Drawing of a swing: A - frame poles with a diameter of 15 cm and a length of 300 cm - 2 pcs.; B - transverse frame crosshead with a size of 40x35x17 cm; C - Seat a swing 40x35x1.7 cm; D - horizontal protective bar (aircraft wing) 45x11x1.7 cm; E is the back of the seat (stabilizer) 29x11x1.7 cm; F - vertical front racks 19x10x1.7 cm - 2 pcs.; G - vertical front carrier rack (fuselage) 19x10x17 cm; H - Seat rack 19x60x1.7 cm - 2 pcs.
And for quite small children, you can make a chair in the form of a flower. Such flights will protect the child from random fall.
The height of the frame frame must be equal to 200 cm. Poles are bought to a depth of 90 cm and are additionally strengthened with concrete.
These children's swings are collected from the following elements:
- A - frame pillars with a diameter of 15 cm and a length of 300 cm - 2 pcs.;
- B - transverse frame crosshead with a size of 40x35x17 cm;
- C - Seat a swing 40x35x1.7 cm;
- D - horizontal protective bar (aircraft wing) 45x11x1.7 cm;
- E is the back of the seat (stabilizer) 29x11x1.7 cm;
- F - vertical front racks 19x10x1.7 cm - 2 pcs.;
- G - vertical front carrier rack (fuselage) 19x10x17 cm;
- H - Seat rack 19x60x1.7 cm - 2 pcs.
Flower protective sides:
- I - seat 38x38x1.7 cm;
- J - back 38x38x1,7 cm;
- K - sidewall 17x17x1,7 cm - 2 pcs.
The patterns of figured parts are shown in the image 2.
In order to make a swing with their own hands, you will need the following materials:
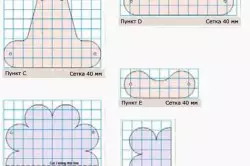
Image 2. Schemes of figured parts.
- concrete solution to strengthen frame racks;
- Wood for frame frame. It is wiser to take a soaked pine, protected from environmental impact;
- carpentry glue;
- fastening elements (bolts, screws, screws);
- Fastening bolts-hooks equipped with washers and nuts;
- Reliable carbines. With their help, you will fasten the rope to the seats of the swing, so, choosing carbines, pay attention to their quality;
- Cord for fastening the seat on the frame. It can be replaced with a chain, but specialists do not advise such a method, since children's fingers or palms can get between the links;
- Fortress on wood and acrylic paints.
When everything you need is prepared, you can start assembling wooden swings.
Back to the category
Assembly and installation of frame
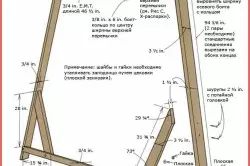
Rapid frame assembly scheme.
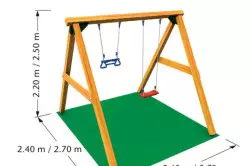
Before installing children's wooden swing, you need to carefully choose a place for them. Free space before the design should not be less than 2-2.5 m. Behind the swing should also remain a platform, free from bushes and trees (approximately 1.5-1.9 m). Thinking up the future diagram of the swing, provide a sufficient distance between the seat and frame racks. In this case, it is 60 cm on each side. Therefore, carrier poles are bought at a distance of 162 cm from each other.
To fix the columns, you will need to drench the pits with a diameter of 30 cm and a depth of 90-100 cm. When choosing a place under the swing, make sure that under the future design, underground communications and highways (telephone cables, water pipelines and the like) are under the future design.
The transverse beam of the frame frame is assembled from 2 boards of 14 cm wide and 4.2 cm thick. It is fixed with grooves that are powered in logs. On both sides, it is also necessary to form groove on both sides. First apply for all parts of the nodes markup and only then proceed to drinking the grooves with a width of 2.9 cm and a length of 15 cm. Plugging the carrier frames of the frame, a circular saw. Slide the grooves to the maximum possible depth, then finish the formation of the grooves with a tree hacksaw.
In order to choose wood to the entire depth of the future groove, 2 holes in the corners of markup are drilled in the posts. Then with the help of the chisels form a deepening.
The boards from which the transverse beam will be made are cut to a length of 220 cm. Then they are tightened with the help of self-tapping screws and from both ends there are spikes for fastening on the frame poles. The sizes of spikes should coincide with the size of the grooves and be the same on both sides: 15x2.9 cm. They are easiest to be filled with a circular saw, and then modify the chisel. Try to handle the surface as ironing. Check the fasteners made before collecting the frame. The spikes of the transverse beam should be included in the grooves with some effort.
Back to the category
Installing pillars for frame
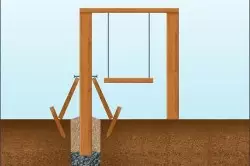
Scheme of the installation of poles for frame frame.
Drop the deposits for the installation of columns. Be sure to check the correct location of the vertical racks using the construction level. Some masters for such structures use pipes made of metal. But specialists do not recommend doing a swing for a child from this material. Pipes can bend or even crap, and it will not happen with wooden pillars. Replace the wooden rack that has become unusable is much simpler and cheaper than the metal frame.
Install the poles in the prepared recesses. Fix their positions with wooden pegs or bouts of boards. After that, once again check the correct location of the racks by the construction level. Then pour the concrete solution into the pits so that its surface does not reach 2-3 cm to the soil level. Be sure to endure the flooded concrete, following the napity in the foundation for swing.
To avoid errors when installing a frame, it is wiser to first fasten one post, and only then pour the second solution. So you can adjust their height if there is a need for this.
After the solution is completely grabbed, secure the top transverse crossbar in the grooves and pull the pillar and spike beams using long screws. Drive the entire frame and paint the color you choose. To make a swing with their own hands, acrylic paints are best.
Back to the category
Seat assembly for swing
Scheme of the seating of swings.
After the frames are fixed, you can go to the assembly of the seat. The seats are going to one of the principle, but the swing in the form of an airplane will be more suitable for older boys, while the flower choose for children to shame. If you have 2 kids, you can make 2 seats and change them as needed.
Figure blanks are cut from the plywood sheet along the paths proposed above. To do this, first apply marking, and then cut the blanks using the jigsaw. Carefully treat all sections of emery paper so that there are no burrs left.
First on the seat fasten the vertical transverse racks. Mix the joints with glue, before taking the details of the self-drawing: so children's wooden swing will turn out much more reliable. In the same way, collect all the billets of the seat. Change the fastening location clamps and leave until complete drying of the glue.
Then in the wings and fuselage of the aircraft you need to drill holes for fastening rope. The diameter of the hole, and, accordingly, the diameter of the drill depends on the thickness of the cord, with which you are going to fix the seat to the frame. Wings are drilled through, forming 1 hole on each side of the parts. It turns out 8 holes.
The flower seat is assembled in the same way. It is the wisp of everything from plywood first the seat seat, and then using it as a template, shape the sidewalls. But follow the back to be above the side walls by 2.5 mm.
The sidewalls and the back are fixed to the seat in such a way that the petals perform the edges. Holes for fastening ropes are drilled in the seat itself about 10 cm from the edge and in the figure back.
If your children are not yet too confidently held on the swing, then the seats are wiserfully supplying additional belts providing safety. For them, it is best to choose wicker slings, fastening on ordinary carbines or belt clasp. Transverse belts install so that they go to the level of the baby's belt.
Back to the category
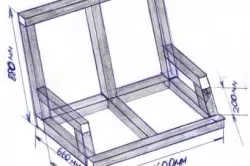
Assembling all design details
Size diagram of the design of the swing.
The assembled seat must be carefully treated with sandpaper or a special grinding nozzle, brew and paint.
To attach bolts-hooks, it is necessary to pre-drill down the holes in the crossbar of the frame frame at a distance of 20 cm from the center of the crossbar. Insert the hook into the socket, top the puck on it. Using one key, wrap the bottom nut. Then, holding the bottom nut, securely tighten the top mount (lock nut).
Attach one end of the rope in the hook, securing it with a reliable node. Choosing a cord, remember that the rope will be plastic and the larger, the more reliably the node will be released. But still it is wiser to give preference to wicker cords. The so-called tongue node is considered the most reliable (men's ties are tied in the same way). You can first attach the rope to the carbine, and the Carabinist himself attach to the hook. This method of fastening will allow you to change the seats much faster.
Free ends of the rope must be trained through the holes in the seat of the swing. It is easier to do this if the ends of the cord are pre-wrapped with a painting scotch. Tie the rope with a reliable node so that it does not unleash under the weight of the child.
Stopping the seat, make sure that the distance of 35-40 cm is preserved from the bottom of the swing to the ground.
Article on the topic: Angular Bach toilet