
Table of contents: [Hide]
- Bed attic: Main options
- Bed attic: Highlights and design features
- Bed-attic do it yourself: stages of work
- Production of bases and stairs
- Order assembly
- Installing the bed on the top tier
In conditions of a small area of an apartment, even a family of 3 people can be closely, especially if there is a child. Children need more space for games, it becomes necessary to allocate a separate sleeping space for it to save the same part of the space. To solve this problem, you can make a baby's bed for your child. And it may not be just a comfortable sleeping place, but a whole home sports complex.
Frame assembly scheme for bed.
Bed attic: Main options
Before assembled the attic bed, you need to familiarize yourself with the available options.
Bed The attic is a great solution for apartments of a small square, which makes it possible to save a lot of rooms in the room.
A similar design is a full-fledged bed, installed at an altitude of about 180-190 cm from the floor, which is closed along the vertical or inclined staircase.
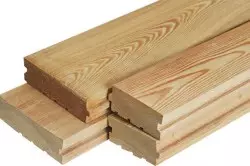
For the construction of the bed, polished dry boards are needed.
Thus, a similar bed does not take place on the floor, so it will be a table, a corner for recreation, racks, or use this space by any other suitable way. You can make the bed attic with your own hands. Instructions The bed allows you to assemble enough quickly and with minimal time and money costs.
Most often, such structures are placed in the corner of the room, between 2 adjacent walls. The same sleeping place can rely on 2 or 4 racks. In the first case, the side opposite to the racks is firmly fixed on the wall. Available and option at all without racks: In this case, the bed is supported using a special fastening screwed to the ceiling.
Sometimes the loft bed is not located in the corner, and only 1 end adjoins the wall - in this case there are also design options with 2 or 4 racks.
Like ordinary outdoor, attic beds can be both children's and adults. If you are going to make a bed attic for adults, then, of course, more materials will be required. In general, similar beds are performed from natural wood solid rocks, however, there are options with a metal frame.
Article on the topic: Curtains monochromatic - universal choice
Back to the category
Bed attic: Highlights and design features

For the construction of the bed you will need plywood.
Bed-attic with 2 tiers are always equipped with high sidelights. On the bed, a special ladder is securely fixed, which, as a rule, can be rearranged without any particular problems. The attic bed with a working area can be made of an array of wood, MDF or chipboard. Of course, the most cheap in the manufacture are models of chipboard, but on environmental safety, they significantly inferior furniture from the real tree. To maintain the child's health, it is best to make a bed with a working area of pine. It will work perfectly for 10-15 years without the formation of cracks, deformations and storage. And the pleasant smell of pine and the special healing properties of wood will always have a beneficial effect on the well-being and mood of the child.
Bed-attics with a working area can combine everything you need for learning and child games. Such a bed can be wide or narrow, high or low, complemented by various elements for user comfort. The attic bed with a working area is equally well suitable for boys and girls. The zone of games on the lower tier can be easily extinguished using a lightweight curtain curtain, which will ensure the child's own cozy corner in which it will not be disturbed.
Back to the category
Bed-attic do it yourself: stages of work
At the stage, which precedes the drawing of the drawing, it is necessary to determine which design will be your bed. This instruction examines the procedure for manufacturing a bed located in the corner of the room and resting on 4 racks. To the end of the bed-attic adjoins a wooden inclined staircase. The option of making a bedroom for an adult is considered. Bed for a child is made similarly, only the sleeping place is less than the smaller.
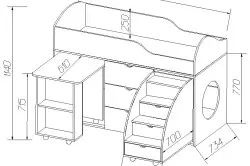
Bed sizes attic.
The height of the racks is about 185 cm, and the size of the bedroom - 195x70 cm. All materials used for the manufacture of the attic bed must be of high quality, smooth, dried and with a minimum number of bitch.
Very important stage of work - drawing up the correct drawing. The drawing with bringing all sizes is not only a design project of a future bed, but also a product assembly scheme that will help you present it in space and not get confused during the work. The design of this bed can be the most diverse. It all depends on your own preferences exclusively. After drawing up the drawing follows the stages of purchasing materials, the manufacture of parts and assembly of the product.
Article on the topic: How to choose a carpet to the floor: Useful Tips
Prepare the necessary tools and materials. You will need:
- Board with a thickness of 20 mm.
- 30 mm thick board.
- Brew with a cross section of 22x22 mm.
- Brew with a cross section of 40x50 mm.
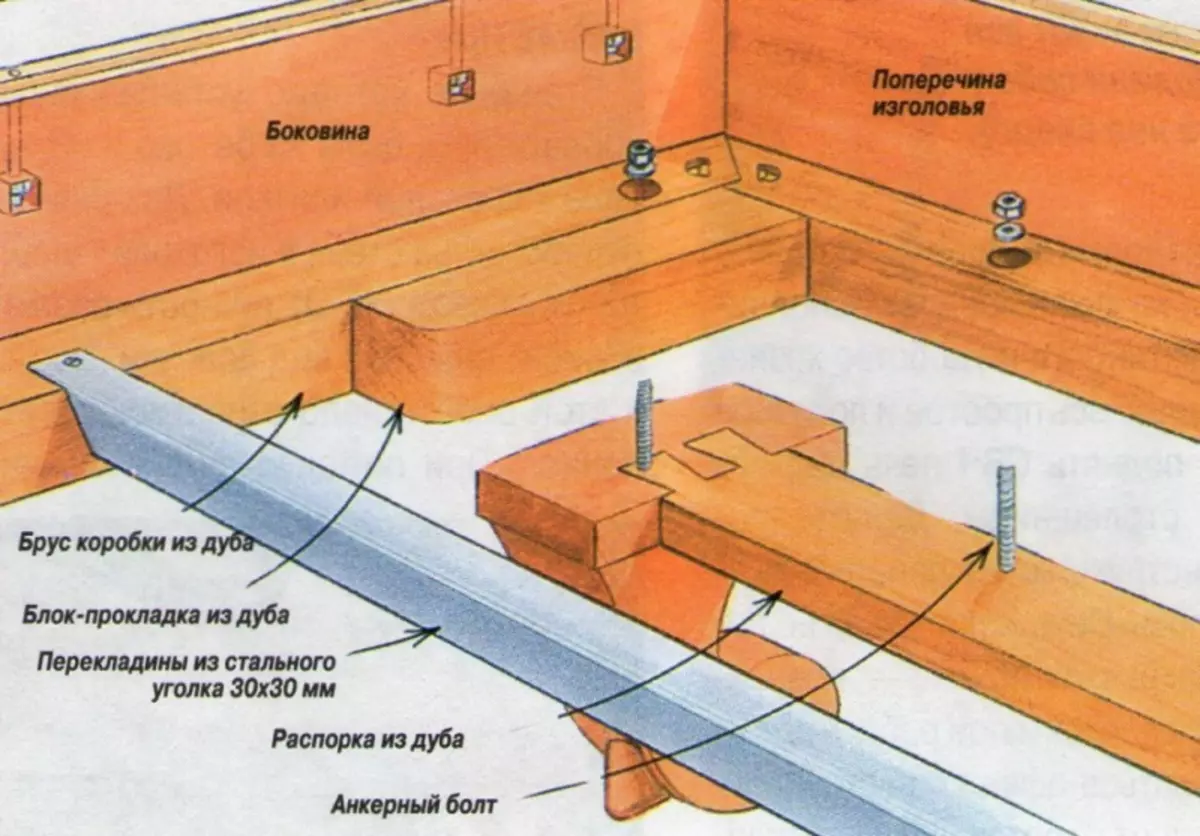
- A timber timber timber (beech) 30 mm thick for crossbar and linings.
- Sucks.
- Shules with a secret head.
- Semicircular wedges of oak or beech.
- Matt lacquer.
- Carpentry glue.
- Finishing nails without a hat.
- Matt lacquer.
- Sander.
- Electronics.
- A hammer.
- Screwdriver and drill.
- Line.
- Pencil.
- Roulette.
- Clamps.
- Paint brush.
Back to the category
Production of bases and stairs
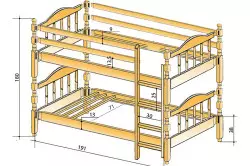
Drawing of a bunk bed.
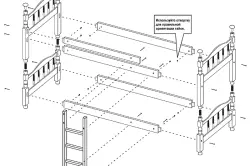
The base of the attic bed is a design of 2 lateral transverse frames connected using longitudinal parts, and 1 additional rack. Side modules are collected using thorough pairing. The crossbars are consistently located at an altitude of 31.5 cm, 60 cm and 98 cm. Longitudinal boards are connected to transverse parts.
After the base is assembled, in the upper end of the racks you need to drill holes with a diameter of 10 mm and a length of 15 mm, which will be pasted with dimensions with dimensions 1x3 cm.
To assemble the staircase on the inner ends of each rack, you must select the grooves of a depth of 42 cm and a width of 30 mm. Buck crossbars are inserted into them.
The staircase for lifting will be located on the end. Because the angle of inclination of the stairs is very small, for more convenience, the steps must be placed at a short distance from each other (especially if this is a baby bed). The crossbars themselves must be made very stable and wide enough.
When construction, it is necessary to take into account one very important point: the distance between the side crossbars and the width of the stairs in the place where a person will sneak, should be such that they can freely place the forearms of the direct owner of the bed, otherwise the sealing and descent can be albeit An unpleasant problem.
Back to the category
Order assembly
After all sizes are calculated, you need to cut the parts. You can do it with your own hands or ask the master in some major building of building materials. After that, you need to adjust them to each other and collect the product from the finished parts.
Article on the topic: 10 new ideas, how to decorate the children's room (50 photos)
Bunk assembly drawing.
Face racks of beds will be filled with binding boards from 3 sides, located at a distance of about 20-30 cm from the floor. To do this, it is necessary on the side racks to make the nests of a depth of about 25 mm. On the cut details are provided for wooden spikes. Before connecting the elements, the joints of the joints should be wrapped with joinery glue. For a similar scheme, a layered frame is created.
The base for the bedroom is reliably strengthened, it is given sufficient rigidity. For this, long rails (2-3 pieces) are used, laid and securely fixed along. They are located transverse boards stacked on board to board.
Be sure to provide restrictive crossbars from the long edge of the attic bed, which does not adjoin the wall. The angle of inclination of the stairs placed from the end of the bed will be quite small, so it makes sense to make side crossbars and the ladder itself.
At this stage, the main part of the work is completed: the frame is made. If you used fresh wood, then after assembling the product and checking it on stability, it is necessary to elate and coat it with a mourn. After the simulator dries, the bed should be covered with furniture varnish.
Back to the category
Installing the bed on the top tier
The frame of the bed is fixed on the base racks by inserting the upper end spells of the base in the socket, in advance drilled in the ends of the product legs. A longitudinal board is disconnected from the back of the bed, on which the added base rack is mounted. The board is installed on the back.
The staircase is installed on the designated place and locks it with the reference element. The pad is adjusted to the size, sticks to the supporting board and additionally nailed with finishing nails without hats. The lattice canvas and mattress are stacked.
The above instructional instructions for creating a attic bed contains a general work algorithm that you can use for the manufacture of a bed-attic - a functional and convenient object of furniture, allowing you to easily organize and use space space. You can use the above algorithm to create the bed of the configuration described or by selecting a different configuration, correctly adjust it in the course of operation.