
Photo
With the help of sliding doors, you can create an unusual interior of an apartment or a private house. Using the use of this device, it will be rational to use the space, delimit it into separate sectors, without losing the integrity of the room. Speaking about how to make sliding doors with your own hands, you should know that everything is simple. It will only be necessary to understand the manufacturing process and have some skills to work with tools.
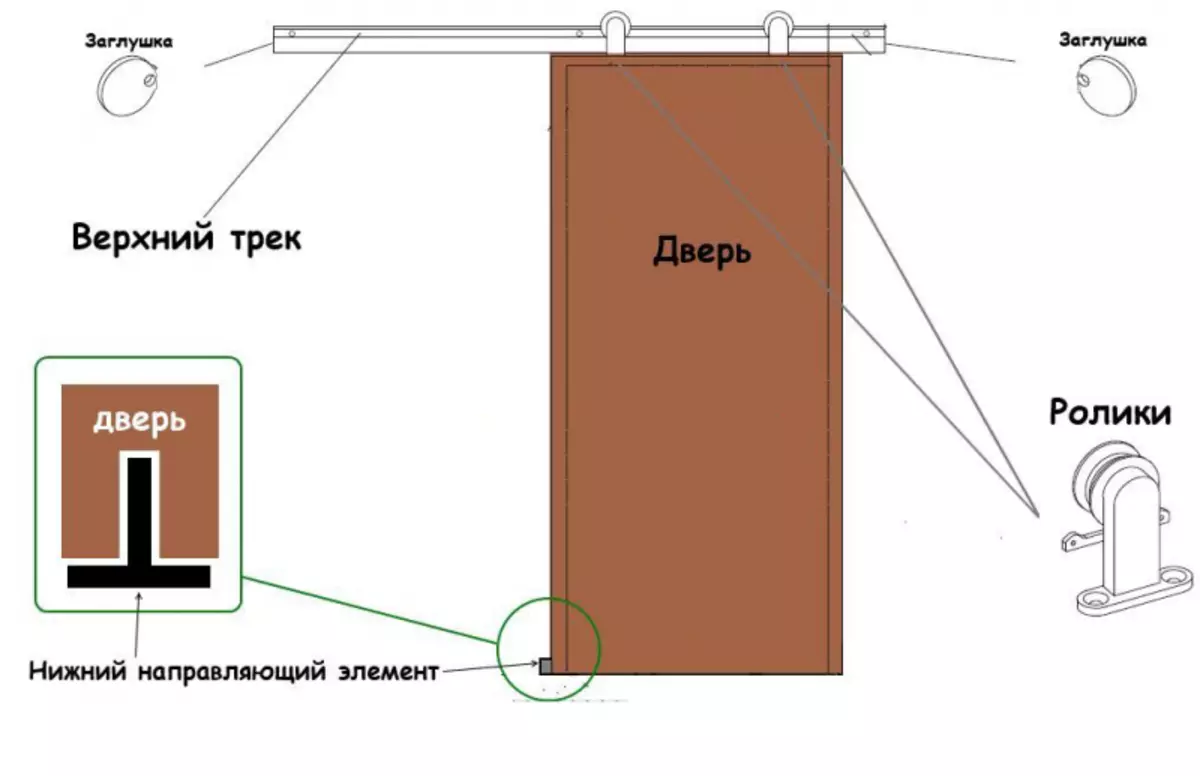
Scheme of sliding doors system.
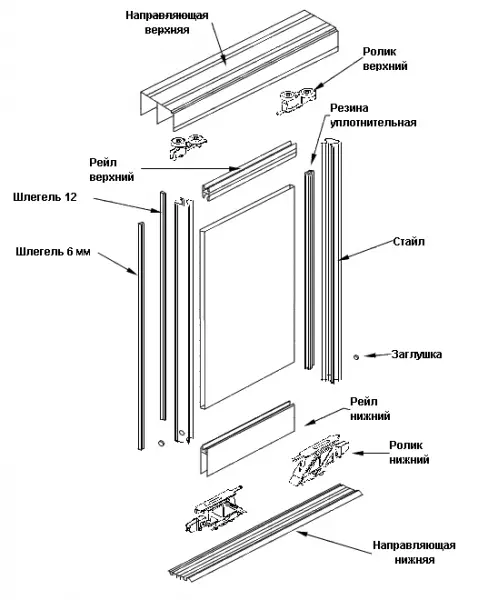
Elements that will be needed for mounting sliding doors:
- Videos.
- Door coating.
- Guide.
- Handles. Natives.
- Reiki for decor.
Existing constructions of sliding doors
Today there are various systems of doors of this type, which differ from each other by appearance. It should be known that the design itself most often remains the same. Such doors are a system that consists of several rollers, guides and canvas. The mechanism of the rollers is fixed to the door, and the rollers themselves move along the guides that are fixed above the opening. Various models can be equipped with 2-4 roller sets, several guides and canvases.

Types of sliding doors.
The design includes platbands, dough, special fittings, as well as decorative panels that closed the mechanism itself.
There is a sufficiently large number of different types of doors, but the following are most often used:
- sliding coupe;
- harmonic;
- cascade;
- single or multi-membered;
- Radius.
Accessories for sliding design
Sliding doors have an unusual design, because they should be purchased special accessories. Pens are not as found on ordinary doors. The difference between such devices is that they are taken to the cloth. It is necessary to draw them in order for the device to move freely from one side to another and call in the opening, which is intended for him. The lock mechanism is designed for vertical snaps.Article on the topic: Screwdrived board: Sexual laying and photo tongue, punch with hands for walls, how to make a video, size
Included together with the finished design there are all the necessary fittings. However, if there is a desire to mount the handles and locks yourself, it will be necessary to choose them correctly. In this case, it is recommended to seek advice to specialists or search for a model in the directory.
Mechanisms for doors of this type
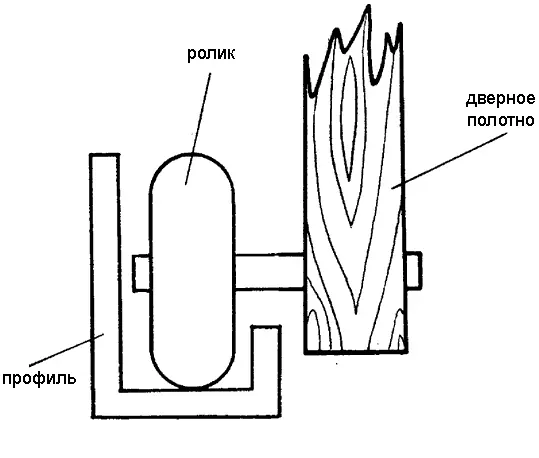
Sliding door rollers fastening.
This method of opening occurs due to the movement of the rollers on the guides. The mechanism and rollers should be selected on the basis of the type of design, the number of sash and the material from which the canvas is manufactured. Different systems may have a different weight, in connection with which they will have a different burden on all the product. For example, if you compare the door from the MDF with 1 sash and a glass of glass with 2 sash, then the 1st will weigh much less, in connection with which the simplified mechanism of the rollers should be selected.
When installing doors of some types, you will need to take into account the number of roller mechanisms, in this case it will be important and the correct selection of the guides will be performed.
For example, for a cascade design, you should install 2 mechanisms for several canvases and multiple gutters guides. Special attention should be paid to the fact that in the process of manufacturing a cascade and compartment coupe, it will be necessary to install one yob for door canvases.
As mentioned earlier, a possible period of using such a device will depend on the set of rollers and the guide. However, in some cases it will be needed to install 2 guides - one at the top of the opening, and the other is in the lower one. Only thus will be able to get a steady and high-quality product with heavy web.
Existing methods for mounting sliding doors with their own hands
Scroll of sliding doors.
The functionality and comfort of doors can make it possible to embody any interior design solutions for small sizes and large rooms. A similar product will perfectly fit into the interior, which will give the opportunity to transform the space of an apartment or a private house.
Article on the topic: Dust of concrete overlap or sex with your own hands
In most cases, sliding doors are installed between several residential sectors. To zonate the room and visually maintain its integrity, you should use doors with 2 sash. When the design will be in a closed position, you can get 2 different rooms. When the doors are open, it will turn out 1 large size room. With the help of the installation of such a design, you can, for example, to separate the workplace from the common room of negotiations.
Another option to install a similar product is the installation of doors between residential rooms and a balcony or terrace in the country house. In this case, it is best to use a design that is made of glass. Through it will be able to pass a large amount of light.
How to make sliding doors and make them installation?
First of all, it will be needed to determine with the type of construction. After that, it will be necessary to purchase all the necessary items. The installation process itself will be considered on the example of a sliding design with 1 sash. This door is simple and used most often. Installation It is simple enough. However, the highlights that relate to other types of sliding doors will be mentioned.
The manufacture and installation of the design of this type is made as follows:
Installation scheme of sliding doors.
- First of all, you will need to mark the guides. In this case, you can use 2 options. The tape measure is measured by the height of the door from the outdoor base. After that, 17-20 mm on the gap between the floor base and the design was added to the result obtained. The resulting height is summed up with the height of the roller structure and the guide. Next, you need to put several labels on the wall and draw a line. The 2nd version is practically no different from the first. The only difference is that the canvas will need to attach to the way, set the tops on the top, after which it is added to the result of the roller structure.
- Before installing the guide, make sure that the labels are located horizontally. You can perform this by using the construction level. If this check is not produced, then after installing the door can be opened incorrectly.
- Next, you need to install the guide on the intended feature so that the design is located under the line. The guide can be fixed in various ways. Some designs are fixed to the wall of the dowels, the others are attached to the brackets or bars from the tree. The guide should be at a short distance from the wall so that the product does not cling to the opening. It is important to carefully select the guides and choose the correct attachment method.
- After the guide is fixed, it will be necessary to insert the rollers insert the fastener screw and make the entire device in the guide. For ordinary doors, 2 rollers are used. But if you plan to install cascade doors, the rollers should be on all sash.
- At the top of the cloth, you will need to install brackets for carnet of the rollers. They should be fixed with an indent of 4-5 mm from the extreme part of the door. If you plan to install a glass design, then several metal paws should be used as a fastener, which are fixed with each other and tightened with fastening screws. Glass has a lot of weight, therefore it is recommended to install several guides.
- When rollers and all fasteners are mounted, it will be necessary to put the cloth, lift it and screw the fasteners into the brackets at the top of the door. This stage is recommended to produce with a partner, which will help lift and keep the design until the screws are installed. Then you will need to check the horizontal structure. If necessary, it will have to be aligned by twisting the bolts.
- The opening and slopes can be hidden behind the platbands and dogs. The mechanism of the rollers itself will be hidden behind the decorative rail, which is hosted from above.
- At the very end, you will need to install door fittings.
Article on the topic: Stand for shoes with your own hands
Make the door of this type is easy if you have all the necessary items and follow the sequence of actions.


