
Sooner or later you have to change interior doors. The procedure is not so complicated to hire a specialist. If there is at least some skills in handling a saw, level and plumb, you can spin several screws - cope on your own. When replacing, before installing the interroom door, the old one needs to be dismantled. And here there are also features. All subtleties are in the photo and video with detailed instructions.
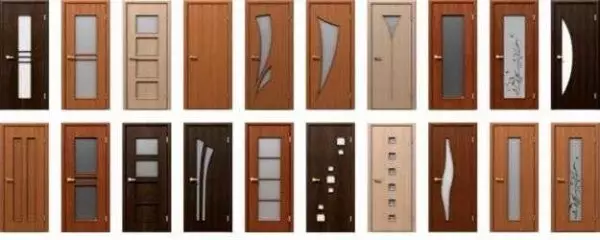
Interior doors are different not only in design, but also make them from different materials.
Interior doors are made from different materials. Moreover, the material and door canvases are distinguished. Door canvas happens:
- From fiberboard. These are the cheapest doors. They are a wooden frame to which laminated fiberboard is attached. They are distinguished by low sound insulation, fear of high humidity, are easily damaged.
- From MDF. It is much more expensive, but also qualitative characteristics are much higher. They are better at sound insulation, they are not afraid of moisture, stronger and more durable.
- Woods. The most expensive doors. Make from different varieties of wood - from pine to oak or more exotic rocks.
Door boxes are made of the same materials. The worst choice is the boxes of the Fiberboard, even under their weight begged, and the door can be mounted on them - the judge flour. So try to take or MDF or wooden. There is another material: laminated wood. It is good because you do not need to handle and paint, but the service life depends on the quality of the film.
Dimensions and equipment
Interior doors are produced standard sizes, it is a pity that the standards in different countries differ. For example, in our country, swing doors make a width of 600 - 900 mm in 100 mm increments. In some EU countries, the norms are the same - in Germany, Italy and Spain. In France, others are standard. There are the most narrow doors of 690 mm and then with a step of 100 mm.
Is it important to the difference? If you change only only the door leaf without a box, then it is important - you will have to choose from your segment or completely change with the box. Interior doors of such a standard, as in our country, the choice is much more, as in France - are many times less.
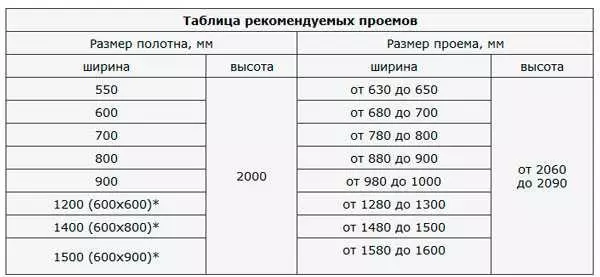
Recommended door cloth width for different sizes of the door frame
What the width of the door is needed depends on where they are going to put them. If we talk about standards, the following values are recommended:
- In the living room width from 60 to 120 cm, height 2 m;
- Bathroom - width from 60 cm, height 1.9-2 m;
- The kitchen width of the door leaf is at least 70 cm, height 2 m.
If when replacing the door, it is decided to do more / less when it is needed, it is not necessary for this permission, but it is necessary to remain in the limits specified for each room.
How to determine which width to buy doors? Measure the door cloth, which is available and you will know what you need. If there are no doors, find the most narrow place in the opening, measuring it, you can find out what width you need a block: it should be less measured value. For example, you have it turned out 780 mm, look for 700 mm with parameters. Wide in this opening do not insert.
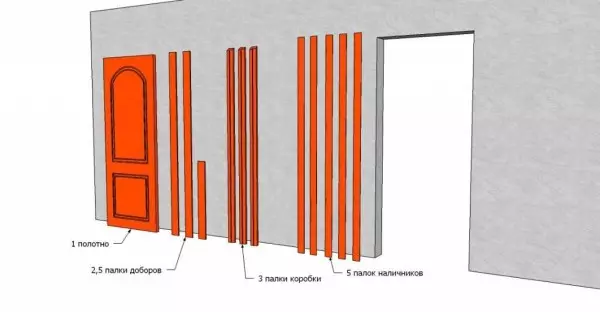
The most complete equipment of the interior door - with a box, dignity and platbands
Article on the topic: Plastic roof drainage: Montage with your own hands with ties, gutters, pipes
When choosing a door, pay attention to the package. There are three types of assembly:
- Door leaf. Box buy separately.
- Doors with box. All complete, but the box in the form of individual boards. You have to heat the corners and connect, hang the loops yourself.
- Door block. It is ready to install the door - a box is collected, hung loops. Just trim in the height of the sidewall, expand and secure.
With the same quality of the door canvase, the prices are significantly different. But the difference in time that is decent on the installation.
Step-by-step installation of interroom doors
In general, there are many subtleties. The most common moments will try to describe and illustrate in the photo or video material.Step 1: Build the Door Box
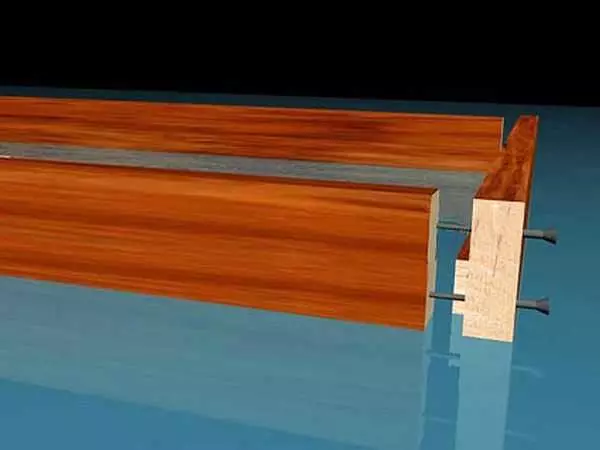
If you have not bought the door block in the assembly, the first thing will have to collect the door frame. It consists of two long racks located on the sides, and one shorter crossbar at the top - perts.
Connection methods
Even a minimum, two options for how to connect these planks to each other:
- Under 45 °. The option is the right one in terms of aesthetics, but also the most difficult. It is necessary to high accuracy so that there is no cracks. When snoring, you can cut off with a carpenter stouch, but you need to do carefully. The second moment - if you cut the laminated material with a hacksaw, it remains chips. Exit - use well-fulfilled tool.
One of the ways of connecting the door frame
- Install an online jack, at 90 °. This method is easier - less opportunities for an error, but at the same time it is necessary to remove part of the protrusion at the stack of racks and perts. To do this put to the corner
Regardless of how exactly you gathered to connect the elements of the door frame, the first thing makes the racks and perts on one side. Then on the floor they are folded into the box, checking the correctness of the connection.
Determine the dimensions
As folded state, the required length is measured along the inside of the rack. Racks are not always the same: the floor is often uneven and it must be considered. For this we take the level and check how smooth floor is. If it is perfectly smooth, the racks will be the same. If there is a deviation, it must be taken into account: make one of the racks longer. Usually it is a few millimeters, but it happens enough to shine the doors.
When calculating the height, note that the racks should be 1-2 cm longer than the door leaf (including sleep). 1 cm gap is made if the rug is not expected under the door. If the rug / carpet / carpet will be better to do it anymore. Do not be afraid to leave the gaps. They are needed for normal ventilation indoors. We pay attention again: the height is measured by the inside - from the lower edge of the spike. Slicing, trying on the stand in the doorway.

Clamps when installing interroom doors
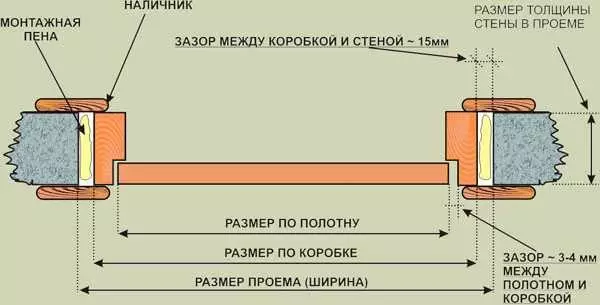
Now it is necessary to sprinkle in length and, if necessary, stored on the other side (if the junction is 45 °). The length of the pendant should be such that in the folded state, the distance between the racks was larger than the width of the door canvase. The minimum clearance is 7 mm, but often make more. 7-8 mm are distributed as follows: 2 mm - on the loop, and 2.5-3 mm for compensation gaps. Any interior doors - MDF, DVP, wood - depending on the humidity change their dimensions. To take into account these changes and the gaps are required. But 5-6 mm - this is not always enough, especially in wet premises. For the bathroom exactly leave a little more, otherwise with high humidity they can hardly open.
So, we decided with minimal gaps when installing interroom doors:
- on the loop - 2 mm;
- at the top, below and on the sides - 3 mm;
- bottom - 1-2 cm.
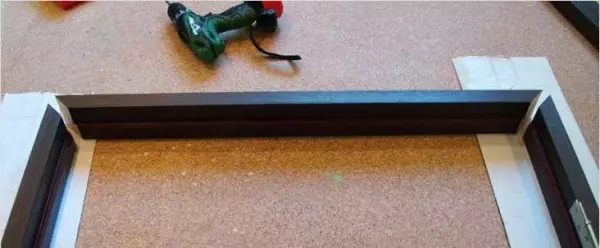
After cutting off all parts and made a washed, fold the box on the floor. If you noticed somewhere shortcomings in the docking - eliminate with the help of sandpaper fixed on the bar. The more accurate there will be a coincidence, the smaller the gap.
Assembly
Regardless of the material of the box and the combination method, the holes are pre-drilled under fasteners - so that the material does not break. The diameter of the drill is 1 mm less than the diameter of the self-press.
The box is folded, exhibit the angles of 90 °. Holding the rack and prodock in this position the drill drill holes. If there is an assistant, he can hold it. If you work alone, put temporarily put up correctly by two transverse bars - closer to the top, and below. This will help not make a mistake and make the correct connection.

How to connect the door frame in the corners
If 45 ° was connected at an angle, three holes are made on each side. Two from above - retreating centimeter from the edge, and one side - in the center. Total for each compound requires three self-pressing. The direction of the installation of self-tapping screws is perpendicular to the connection lines.
How to connect the door frame
If connected under 90 °, everything is easier. Two holes drill on top, directing the drill exactly down.
Step 2: Cutting Loops
Most often, 2 loops are installed on interior doors, but it is possible and 3. They are set up with a retreating 200-250 mm from the edge of the door leaf. If the box and door canvas are wooden, choose the place so that there are no bitch. First fasten the loops to the door canvase. The order of work is:- At the selected places we apply a loop, outline contours. The easiest way to do this is a finely honed pencil, but experts advise - blade a knife. So it turns out more accurate and smaller gaps remain.
- If there is a milling mill, they work, if not, take the chisel and choose the material on the thickness of the loop. You do not need to do more than the sample, only on the thickness of the metal.
- A loop is installed in the prepared recess. Its plane should be on the same level with the surface of the canvas.
- The exhibited loop is fixed with self-draws.
Fixing two loops, put the door cloth into the collected box, set the right gaps: from the loop side - 5-6 mm, 3 mm on the opposite side and on top. By putting these gaps, they are fixed with the help of wedges. Also exhibit the canvas exactly in the horizontal and vertical plane.
After the placement, place the location of the retaliation parts of the loops. Sometimes it is more convenient to remove the loop already installed, and then install in place. On the markup, too, make a recess. The depth is also such that the loop surface is on the same level with the surface of the door frame.
Details of the door hide is described in the video.
Step 3: Installing the Door Box
The collected box must be properly inserted into the opening. This is a very responsible task. Before installing the interroom door, knock all that can fall off in the opening. If there is a need - too dry wall - the surface is processed by primers of deep penetration with the astringent effect. If there are too big holes, they are closed with plaster, very large protrusions are shy. In the opening door prepared in this way, the interior door is easier.
The box without the door canvase is exhibited. It is oriented strictly vertically. Vertical is checked not only by level, but also a plumb. The level is often the error, therefore it is more reliable to check the plumb.
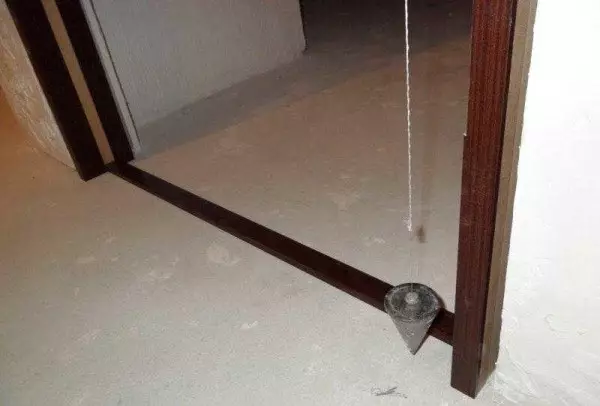
Check the inserted interroom door with a plumb
To during installation, the box does not turn, still on the floor, set the time struts, in the corners - covers that give a high degree of rigidity. For the doors to be opened, they are inserted in the same plane with the wall. Only so it will open completely. If the wall is uneven, put the box not on the wall, but vertically. Otherwise there will be problems with opening or closing the door.
How to insert the interior door with your own hands - in the same plane with the wall
After the position is selected, you can fix. Do it with mounting wedges. First, the wedges put on both sides of the sides - cross, then above the racks. Thus, the position of the box relative to the doorway is selected and fixed. Next, it is checked again the verticality of the racks. They are checked in two planes - so as not to be inclined forward or backward.
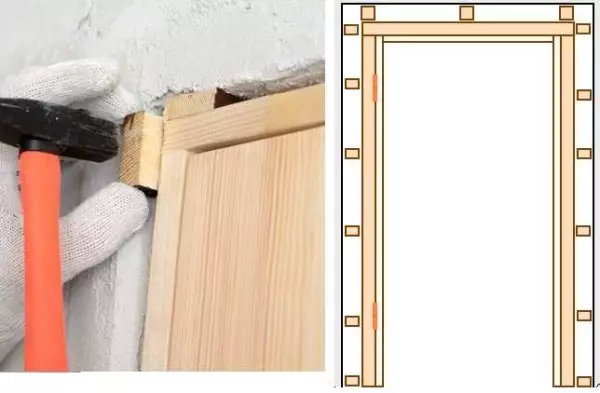
How to put the interior door with your own hands: we crush the box
Then the wedges are installed below, then approximately 50-60 cm, checking the racks exactly stood smoothly. Opened additionally and the transverse bar - in the middle. Check if there were no box elements somewhere, adjusted if necessary. You can begin to fasten.
Step 4: Fastening the box to the doorway
Fastening methods are also two: through straight to the wall and mounting plates. If the wall allows you and you are not frightened fastener caps in the box, you can attach through. It is reliable.
To install interroom doors, it is enough to spin two screws into cuts under the loop and on the other hand - under the plate of the castle's response. Additional holes are sprinkled in the cut outs. They are done so as not to get into the holes for the fastening of the loops or the response. Make sure that the head of the screws has been drowned and did not interfere with the installation of loops and lining.
Installing interroom doors according to this scheme is shown in the video. There, there are some interesting nuances about the placement of the door box.
If such a quantity of fasteners seems unreliable, drilled through, and the holes are closed with decorative washers selected in the tone. Or there is still a special handle from MDF with removable planks. Fasteners are installed in the prepared groove, and then closes the bar.
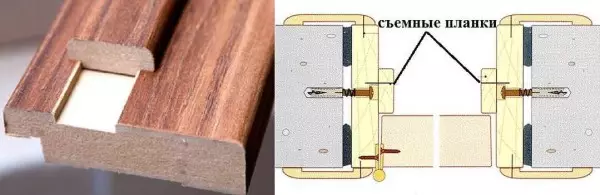
Special boxes for interior doors from MDF
The second method is counted, the fastener is not visible. First mount mounting plates on the back of the box. In principle, it is possible to use for drywall, but there are also special - thicker, although when installing interior doors, there are enough plasterboard.
Step 5: Fatitude
After all the gaps are exhibited and the wedges are installed, the slots between the box and the wall are filled with the mounting foam. For better polymerization, the wall is wetted with water from the spray. After extruded with a foam, filling no more than 2/3. Too large foam can lead to the fact that the box blows inside. Therefore, do not overdo it.
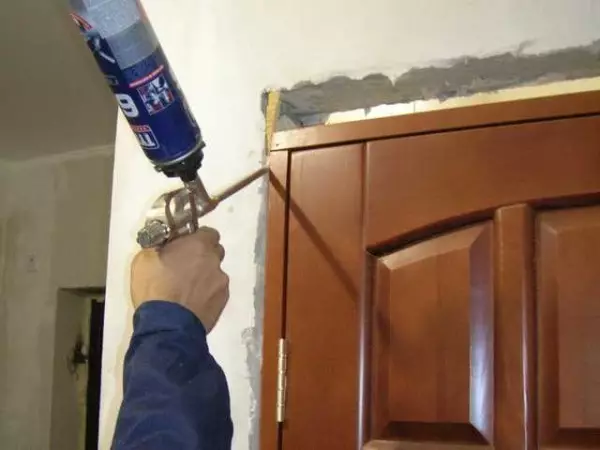
Foam fill the gap for no more than 2/3
To ensure that the doors of the foam did not forcerate, put struts. But if you do not move with foam, nothing happens.
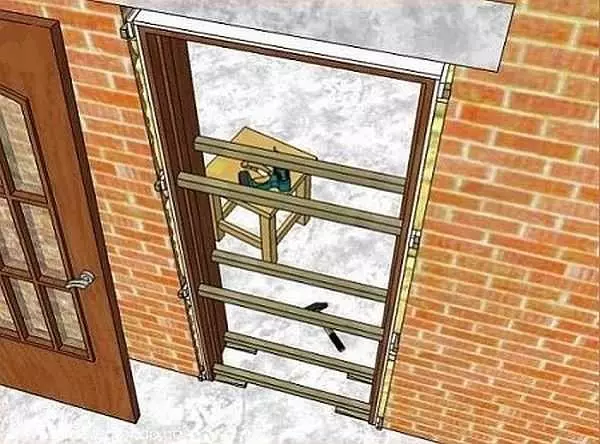
Struts for fixing the box - with such an installation of the interior door, the box should stand smoothly
After the foam is polymerized (the exact time is indicated on the cylinder) the struts are removed, the door canvas are tested and check the door. Next are finishing work: Sunsaws and platbands, if necessary, DOWERS.
How to install interroom door do-it-yourself you know. There is nothing superpower, and we tried to describe the main nuances. There is a lot of useful in video - these are recommendations from practitioners.
Article on the topic: Wall panels for the kitchen: photo wall decorative panels, sizes, under the brick, instead of tile, video