
Saray - Building necessary on a private farm in the city and in the village. Without it, you will not go through the dacha. Gradually accumulates more and more tools, techniques, building materials that need to be stored somewhere. Reliable shelter for all these things - a metallic shed. If you know how to cook metal - you will not be difficult to do it yourself. It turns out at a cost approximately equal to wooden, and much cheaper brick.
Iron Sarea Construction Technologies
There are metal sheds of capital, and there are prefabricated. Capital shed from iron may have a concrete floor, which is poured on a prepared base, and maybe wooden. If the floor is planned from the boards, the upper strapping on which it will be relying, is made from a thick-walled profile pipe with a cross section of 60 * 60 mm or 60 * 40 mm or angle with a wall thickness of 4-5 mm and more. Lugges of the floor are attached to the strapping. They can also be metal, and they can - wooden.
In a small shed from metal, you can make the floor without lag. For this, the strapping can be made from a thickness of about 4-6 mm thick and a side of at least 10 cm. Corner shelf use as a support for boards. Only the board must be at least 40 mm thick. With a large span, an additional support may be needed. It can be done from the profile pipe of the corresponding cross section.
Metal barn with wooden floor
The precast / collapsible metallic shed consists of separately welded frame frames that are connected by bolts. Sheathing - most often a professionalist who is quickly mounted and removed. The roof is made of the same material. Install such a construction in the country can be in a couple of hours as well as dismantled. They are put at the time of the season on unguarded dachas, and then or hide under the castle, or take off the winter apartments.
There is one more option of the prefabricated barn (they are also called "Hozblock") - for those who do not want to be used with the manufacture. Industry produces ready-made kits that are collected as a designer. There are options of Chinese production, there are - domestic. The price difference is not a catastrophic 20-30%. And what you trust more, then choose. The assembly of one of the Russian iron collapsible sheds is shown in the video.
Article on the topic: How to paint the wooden house outside with your own hands: Collect paint
How to make a fence from a corrugated floor, read here, and setting the fence from the chain grid is described in this article.
Metal barn from the professional sheet do it yourself: photo
They built from pipes of different sections and corrugated floor, with a single-table roof. The size of the barn is 6.5 * 4 meters, the height of the front wall is 2.5 m, the rear - 2.15 m. The floor is made concrete: in winter, in addition to the tool, nothing will be and a warm floor.Materials
Racks of round pipes with a diameter of 61 mm. They were chosen because they were in the farm. Binding and intermediate racks from a rectangular pipe - profile (60-40 mm and 40 * 20 mm). Wall thickness everywhere - 2 mm.
Consumption of pipes: Round 32 m, profile larger section - 21 m, smaller - 156 m. Roofing professional flooring MP-20 passed 4 sheets with a length of 3.5 m, and 4 - 4 m, elevated galvanized C8 - on the walls - 4 sheets 2.15 m, 16 sheets of 2.5 meters. This is a list of materials for the frame. And fasteners and consumables for concreting:
- 16 cement bags;
- 7 tons of gravel;
- waterproofing (1 roll);
- self-tapping screws, rivets, welding electrodes;
- Wooden rails on the crate: 50 * 25 mm - 3 pcs. 6 meters.
An impressive list of building materials. But at the price of such a barn is still cheaper than brick.
Step-by-step construction
The beginning of the work is the markup of the site. Kens of pegs in the corners, diagonally checked. If they are smooth, the twine is stretched, it is placed on the installation sites of the racks. In the marked places, the mines are made at a depth of 60 cm. Pipes are displayed and poured with concrete solution (M200).
At first, put and poured the racks in the corners. When the concrete grabbed a bit, they tied the fishing line - at the top and bottom. They were squirting the rest.
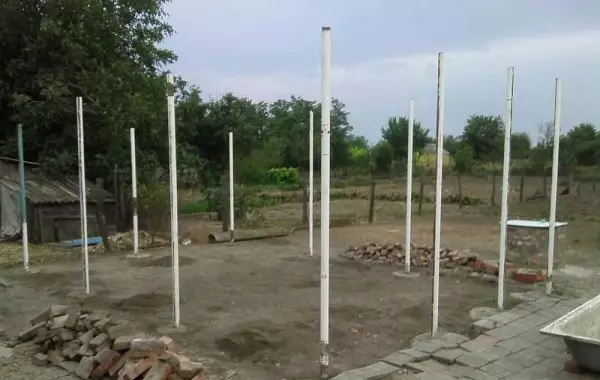
Pipes are exhibited and concreted
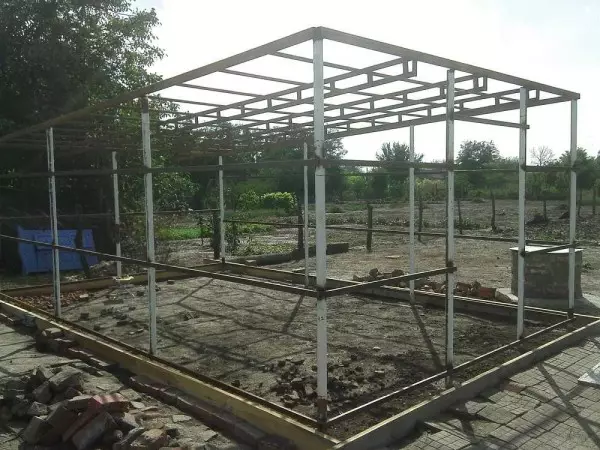
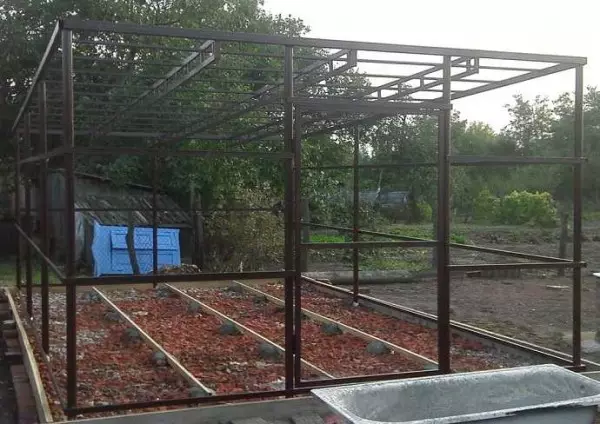
The next stage is welding frame. Top pipes are welded pipe 60 * 40 mm with a wall thickness of 2 mm. Next, on one of the pipes in the corners, we mark the floor level. With the help of the hydroevum, we carry it into the remaining angular racks. At these marks, tie the twine and carry them on all racks. By markup we weld on the perimeter pipe 40 * 20 mm. In the same way, the principle is welded in front of the middle: two exactly needed. To freely at the door, a motoblock or a car, they are made wide and high - 1.2 * 2 meters. The base of the shed of metal with their own hands has already been collected.
Article on the topic: Blinds for a gazebo: a variety of materials and mounting methods
Metal Shed Frame
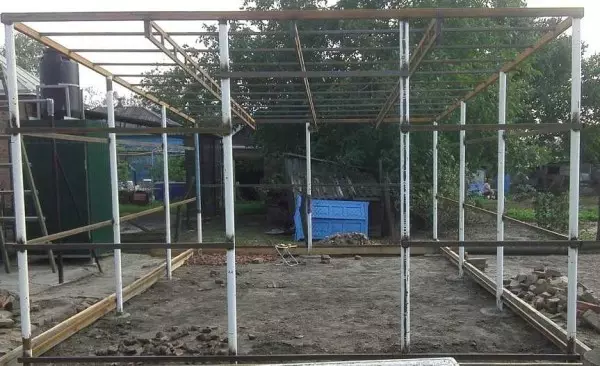
Next follows the assembly of the guides for the roof. We needed three farms of 6.5 meters long. They were welded on Earth, then welded to opposite beams. After the transverse segments of the pipe 40 * 20 mm (10 pieces) were welded. Metal shed carcass is ready completely. The next stage is the primer - so as not to rust.
Next, started making a concrete floor. First installed formwork. She was put out outside the frame, retreating 10 cm. Passed by spicy boards, restned bricks - so that the concrete did not spread. Next, they conducted the preparation of the foundation. Crushed stone and broken brick knocked into the ground. They knubled literally rubber in China. A piece of bricks are put on the ground, knocking until it almost hits. This makes the base tougher, and another uneven surface is better connected with the soil.
Installed opal
After a dense solution, the lighthouses were put up - even rails (25 * 50 mm board), they were far from the fishing line: the points were noted at the opposite ends of the lower strapping and the fishing line was pulled out between them. After checking her horizontality, the lighthouses were exhibited.
On the bit of brick, a fallen hammer in the ground, put the lighthouses
After the solution on the lighthouses grabbed, poured with concrete M-250 (they read about the brand of concrete and their composition here). Less ruled on the beacons exhibited and the lower strapping pipes, which were put on the same level.

This looks like a concrete floor in a barn after the solution grabbed
Next began installation of the trim - the proflist. Started from the roof. To condensate, which will be formed on the metal, not a drip on the head, first on the frame spread the waterproofing film. It is placed with the adoption of one panels to another of approximately centimeters by 10, gluing them with each other with a special bilateral scotch (sold there, where and waterproofing). An ordinary polyethylene film is better not to use: it serves no longer than several years - maximum -3-5.
Article on the topic: Tarldile toilet
Relieve waterproofing begin from below, moving up, gluing cloth. So it turns out that the drop dropped from above, flows to the niza himself. The strips were cut off longer than it is necessary and hung at the edges a little (30 cm) - so that water flows from them and did not fall into the small gaps of snow during lateral wind.
Next began installation of the professional leaf. When laying any sheet material on the roof, it is important to set the first sheet correctly. Then then everything will go easily. Therefore, carefully measure all the protrusions with coats, rules, etc. When the sheet is exhibited, it is screwed by self-drawers. They put them in the wave - in the protrusion. So less chances that water will fall into the hole.
With the skin of the sides, everything is also about as well, only you will have to cut the upper sheets from the skate. First exhibit exactly, then everything is like oil. The new sheet is flushes in the wave and fasten. About 20 screws left for the attachment of one professional sheet.
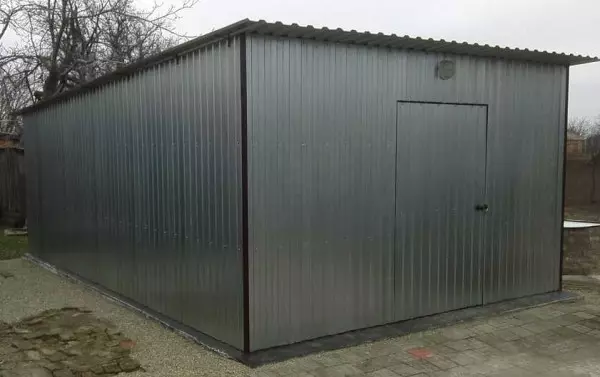
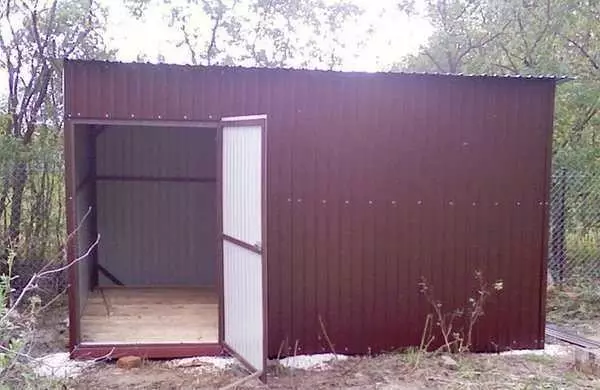
Ready shed do it yourself from metal (professional flooring)
The door frame was welded from the same profile pipe 40 * 20 mm, looped. When the door is trimmed, it was removed and stitched on a flat surface, jacing already in the finished form.
You can read about the hardware gate device here.
The metallic barn in the corners were trimmed with a metal corner. It is planted on rivets. It serves for decorativeness, and also closes small gaps, which were formed when docking at the corners.
It turned out more than a spacious construction - 26 squares. It can be used to store inventory, building materials, assigning a part under the workshop. This is if it stands on a plot near the house.
For the cottage without the protection of the shed from the metal - the case is risky, except to strip it from the top of the tree. Then you have to fix the wooden wrapping on the frame (in the photo below).
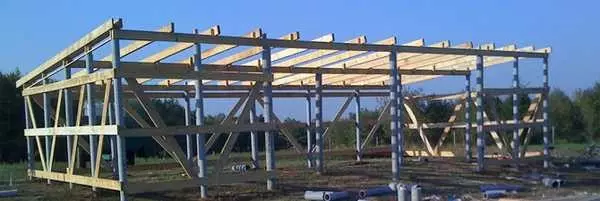
Shed with wooden trim on a metal frame is built so
You can read about the construction of a wooden shed here.
We are building an iron sray barn without welding: video
Not everyone knows how to use welding, but drill holes and pull two elements with bolts much easier. The video shows the entire process of assembling a shed of decent sizes from the profile pipe on the bolted connections. Welding used once: Widget loops. There will be no bolts.