
Plywood, probably one of the most unique construction and finishing materials. The scope of its application is practically not limited, but it is more used as a rough version. However, the diversity of her species and, above all, the thickness can expand its scope. A fully organic detail of the interior could be lamps from plywood, with their own hands that are completely able to create even a person having a minimal experience in hand maid. However, certain knowledge of the manufacture and connection of electrical circuits will be required, but this problem can easily be solved with the help of an old lamp, from which you can remove all its internal stuffing.
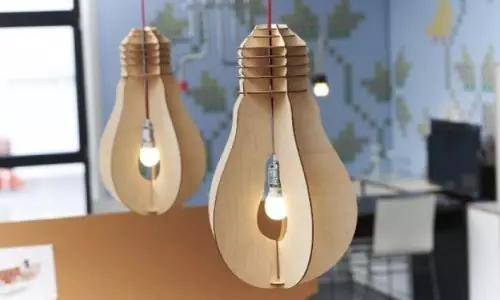
Plywood is an eco-friendly material that allows you to create designer lamps with your own hands.
Plywood is quite natural material produced from wood. It has quite high strength with a very small thickness. It is good processing, including burning. Also on a sheet of plywood using an electrolovka, you can cut the bizarre patterns on the details, which then can turn into open-mine interior objects.
In the market, lamps from plywood are represented by several manufacturers and for interiors performed in a wide variety of styles. They are especially relevant for the ethnics, for example, the Scandinavian style, but they can become very organic for high-tec, if it is a combined version of plywood and metal. For interior equilibrium, it may sometimes be necessary for a couple: for example, a chandelier of plywood can be supported by a scheduling, made in the same design, or various accessories, toys or even kitchen utensils.
Tools and materials necessary for the manufacture of plywood lamps
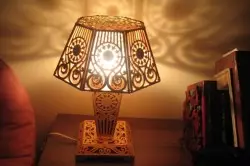
For ideas with an openwork pattern, a thin plywood is best suitable, such a lamp will be easy and elegant.
Article on the topic: Decoration of ladder laminate with their own hands (photo and video)
To make an original and beautiful lamp or sconce from plywood, the material itself will be required, the thickness of which can be different depending on the designer plan. Sometimes a thicker plywood can be used for the base, for example, even 10 mm, and for the manufacture of the ceiling, it is most convenient for 3-4 mm, since it does not waste the design.
It will be necessary to acquire a tool for work. It will take an electric jigsaw, a set of different pylons, a drill or a drill-screwdriver with a set of drills, a small hammer, sandpaper of various sizes. For gluing parts, it will be necessary for carpentry, casein glue or pva, tassel. You can additionally prepare material for decorating, including paints. Although the plywood is often quite sufficient to process with a colorless varnish, which protects the surface and more clearly shows the structure of the material - a pattern of wood. If it is planned to apply a pattern by burning, then a soldering iron should be prepared.
In addition, the electrical filling of the future lamp or lamp should also be prepared: parts for it can be purchased separately or use the ready-made scheme. For such products from plywood, it may be very correct to choose LED lamps: economical and safe due to the fact that they practically do not contribute to the heating of the surface of the plafoons.
Preparation of sketch and manufacture of lamp parts
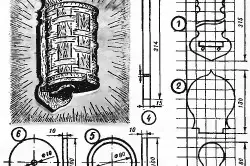
Plywood lamp diagram: 1,2,3 - parts of the bracket. 4,5,6 - details of the ceiling.
For a beginner, it is best to choose variants of models with more simple in detail. You can make the invented thing yourself or choose the model you like from any source: magazine, Internet, etc. It is desirable that there were sketches of each detail and instructions for execution. If instead of the sketch there is only a scheme, you first need to draw each item in a natural size and cut, then apply them to each other and, if necessary, make adjustments, and then transfer the pattern of the template to the plywood sheet. If the logging experience is minimal, it is better to choose models without a large number of openwork elements.
Article on the topic: Replacing the larvae and the castle in the metal door do it yourself
After all the details are transferred to Phaneur, you can proceed to their discharge. The next stage is the processing of their sandpaper, first coarsely, then shallow, and at the end, to ensure the maximum smooth surface, "zero". After that, each item can be covered with colorless varnish or paint. It is important to take into account the fact that the surface can "take up" - then it is necessary to walk the sandpaper again along the painted layer, and then apply one more or two, depending on the required color intensity, the layer of paint or varnish.
Assembly lamp from plywood with your own hands
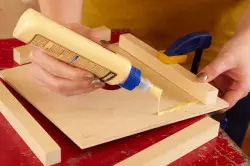
After applying glue, the details should be tightly pressing each other and fix the clip.
For connecting parts from plywood, special adhesive compositions are used, designed to work with wood: carpentry or casein glue. Alternatively, it is quite acceptable to use PVA glue, but it does not guarantee high strength of the compounds. Performing parts gluing, you need to closely monitor the accuracy of the compounds, and especially angular, as it can very seriously affect the appearance of the future chandelier or sconce.
Next, the prepared cartridge with a light bulb is mounted and the feed cord is connected. After that, it is possible to test the new interior object.
Simple models of luminaires from plywood
Beautiful chandelier or other lamp of plywood made with their own hands are able to become a real highlight in the interior.
And for this it is not necessary to choose a complex or coupling design. For example, a luminaire in the form of a box with small holes for light can create a special comfort in the house, and it is easy to make a sheet of fine plywood. Inside, it can be installed as a cartridge for a conventional light bulb or energy-saving (it is more preferable, since it does not contribute to excessive heating of the walls of the plywood plaffron) and the scheme for the LED.
Article on the topic: We use a kel for painting walls
Special attention when assembling such a lamp should be devoted to joints: if the parts are not tightly fit to each other, then the light will be seeded, which will break the entire harmony of the product.
Eastern style lovers, most likely, the minimalistic frame of the combined type of plywood and fabric will have to do. But such a lamp is not only suitable for the Japanese or other oriental interior, it is quite logical to fit into high-tech or even a classic. The base is a sheet of plywood, rails and fabric. The lantern size can be any, for the desktop option should be stopped at the height of the side from 15 to 35 cm. You can choose or square or rectangular.
First, you should prepare the rails on the selected size, collect them in the form of a square or rectangle and to attach cloth to them. In total, it should be 5 parts: depending on the selected size and shape of the lamp, they can be all the same or different, for example, according to the following scheme 4 sides +1 top, 2 sides +2 sides + 1 top.
From the sheet of plywood, it is necessary to draw a base for which the cartridge for a light bulb will be attached. For such a flashlight, for security purposes, it is also better to give preference to energy-saving light bulbs. The next step is connecting the wire with a fork and testing. If the result is positive, you can proceed to the final assembly.
All parts are connected by the method of gluing the rivers among themselves, which form the lantern ribs, and then installed and fixed the bottom of the plywood with a light bulb. You can make another option of the same lamp, in which the bottom, and the top will be plywood. And for the wall version, one of the sides of the lantern must be from plywood, it will be the lamp that will be attached to the wall.