

Today, the installation of the plinth is considered the final step of the implementation of repair activities. As a rule, it is carried out after pasting the room with wallpaper, laying suitable flooring and hanging door canvases. Properly fasten the plinth with your own hands, maybe even an inexperienced worker who can take into account a number of useful recommendations of experienced specialists.
Product selection
Before installing floor plinths, you should choose a suitable product name. Now almost all the products under consideration are divided into two main categories, such as:
- Wooden counterparts;
- Plastic plinth.
With the laying of plinths from the tree will have to be tinted because they are massive and harder than the other competing goods. Mounts for plinths of this type also need to select more durable and durable. To process wooden products, use a special hacksaw with small teeth, while the cropped edges are recommended to clean it with their own hands, as well as properly coated properly. It is not easy and pointed by a plinth, as it requires a jewelry fit in size.
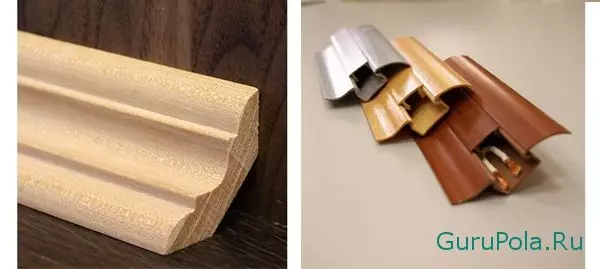
Wooden and plastic plinths
Installation of floor plinth of plastic is not so difficult, since said material is characterized by flexibility, low weight and ease of processing. The plank of this product most often consists of two main parts - the lower base and the front side. Properly fasten the base with your own hands will not be much difficulty, and the platband is subsequently inserted into a specially intended deepening.
Wooden Plinth Installation Features
Before laying the plinth, you need to stock up with certain tools, the list of which are invariably included such devices as:
- fasteners (dowels, screws, nails);
- hacksaw with small teeth;
- tray to cut the boards;
- Perforator (drill).
Installation of plinths from a tree with their own hands implies the material processing with abrasive means, neat application of primer with the subsequent painting. Immediately before laying the plinths, they should be adjusted along the length, then fix in the tray to cut the boards (stub) and trim strictly at an angle of 45 °. It is recommended to do this at least in order to subsequently be easier to poison products around the perimeter of the room.
Article on the topic: Thermal converters for temperature measurement
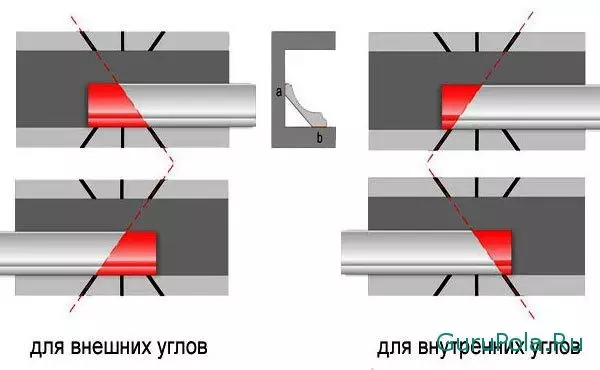
Stuslo for cutting plinth under different angles
Styling of wood plinths are carried out using a dowel, which are capable of firmly fix the product at the base. Sometimes other fasteners are used instead of dowels, such as long nails. In this case, before you nail the plinth, you should lubricate the nail composition, which makes it possible to exclude the probability of cracking or deformation of dry wood.
Before installing floor plinths, it is necessary to make appropriate mounting marks on the basis and wooden plank. The fixing elements should be approximately one distance from each other (about 10-15 cm). At the next stage, the drill is drilled in the bar the hole, the diameter of which should not exceed the thickness of the attachment for the plinth. It will be useful to put a wooden backup under the bar that can protect the floor from damage and become a reliable support for the workpiece.
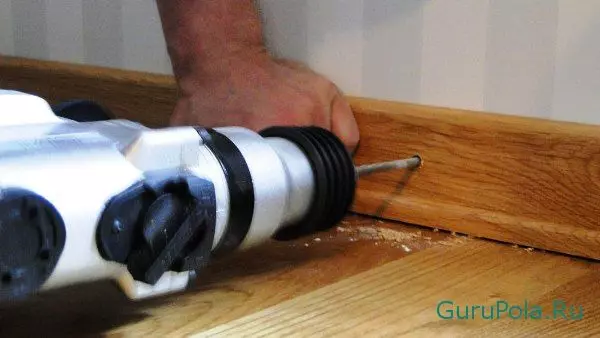
Drills hole perforator in plinth
At the final stage in the wall with the help of a perforator, you need to make holes for dowels, which are driven by a hammer to a certain depth. Next, we apply a bar with drilled holes, after which we screw the attachments of the plinths, completely "combing" the screw screw in the tree. At the end, check the strength of the resulting design, as well as the presence of defects on the material that is easily eliminated with a putty on the tree.
Playing Plastic Plinth Installation
Before attaching the plinth of plastic with your own hands, you need to get a similar set of tools as when laying wooden plinths. Various defects here will help hide original plugs, corners and other connecting elements, visually leveling decorative products. In the process of laying plinths from flexible synthetic material, it is recommended to pay attention to the following nuances:
- The base must be made perfectly smooth;
- mounting for plinths can be chosen as clip;
- Metallic clips are fixed to the wall only with the help of dowels.
Article on the topic: Installing double-glazed windows with your own hands (instructions)
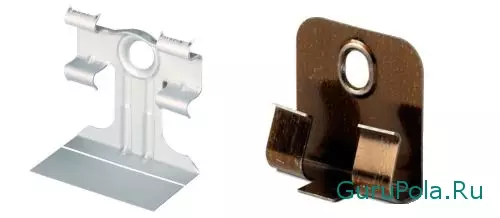
Metal clips (fastening for plinth)
At the initial stage of installing floor plinths, it is necessary to take clips, press them to the wall and the floor, after which the pencil should be noted that later it will be necessary to make a hole for fixing elements. Next, the perforator or shock drill gently turn the holes for the fastening for the plinth. In order not to be mistaken with the depth, on the drill you can prudently make a mark equal to the length of the dowel. The attachments of plastic plinths are recommended to be located at a distance of about 20-30 cm from each other.
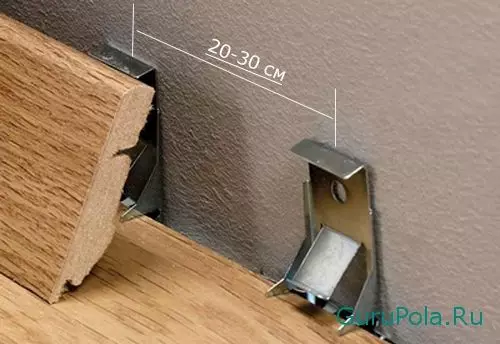
Distance between clips (fasteners)
After holding all the properties, using a special hacksaw with small teeth and a tray for boards (stub), cut the plinth. Next, you must carefully install the attachments of the plinth on the wall, for which screws are screwed to the base for screws. It is not necessary to apply excessive efforts in the process of screwing the attachment of plinths, otherwise you can rip the head or screw thread. When installing clips in drywall, it is recommended to use special dowels, twist which should be simple crushed screwdriver.
The fastening technology for clips is not so complicated: initially it is necessary to start assembling from the angle of the room, a small finger force pressing the decorative element. In this case, it is necessary to avoid the use of hammers and other heavy tools, as they can damage the drawing on the plastic. To dock such elements should also be manually, while on the market now there is a huge number of unique shrinks, allowing to achieve aesthetics in attaching plinths. At the end of the work, it will not be superfluous to check the resulting structure for strength.
Actual advice
Before you nail the plinth, you should consider a number of useful tips from experienced repairmen. For example, select the described element is recommended not to the tone of wallpaper or furniture, but under the color of the floor covering. Categorically do not combine plastic decorative products with parquet or wooden board.
Article on the topic: Swedish wall do it yourself
Recently, new models have appeared on the market that do not need to be allowed. They got the name "curvilinear plinths", capable of tightly wrapped complex architectural forms with a radius of bending to 20 cm. The presented products looks very original, and as fasteners for the plinth, it is possible to use liquid nails without any problems.
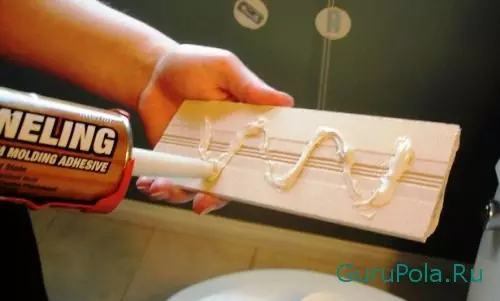
Installation of plinth on liquid nails
Thus, the topic of how to install an outdoor plinth will not cause difficulties in people who want to cope with this work. Given the above-mentoring tips, you can easily mount, dock, align wooden or plastic decorative products.