How to make a lightweight device from a diode tape with your own hands? What it is? It is worth talking about it in more detail. LED lighting is gaining popularity every day. It covers new spheres of its application.

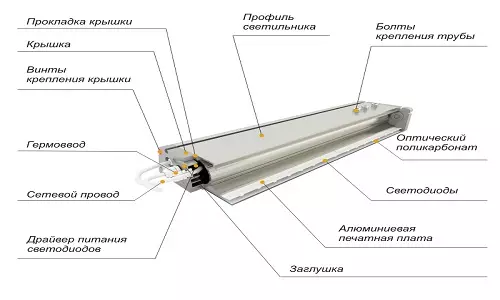
Scheme of the LED lamp.
Very often, the LEDs are used not only for the main lighting of the room (lamps), but also for some types of highlighting (for example, in the kitchen, in the dressing room and so on). Such beauty, of course, can not cost cheap, so if you want to use LED lighting at home, then you will have a little to upset.
Options of lamps from LED tape do it yourself
So, for the first version of the lamp you will need:

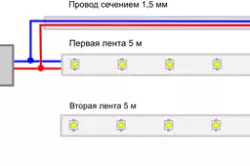
Diagram of connecting LED ribbons from one power supply.
- LED self-adhesive tape (8 mm width);
- aluminum corner (10x10 mm measuring, 1.5 m long) or plastic electric circular (to choose);
- screws;
- Small-sized switch.
LED ribbons are practical in use. They look like a flexible "board", on which the LEDs and resistors themselves are fixed. From the LED tape it is very convenient to cut off the size of the LED size you need. Methods of making lamps from the LED lamp with their own hands. They depend on how the final type of lamp you want to get: vertical lamp, horizontal or legs. Consider a few such.
Perform a lamp design

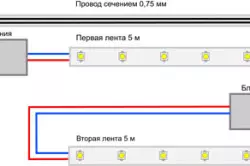
Connection diagram of LED tape with two power supplies.
To do this, you need to measure the length of the corner that you need. Next, drill a hole in it so that you can attach it to the surface to the surface. Having done this, you will need to cut the groove to fix the microswitch. By completing all the instructions, attach the corner to the selected place with the help of screws. In order for the LED ribbon well to stick to the corner, you need to wipe it with acetone, for degreasing. Do not forget to install a switch in the groove and solder wires. Connect them to the adapter or power line with a power of 12V. Lighting device ready. It is intended for a horizontal surface. It can be used, for example, in the kitchen (under the cabinet). If such a lamp is used at an altitude of 70-80 cm above the surface, it will be good to light 60 cm its width, the main thing will not make the eyes.
Article on the topic: Paper shutters on Velcro in Ikea and Lerua Merlen
Now consider the second version of the lamp. It will be more complicated in work, but original. Let's proceed to manufacture. To do this, you must buy such materials:
- RGB LED tape (3 m long);
- 3 feet for furniture;
- nickel-plated pipe (with a diameter of 25 mm, 1.5 m long);
- 2 fastenings for the pipe;
- 9 m rails (platbands);
- plywood (10 mm);
- Cylinder with black paint;
- RGB controller (console);
- piece of chipboard;
- electric jigsaw;
- Thin screws.
First you need to cut the electric jib of plywood 6 rings with different diameters (2 large, 2 medium, 2 small). As well as one circle of chipboard (it will be the basis of our lamp) and the circle of plywood in which they drink six holes (this is the top of your lamp - his hat). All carved rings and rails are painted in black, let dry. It is better to produce painting on the street, as the paint has the smell. Please note before painting the rails, you need to drill holes in them at identical distances for fastening screws.
On the circle of chipboard and the circle of plywood you should fix the attachments for the nickel-plated pipe. It will join the entire design of the lamp made with their own hands. In the middle of the rings, turn the LED tape, which initially cut into segments equal to the inner diameter of the rings. To each of the rings you need to solder wires.
After that, begin to connect with the help of screws small rings with slats. They will be in the middle of your lamp. Next, on both sides of the small rings, the average rings will be attached and at the end of the bottom and top of the lamp. Wires hide in the cable over the entire height. Do not forget to paint and the cable into a black color so that it does not differ from the ridges and rings.
The final stage of work

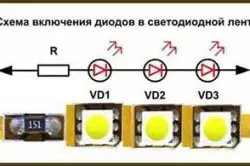
The diagram of connecting LEDs in the LED tape.
Article on the topic: how to plaster corners properly
So, we make the top: to the big ring from plywood, the circle cut out from the same material with six holes. Received a glowing cap, which is dripped by LED ribbon down to the lighting device. Then we make the bottom of the lamp. To do this, the furniture legs should be attached to the DSP circle (the lamp will hold onto them), and to attach the remaining large ring from plywood from above.
Next, you need to insert a nickel-plated pipe in the mount to connect the entire design. Also from the bottom Breppy RGB controller, with which the lamp will eat, do it yourself. Received his bottom, which is attached to the whole design. Food Your lamp will receive from a computer unit of the power supply if you do not fit it, you can come up with something your own, such as food using an electronic transformer and so on.
For better reception of infrared rays from the remote, you need to put the disc to the floor with a shiny side.
Well, the lamp from the LED ribbon is ready. In general, they got an inexpensive, beautiful, original, economical and ecological lamp for your room. But these options for the manufacture of lamps are not the limit, they are only basic. The rest you can invent yourself. Do not stop before problems! Decorate the house with your own hands!
