
Roman curtains people enjoy many centuries. And during this time they did not become less popular. This is explained by the fact that the design of the curtain is extremely simple. Such a curtain can be made literally from the girlfriend.
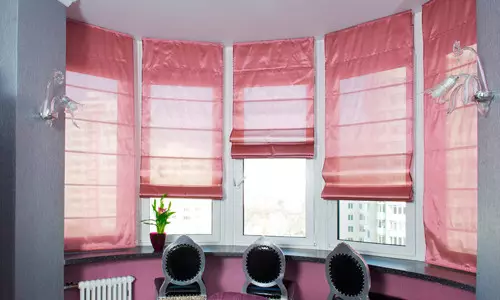
Roman curtains help make the design of the room unique and protect the room from sunlight.
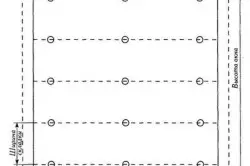
Curtain reminds its sail. The finished porter looks like a rectangular cut of a tissue or other material, stretched on transverse rails. Due to this, the curtain can be raised and lowered.
Selection of material and design type
Modern Roman curtains are multifunctional. In my homeland, these curtains are intended to protect the room from bright sunlight. In addition, they prevent the penetration of hot air into the room. Therefore, they are most often sewn from dense and sufficiently dark fabrics.
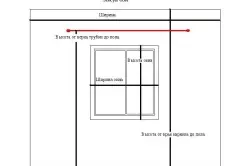
Measures window for sewing Roman curtains.
But now the Roman curtain can serve as a fashionable design detail of the window. Therefore, it is sewn and from light translucent ornamental materials. Specialists recommend decorating with similar curtains narrow and high window openings. They are indispensable in small rooms, such as kitchens. This design does not block the space. At the same time there is no risk that the random gust of the wind swells the chart.
For windows in bathrooms and kitchens, a porter is suitable, stitched from a material with water-repellent impregnation. This will provide ease of curtain care. In addition, such a curtain will not absorb fat, dirt and moisture. If you chose exactly this option of the Roman curtains, it is not necessary to buy a specialized fabric at all. The porter can be collected from the finished polypropylene tablecloth or shower curtains.
Such infrid materials differ also in different textures. They can be smooth or dilated, embossed or a slit pattern resembling lace. Therefore, the curtain will turn out not only functional, but also beautiful.
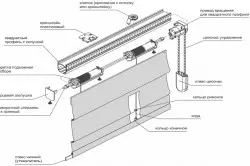
Diagram of the cornice device for Roman curtains.
The design of modern Roman curtains can be two types:
- The curtains are located inside the window opening (the cloth is almost the window).
- The curtains are mounted on the slope of the window (curtains wider opening about 10 cm on each side).
Article on the topic: Installation of apron in the kitchen from MDF
Each of these models have its advantages and disadvantages. With a narrow porter, the room is difficult to ventilate, as the curtain interferes with open the window. The design with a wide curtain can be quite cumbersome and heavy. It is difficult to add, and long transverse rails in the assembled state fall unevenly.
Removing the measure for sewing
But the choice of the model depends on the tastes and the preferences of the owners. From the design depend on the types of measure that you need to remove for sewing.
That is, you will need the following measurements:
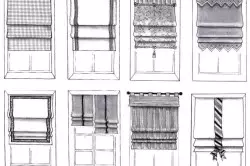
Types and styles of the Roman curtains.
- distance from the lower edge of the cornice to the floor;
- distance from the lower edge of the eaves to the window sill;
- the width of the window opening (excluding the width of the curtain);
- The width of the cornice from one wall mount to another.
If you are going to sew a narrow slope, which will be mounted inside the window opening, then the last measure will become the main one when determining the width of the porters. But the Roman curtains are good because the fastening type can be chosen at their own request.
The classic curtain of such a design is mounted on the cornice bar, which has been done in specifically for this provided by the scene. But now you can buy flat fasteners. They look like a plastic panel, which is fixed on the top frame of the window or window opening. Its surface is a Velcro tape (Velcro). The second half of the braid is sewn to the curtains. In this case, the width of the panel depends only on your desire.
Usually, the Roman curtains are lowered to the windowsill or slightly lower it (about 10-15 cm). But if you wish, you can sew a long curtain. Only in this case should be taken into account that the longer curtains, the greater load falls on the lifting mechanism.
Building a pattern of curtains
The example waste for the Roman curtains.
To make Roman curtains do it yourself, professional sewing skills are not required. The main difficulty lies in the competent construction of the pattern and calculate the folds.
Cutting tissue occurs on dotted lines. Naturally, you can build a pattern by own sizes, but the masters advise to adhere to the specified proportions.
Article on the topic: We are wearing a wall of plasterboard sheets without a profile
To calculate the depth of the folds, the following formula is usually used:
Curtain length / (the number of transverse regches * 1.5 cm)
On this calculation, 1.5 cm is a breakdown to the slash. For example, the length of the curtains is 145 cm, and the horizontal attachments are provided 7. In this case, the calculation looks like this:
145 cm / (7 * 1.5 cm) = 13.8 cm
But it should be noted that this calculation provides for shallow folds (classic option). The milets can be built on the basis of personal preferences. There are curtains with folds of 30-40 cm. At the same time, all the product looks great.
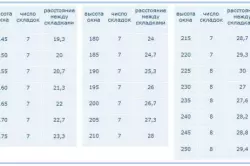
Table of calculating the folds of the Roman curtains.
As a rule, such curtains sew from 2 identical cloths. At the same time, 1 cut is the front side of the curtain, and the second is an invalible. Rail stories are formed using oblique beacks, stolen from the wrong side.
But if you make a porter not from the fabric, then the attachments can be external. It is this method of fixing is shown in Fig. 3.
In such a case, instead of the scenes, use the reinforcing tape (for example, a trouser or a curtain). Rings are shed on the braid, and they have a cord that replaces the rail.
Sewing Roman curtains
For sewing folding porter, you will need the following materials:

The scheme of manufacture of the Roman curtains.
- Basic and irons (nonwoven canvas);
- Laying for the scenes (in case of sewing curtains made of fine material);
- reinforced threads;
- Reiki (can be replaced by flexible metal or plastic rod);
- rings and cord;
- Stoporks for the ends of the cord.
In order for the manufacture of pockets, the line turned out to be neat, use a special paw of the sewing machine. It is intended for the formation of the scenes and feeding the cords. And to form places for the fastening of the rails at an equal distance from each other, the guide ruler will help you, which is attached to the carriage.
Pockets for fasteners are enhanced by gasket (fliseline or dublerin). If this is not done, then the fabric stretched on the rail will quickly come into disrepair. Threads for sewing is wiser to use reinforced or with silk fiber. Then the curtain will last you much longer. This rule applies to the manufacture of a porter from nonwovens.
The pattern for the Roman port is not necessarily made separately. All necessary labels can be applied directly to the fabric by the tailor shallow or a piece of dry soap. If you sew a pad with a lining, then you can paint both panels at the same time. The fabric folds in 2 layers, the markup is applied only by 1 canvas. Then both pieces are cut together.
Article on the topic: Stylish kitchen for girls with their own hands
Cutting and tailoring curtains from nonwovens (polypropylene tablecloths) is no different from the manufacture of curtains from traditional fabrics. But it is worth remembering that there are holes from needles and pins on such a canvas. Therefore, it is not recommended to pre-spin or lent them.
Production of rising curtains
Fold both web faces to each other, scroll around the perimeter by pins. Lay the line about 1 cm from the edge of the fabric. First burst the lower edge of the curtains, and then the side sections. The top remains open. If you chose a thin material for sewing the port, then the battery is cut close to the line.
The billet turns on the front side. The edges are affected.
Please note that the curtain of nonwoven material is impossible.
In this case, it is enough to spend along the entire length of the seam of nail. Curtains pulls along the seams at a distance of 0.5 cm from the edge. In this case, you can use threads of contrasting color.
Next, pockets under the planks are formed. The first must be made of a row under the bottom weighting rail. From the lower edge, the curtains are laid off the distance equal width plus 0.5 cm. The allowance is sweeping on the wrong side and adjust. It is wiser to use a double line. So all the product will be more reliable.
Then place the location of the transverse speakers. The labels are better to apply the curtains with the front side, then the line will be careful. Next adjust the oblique beyk or curtain tape. It is they who will form a scene in which the rail will be inserted. Typically, the width of such a tape is 2.5-3 cm.
Lastly turn the top edge of the curtains. Punches are bend on the wrong side, they are climbing and affected. The width of the bend should be 2-2.5 cm. From the wrong side, it is applied to the half of the Velcro tape and admonish it, grabbing the filing of the fabric. At the same time, the edge of the Velcro should perform above the curtain cut. In the pockets of the finished curtains insert the rails.