
Plasterboard is one of the most popular building materials. It is used to align the surfaces, the construction of partitions during redevelopment, installation of various structures. It is easy to work with the material, it is even a novice home master. Starting the installation is necessary from the construction of a wooden or metal frame. Despite the fact that the metallic basis is more durable and mounted easier, many prefer the wooden frame for drywall.
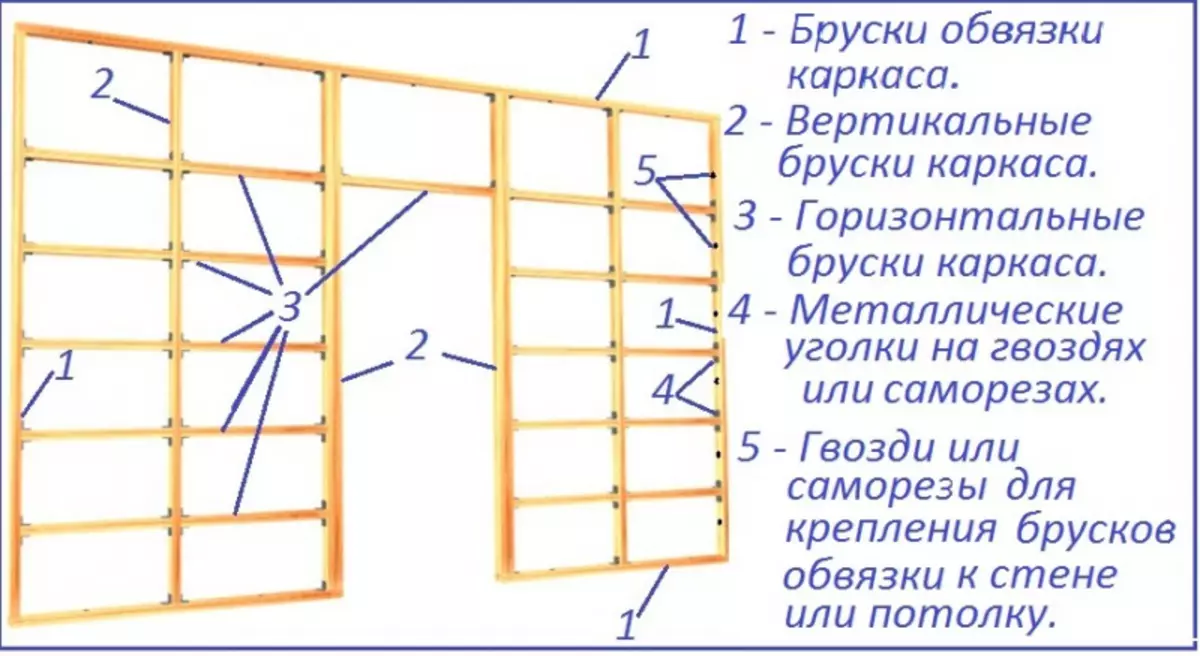
Wooden frame circuit for design from plasterboard.
Materials for the carcass
The use of a frame makes it possible to hide the shortcomings of any surfaces without prejudice to the useful area of the room. It is serious about its construction. From how accurately it will be designed and designed, the success of further work depends.
For construction framework you need to prepare wooden bars. It should be coniferous wood, the best option is pine.
Mounting frame for plasterboard design from wooden bars.
The material should be without flaws and is well dried so that during operation it is not deformed and kept heavy loads.
Before starting to work with the material, it should be treated with an antiseptic composition. The antiseptic should not be toxic, because work will be conducted indoors. It should easily penetrate into the wood, not to decompose, do not wash and not be smell. It is not necessary to use an antiseptics on an oil-based basis. It may adversely affect the health of residents at home.
The thickness of the bars should be at least 40 mm. Permissible humidity - no more than 15-18%. However, the thickness directly depends on the size of the future design of GLC. For example, when building a partition, pay attention to its width and height. The more these values, the larger the cross section of the bar must be. To cover the walls or ceiling, the width of the material is chosen on the basis of how much useful area I would like to save. If the surface is very uneven, the bars of different sections should be used.
Article on the topic: What color to choose a bedroom wallpaper: 6 practical advice
Basis under plasterboard

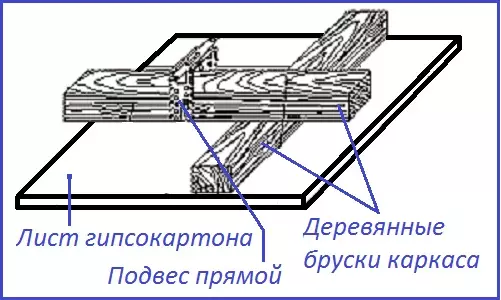
Figure 1. Hard fastening of a wooden frame to the wall.
To secure the wooden frame on the walls or ceilings, there are two ways. One of the most reliable is the rigid fastening directly to the wall (Fig. 1). Initially, the strapping is performed. If the frame is constructed on the ceiling, then the bars are fixed on the walls. If the wooden frame is made for the wall, the mounting of the bars is carried out to the ceiling, the floor and to the walls located perpendicularly.
To the ceilings or walls frame for plasterboard can be mounted in another way: with the help of metal brackets. The advantage of this method will be quick installation, and the disadvantage is low rigidity of the structure.
Before making a wooden frame, for example, on a ceiling of wood, it is necessary to make a markup (Fig. 2). To do this, the lowest point of the ceiling is determined. From it you need to retreat 50 mm and spend the horizontal line throughout the perimeter of the room. On this circuit, the rail will be fixed for the strapping. For the accurate horizontal line at the corners of the room, marks are made at the required level. Between them stretches the cord and the straight line is littered. In the rail, you need to drill holes for fasteners with a diameter of a little more than a self-built or screw.
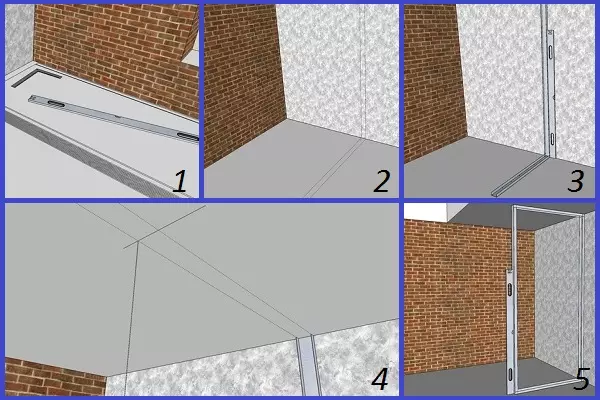
Figure 2. Frame markup: 1 - Prepare a pencil, angular ruler and level, 2 - Using the level and pencil should be made to make a smooth markup for fastening profiles, 3 - profile applied to markup and screw it to the floor and wall, 4 - Mounting the place of attachment with The help of the plunder, 5 is a frame assembly and leveling levels.
The rail is applied to the line on the wall and the labels of future mounts are transferred to the surface with a pencil. Then the holes in which the dowels will be clogged or wooden jams for self-tapping screws. Rakes are fixed throughout the perimeter.
Article on the topic: How to shelter a balcony with your own hands: a simple algorithm of action
The next stage is to set the base from the bars on the ceiling surface. The step of attachment of parallel bars should not exceed 800 mm. This will ensure the reliability of the future design. Perpendicularly attaching bars, which will subsequently be mounted by plasterboard.
The frame for the wall can be assembled on the floor and only then fastened on the wall. The size of the wall is measured on which the plasterboard will be mounted. From the result obtained, subtract 5 mm on each side and cut the bars of the corresponding sizes. Collect frame from 2 horizontal and 2 vertical bars. Additional rails are fixed with a step of 600 mm, perpendicular to them the crossbars are fixed. The frame is fixed with dowels, screws or dowel-nails throughout the perimeter of the wall. With this method of manufacture, the thermal insulation layer is attached straight to the wall, and the frame closes it.
In the manufacture of the frame, you can do without transverse bars, if its length does not exceed the length of the GLC and there are no door or window openings on the wall.
Making framework for partition
Before building a frame for drywall, it is necessary to draw up a drawing of the future partition, on which to designate the location of the doorway. Holding the rigidity of the structure, the number of horizontal parts should be taken into account.
To perform work will be necessary:

Frame mounting tools.
- Level.
- Pencil.
- Perforator or drill.
- Saw.
- Screwdriver.
- Self-tapping screws or screws, mounting dowels.
- Metal corners.
- Screwdriver.
- Bruks: For vertical racks, a cross-section of at least 40x70 mm, for horizontal - 30x50 mm.
Installation of the frame begins with fixing to the floor, walls and ceiling of bars strapping (Fig. 3). To do this, they use selflessness and dowels, if the overlaps are concrete, and nails if wooden floors. For fastening on the ceiling will be needed anchors.
First, the mount occurs on the ceiling. The boundaries of the future partition are placed, only after that the bars are mounted. Using a plumbing mark on the floor. For more accurate marking on the walls, it is necessary to make several marks. After the markup is completed, the bar is fixed on the floor.
Article on the topic: The best 5 Soviets: how to wean a cat wash furniture and wallpaper
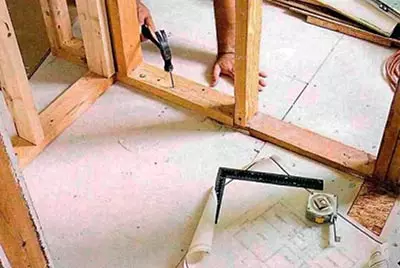
Figure 3. Mounting of the frame starts from fixing the bars of strapping to walls, floor and ceiling.
The next step is the mounting of the vertical strapping, which connects the ceiling and floor bars. Vertical racks will carry the main load in the design, so the mount should be as strong as possible with the fastener increments of no more than 400 mm. If the main walls in the room are not of durable materials, then dowel-nails are used for the attachment. You can drill in the wall of the hole in which put the tubes from wooden pegs and screw the screws or score nails.
If the main walls are durable and smooth, then the binding can be fixed on direct suspensions that are used for a metal frame.
When the binding is ready, the racks are set to 600 mm. It is such a step that will allow to mount each standard sheet of GLK on two racks. Carnat racks can be used with metal corners.
For horizontal jumpers, a bar is used with the same cross section as for the entire design. They are attached self-drawing. Metal corners can be used for greater reliability.
The opening for the door in the new partition requires amplification. For this, additional racks and horizontal jumpers are used. The threshold will serve the lower part of the frame.
The molding of communication in such a partition is not recommended. However, if necessary, the holes of the required diameter are drilled in the racks. The electrical cable is paved in special protective corrugated pipes or tin boxes.