
How to make a tabletop for a washbasin in a bathroom from tile
The advantages that countertops are in the bathroom, lined with a tile, are indisputable. Not everyone can afford to the table top for sink from artificial or natural marble, so it is better to consider the manufacture and facing of the table top with their own tiles.
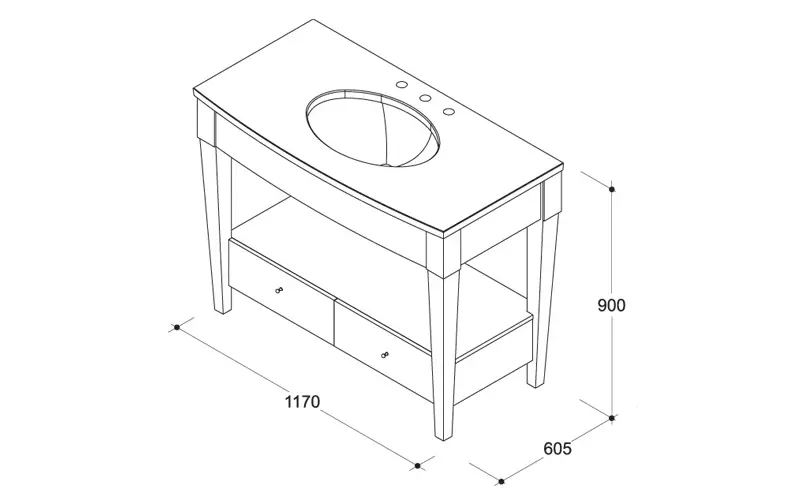
Drawing table top for bathroom.
A facility lined with a cafeter of the sink will be wonderful to look in the bathroom.
Stages of facing tables tiles tiles
It is worth considering that the tile, laid out with their own hands on the table top, should be harmonized with a tile that is posted on the floor and on the walls in the bathroom. Therefore, it is desirable to immediately decide on the choice of tiles. For facing the tabletop under the sink in the bathroom, you can use an ordinary cladding tile, which were laid out the floor and walls. . Deciding with the choice of tile and approximately sketching the plan, you can safely go shopping in search of tiles.Making the base of the future tabletop for the bathroom with your own hands
3 sections of cabinet furniture are taken as the basis:
- Cutter under the sink, size 500x560x820;
- Cutter with retractable shelves 500x560x820;
- Two-door cabinet, size 600x560x820.
Thumbs in the future will be exhibited along the wall of the bathroom in a row. The section will be a length of 1600 mm, in a width of 560 mm.
For work it will be necessary

Bulgarian device diagram.
Instruments:
- USM (Bulgarian) and a disc on the Kafel;
- Raspil (for processing edges of the circumcision tile);
- putty knife;
- toothed spatula;
- rag;
- electrolovik;
- stainless self-tapping screws (3.5-3.8 cm) 200-400 pieces;
- Flomaster;
- pencil;
- electric drill;
- mixer;
- Tree drill (5-6 mm);
- Bucket for solution.
Materials:
- Tile glue;
- Krestles for tile 2.5-3 mm;
- silicone sealant;
- protective composition for wood processing;
- primer;
- adhesive for wood;
- Waterproofing composition or quartz sand + liquid glass.
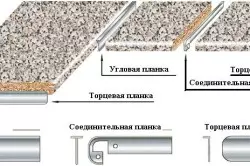
Scheme of plating pads on the worktop.
The base of the table tops should be made of two sheets of plywood from coniferous rocks, sizes of 1500 x 1500 x 20 fb or FSF brand.
FB is a baculecated waterproof pheaneru (impregnated with bakelitic varnish). This moisture-proof plywood can be used in sea water and in a hot humid climate.
FSF is a waterproof plywood, glued with a phenolic resin. Moisture-resistant Faneur can be used outside the premises.
Fastening plywood must be made at least 2 layers, braziness. Before starting work, Phaneur must be properly treated with their own hands with a bitumen mastic or hydraulic protection composition for wood and impregnation.
Article on the topic: How to replace the boards of laminate, without disassembled Gender: Replacement procedure
Coloring Phaneur should consider that the fibers in all layers must go along the section. From the walls of the Plywood section should perform from all sides for 3-5 cm. Shakes of plywood bands should not go to the hole that you want to cut off for the sink. Phaneur should be lined with an electric bike.
The design will be quite severe, so you do not need to save on legs for the case.
The first layer of plywood must be fixed especially reliably. The design should turn out to be fixed. In the side ties of the housings, the first layer of plywood should be fastened from below (on each side of 3-4 self-pressing). The side walls must be attracted by self-drawing (1.5-1.8 cm) to the first layer of the future table top with metal corners.
Then, on the upper layer of plywood, it is necessary to apply adhesive for wood (joiner glue, moisture resistant PVA). The glue must be moisture-resistant. It should be applied to the surface of the zigzag, and then the second layer of plywood press and tighten with self-draws. In order not to stick the caps, you need to pre-negotiate the places where the screws will be attached. It is necessary to have a screws with a step of 15 cm both around the perimeter and inland sheets.
To the top of the second layer of plywood with a stapler, it is necessary to attach a painting mesh with a cell of 0.5-2 cm. It must be started on the side edges of the plywood sheet and secure the latitude.
Treatment of plywood sheets
Scheme Fastening washing at the bottom of the table top.
The countertop is fundamentally ready for facing. At the next stage, it is necessary to carefully treat it with your own hands with waterproofing composition. You can choose the finished version or the composition "Liquid glass + water + small sand + latex", dry, and then lining.
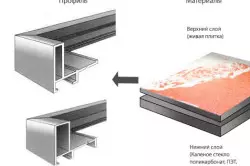
Facing can be made in two ways:
- Laying the tile on a gypsum-fiber moisture-resistant sheet (GVL B) or on a sheet of the CSP (the most reliable option).
- Lay the tile on the cement layer, which will ensure the durability and reliability of the structure.
How to make a contact layer for tile
The flatbed sheet of plywood CSPs or GVL in with drank under the sink must be treated with primer from the inside. Then, on the top layer of the sheet of plywood using a toothed spatula, you need to apply a layer of tiled glue (which was purchased for tiles). Further on this layer it is necessary to lay a sheet of CSP or GVL B and fix to the upper layer of plywood using self-tapping. The junctions between the contact layer and the wall should be treated with silicone sealant. Then with the help of self-samples to the lateral outer edges, it is necessary to attach the strip of the CSP or GVL. The joints between the side edge and the strip need to be filled with silicone sealant or smeared with tile glue, and then wrapped with liquid glass.Article on the topic: How to make lamps from plywood with their own hands?
Next, on the surface, which will be lined, you need to fasten the painting mesh, and then wipe it with a waterproofing composition. Here you should process all the side edges and all the layers of the table top. After drying, the surface can be trimmed.
Laying of facing tile
Mounting diagram tile on the worktop.
It is worth considering a simple veneer option (straight masonry, seam in seam). The basis is taken by a tile with a size of 10x10 cm. This is one of the most simple options.
First it will be necessary to place countertops under the lining. To do this, you follow from two edges to measure the width of the table top. If everything is done correctly, it should turn out 61 cm. It should be noted at the edges of 2 average points (30.5 cm), and then combine their line. The center of the countertop will be the line. In the same way, the center should be placed in the width, similarly note 2 points and connect their line. As a result, two perpendicular lines are obtained, which are held in the center of the countertop. They will serve as a landmark in further facing work.
To the bottom of the table top it is necessary to attach the rails that were used as lighthouses. Rake data will serve as a support for the facing of the next table tops. To the end of the countertop it is necessary to fix the angular outer profile on the self-tapping screw. The cement layer should be carefully primed, wait for the drying of the primer. Then you need, according to the instructions, make glue.
Facing is recommended from the front side of the countertops. Using a toothed spatula, it is necessary to apply the glue layer on the cement layer. Then at the corner of the countertop you need to lay the first tile. Next, by observing the angle of 90 °, it is necessary to post the first rows, checking the external line using the level. Also do not forget using the level to check the plane on the horizontality in all rows. It is also necessary to ensure that the inner side of the tile are on the same level with the pre-lines.
Tile laying technology
You can make an outer angle using the outer angular tile profile. In this case, it is recommended to start it under the upper tile.The further process of laying should not cause special difficulties. Tile should be put on rows, it is better to conduct "long" rows. Do not forget to insert crossbars in the seams and remove the surplus of the solution. To control the plane, you should use the level, when it is applied between the tile and the level there should be no lumen.
During the sawing tiles under the sink, an error is allowed about 0.5 cm. The main thing is that the sink can rely on the entire plane on the lined surface. It is worth noting that the porcelain stoneware can be quite easy to cut off with lever tiles and quite hard ESM (grinder) with a diamond disk.
Article on the topic: Technology semi-drying floor screed with their own hands (video)
Stood the seams between tiles
The next stage of work will be filling the seams to which it is necessary to approach very carefully. The ordinary grout for the tile here is simply not good. The most appropriate material for these purposes are epoxy-based grouts, since they are resistant to the effects of oils, chlorinated water and high temperatures.
Materials of this group are quite widely represented by domestic and western manufacturers. Basically, these are two-component compounds that contain a modified epoxy resin (component 1) and aggregates, pigments and hardener (component 2).
You can prepare the material using a low-speed mixer, stirring these 2 components. When choosing a clutter composition, you should pay your attention to the recommended width of the seams. Basically, epoxy grouts are designed for wide seams (from 8 mm). In this case, the compositions for a seam of 2-12 mm wide are suitable. The process of working with epoxy grouts is quite complicated, as it turns out a thick mass, which is not very convenient to apply the usual method, rubbing with a plastic or rubber spatula into intercutric seams.
In addition, it should be removed from the tile from the tile the remnants of the epoxy grout, otherwise it will be impossible to do it.
In order to facilitate the filling of the seams, it is recommended to protect the tile using the painted tape and apply the syringe to fill the intercutric seams. The cylinder must be filled with a cloud composition, and on the syringe to wear the necessary nozzle. After that, the grout can be squeezed into seam. With the help of a rubber spatula, a seam surface is formed. After that, the malarious tile, protecting the tile, should be deleted. According to the instructions after 30-60 minutes, water is soaked with water residues to the state of the emulsion, and then washed off with a wet sponge. The sponge is often rinsed in clean water. After 2-3 hours, the surface of the tile is closed completely.
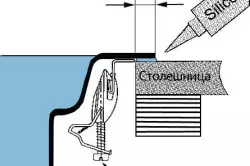
Seam between the tile table and the wall need to pass by silicone sealant. Also, you should not forget when installing the sink into place to wash with silicone sealant of the joint.
Showing the smelting, you can turn the old bath in the masterpiece. Facades can also be tiled. To do this, it will be necessary to fix the sheet of drywall or the remains of the GWL to its facade. This will not be much difficult. By the same principle, you can make a tabletop in the kitchen, lining the table in the room. After spending even the most modest calculations, it is possible to make sure that the savings, compared with the purchase and installation of table tops from a natural or artificial stone, will be at least 2 times.