
Make a balcony or loggia a cozy place is not so difficult. Most often decide to sew a balcony lining. Works quite a few, but it is simple and with all you can cope with your own hands.
What lining to use
Basically, when they talk about the clap, they mean wood products. Much less often called PVC panels, adding the word "plastic". Probably, the whole thing is in a very similar principle of connecting planks with each other and the way they are installed, as well as that it looks like a long boards with a spike on one side and a groove on the other. Choosing which lining to use for the balcony, usually proceed from the cost, aesthetic or practical considerations.
Balcony clapboard - Method for creating comfort, and at the same time insulate the room
In some regions, wooden lining is a cheap material, in some - expensive. So you have to compare the price of plastic and the tree yourself. Often wood give preference because it is natural. It is so, but to preserve its attractiveness, it is impregnated with protective compositions, and this is chemistry. Then it is painted or covered with varnish. The compositions, as you understand, are also far from natural.
If we proceed from practical considerations, then the lining of PVC clapboard is unambiguous: it is easily clean, does not require additional care or processing, for many years it retains an unchanged view. Is that on the sunny side she will observe, so it is better to take bright tones: they are almost imperceptible loss on them.
Wooden lining more capricious during operation: before installing it, it is necessary to cover with protective impregnations. If you are going only to give her some shade, you can pick up such a impregnation that will immediately give you the desired color. Then, on this, its processing will end. If you decide to paint or lacken the finish, then you need to do after mounting (but it is still impregnated with antiseptics to the installation). During operation, it will be possible to remove the old coating periodically, and cover everything again: lacquer or paint can crack, the balcony finishes will lose attractiveness. Here is such a fruit.
What lining to choose for the balcony you decide
Despite all this, solving which lining is better for the balcony, the wood preference is preferred. Tastes, of course, are all different, but by the general opinion, the premises, sheltered wood, much more cozy. As a result, the desire for beauty outweigh practical considerations.
How to cover the lining on the balcony so that it keeps the attractiveness for a long time read in the article "How to cover the lining indoors"
Which is better
It will be about wooden products. First, let's talk about the breeds. The cheapest lining is made of pine and ate. Despite the relatively low cost, it is durable: in the wood of coniferous rocks contain a large number of resins that are antiseptics and preservatives. In regions with hot summer, this may lead to the fact that the resin will be released on the sunny side in the intensive heating places. Another minus is soft wood. If you knock on it (decently, for example, a hammer), a dent will remain. If it does not scare it - you can sow a balcony with pine or firing lining: these are all the shortcomings of this type of wood.
Decide which lining is better for the balcony only you: tastes all different
There are still expensive sorts of conifers: larch and cedar. They have very denser wood, more durable, well resist atmospheric phenomena. But these of their qualities for the plating balcony inside are absolutely not needed. A more fun argument can serve as a beautiful color and structure of wood, as well as fewer resins. The sheathing with lining of such wood is beautiful and for a long time.
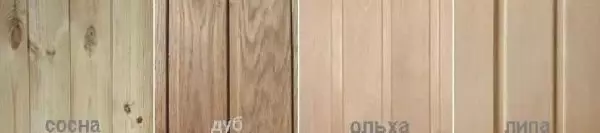
Enjoyed for the eye of hardwood wood. Here choose to your taste: Lipa has a slightly pinkish shade, the aspen becomes silver-gray, alder has a beautiful drawing, oak on decorativeness and reliability - generally out of competition, but also at the price too.
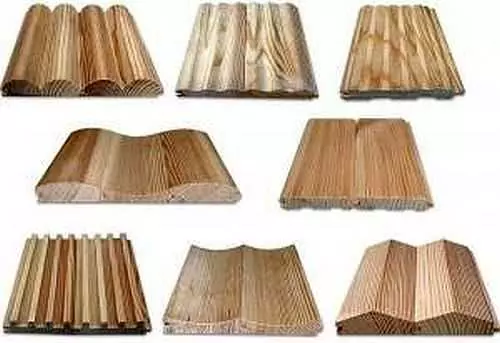
Profiles and appearance
Now about the technical characteristics. Let's start with profiles. There is simply lining on sale, but eurogrammer. The main difference is that on the back of the version of the "Euro" there is one or more longitudinal furrows. They provide air circulation, which extends the term of the "life" of the finish. Also, in theory, the sawn timber with the prefix "euro" has standard dimensions and produced from high quality wood. In practice, everything is different: and the size of "float" and the quality is far from always good.
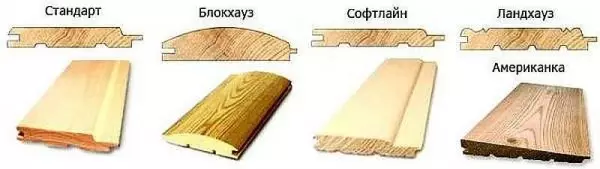
Most popular profiles
Profiles numbered a couple of dozen. Different chamfer, "waves" of different sizes and other curly surfaces allow you to get different in the appearance of the wall. In the photo at the top - the most common, are usually produced by large parties.
Article on the topic: How to plaster aerated concrete - Technology of applying plaster on aerated concrete walls
These are some species that can be made to order.
There are some more species that can be made to order. Such a "custom" party will cost much more expensive: you have to reconfigure the equipment.
Varieties and humidity
The cutting of the lining depends on the number of bitch, cracks and changes in the color falling on the ski. The variety A or "Elite" should not have them at all, or in a very minor quantity. Grade "B" - no more than 4 bumps of brown and color changes of a small area, the variety "C" can have many bitch.
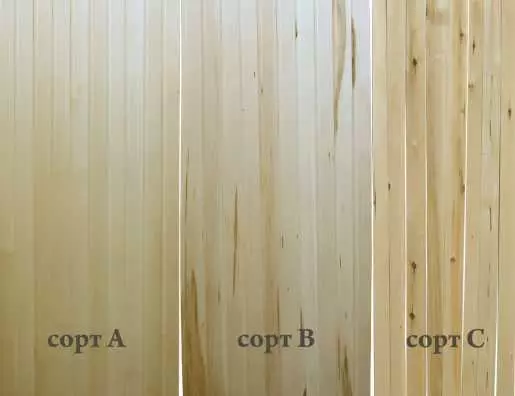
What is the difference between one grade lining from another
The presence of bitch does not mean that the wood is bad. The main thing is that they were brown, not black and did not have traces of destruction. And in general, the knocked wood looks sometimes great. All this is a matter of taste and preferences.
Here with the humidity it is much more serious. Buy for interior decoration lining from raw wood, maybe much cheaper, but much more troublesome. If you bother the finish strap with high humidity, it will gradually dry, decreasing in size. Between the boats will appear, some of them will get out or running. You will have to remove everything, go through and mounted anew. Moreover, maybe twice: it is difficult to predict when the destruction end. Therefore, for the interior trim, the balcony is better to take the lumber of chamber drying. Humidity is not higher than 7-10%, it will not "not be" and not running: these materials were discarded after drying. Therefore, the prices are higher.
About the thickness and width of the planks. For the interior decoration of the premises, you can take a thin board: the condition of the atmosphere is stable. But the balcony is not completely interior, the temperature differences and humidity are more serious. Even with good balcony insulation. Therefore, the thickness is suitable average - 14-16 mm, but it is possible to use 12 mm.
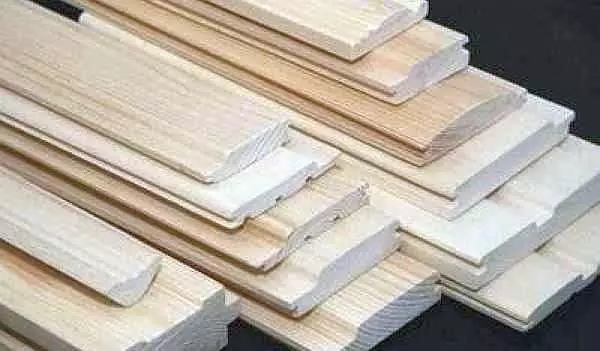
The width and thickness of the fabric is changing widely
The boards width can be from 60 mm to 150 mm. Slide a narrow longer, with wide work less, but in a small room the wide bands "eat" volume. So to cover the balcony, the optimal width of the lining is average, about 90-120 mm.
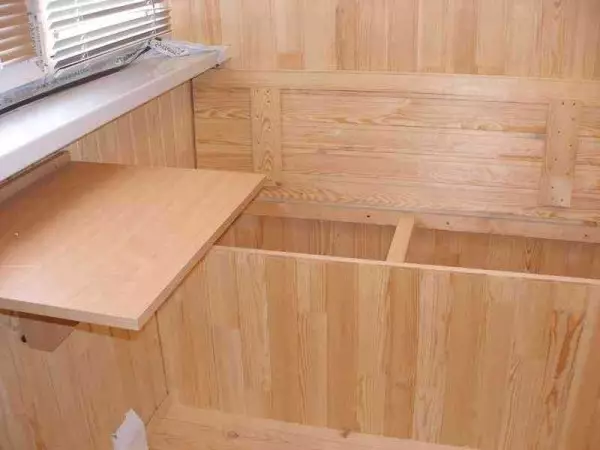
How do it yourself shelter balcony lining
First of all, it is necessary to decide whether you will warm the balcony or not if you are, what parts of it and what material. The structure of the crate and the thickness of the used bars depends on it. The order of work will change slightly - there will be no installation of the insulation. All other stages and their sequence will be similar.Work order - step-by-step instructions
At first, the whole old finish is dismantled, plaster, paint, tile, which is well kept. Everything that keeps firmly can not touch. For greater reliability, before you see the balcony of the clapboard, it is necessary to predict the walls, the floor and the ceiling with anti-grapple composition. This is especially true if he was previously open. After drying the composition begins the work actually on the installation:
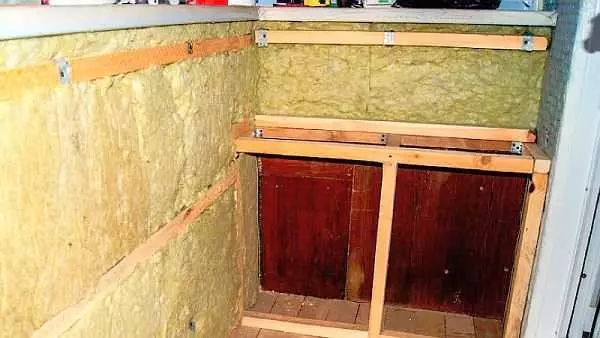
- The walls and the ceiling are stuck. It is usually made from wooden bars. If the balcony or loggia will be insulated, the plank set step is consistent with the width of the insulation.
- Installed and fixed insulation.
- Floor lags are mounted.
- The insulation is stacked between them.
- From above, the moisture-resistant plywood with a thickness of at least 10-12 cm is fixed in lags by self-draws.
- Mounted lining on the walls.
- Mounted ceiling casing.
- Floor and ceiling plinths are installed, corners, slopes.
Next, about some stages and materials.
What to insulate
Before we have a balcony of the clapboard, you need to pave the insulation. Any of the thermal insulation materials available on the market:
- The cheapest is the foam (PSB). Released in plates. It has a good thermal conductivity (see on the chart). Its main disadvantage: it does not make loads - things, but under the wagon, this flaw is not important. The second moment that many people do not like is unnatural and can distinguish harmful substances. We will not argue with an unsentrally, and the second statement is right only in part. Under normal conditions, the foam is chemically neutral and harmless. It allocates harmful substances only when burning. More negative quality: it has low vapor permeability (does not display pairs). But this is the reverse side of the insulation. With the abrasiveness of humidity today they cope with the help of a ventilation system.

Insulate the balcony under the clapboard can be foam
- Mineral wools. They are made from molten rocks, slag or fiberglass. So this insulation is natural. But in production, phenol-formaldehyde resins are used as a binder, which is not happy. There are basalt stegan mattes, in the production of which binders are not used - they can be used even in children's institutions. The positive qualities of mineral wool are not bad thermal insulation properties, ease when working (only not with fiberglass). The disadvantage of this material is hygroscopicity, which is why it should be closed from all the parties from moisture. Price range - medium.
Mineral wools have good characteristics, but they are afraid of moisture
- Extruded (extrusion) polystyrene foam (EPPS). It has very good thermal insulation characteristics and high density, well resists mechanical loads. Simultaneously with thermal insulation, sounds well. From relatively inexpensive insulation, he is the most effective. Sold in the stoves, has a locking system, which eliminates the formation of the slots, between which the cold air penetrates. It is this material that is most often advised. If you have a material opportunity, put it under the wagon trunk. Of the disadvantages - does not spend steam and is expensive.
Extruded polystyrene foam differs in high density and low thermal conductivity
- Foil polyethylene foam. This is an effective vocabarrier that does not allow moisture penetration into the insulation. When using mineral wool, it must be rolled from above, knit the brackets to the crate, the joints should be glued with foil scotch. You can use simply construction foil, but it is more complicated to work with it, and polyethylene layer is an additional heat insulator. One thing is possible only in the southern regions, on the rest of the territory it is only an addition that improves thermal insulation.
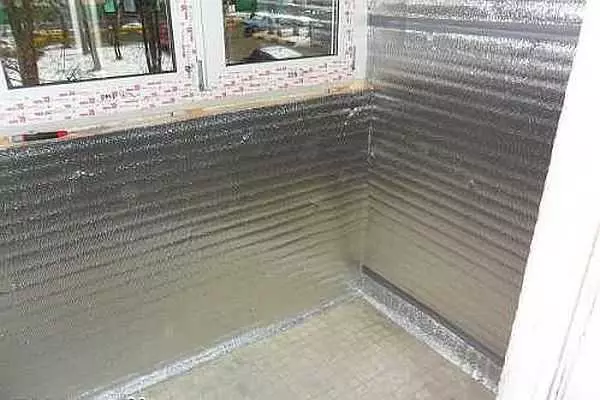
Over the insulation, foil polyethylene is naked to reduce heat loss and prevent steam penetration into insulation
- For those who want to have environmentally friendly housing, there is a natural insulation with excellent characteristics: foamed glass (foam glass). It does not burn, nothing distinguishes, light, durable, frost-resistant (operating temperature range from -260 ° C to + 230 ° C). The thermal conductivity of the foam glass is 0.04-0.08 W / (M · K). It cuts with a hacksaw, mounted on the foam. Disadvantage - high price. There is a foam glass of Chinese manufacturers at acceptable cents, but the quality is below average, there is Belarusian - secondary and price and in terms of characteristics, the best is European, but it is expensive.
Foamglass - natural thermal insulation material with very good characteristics
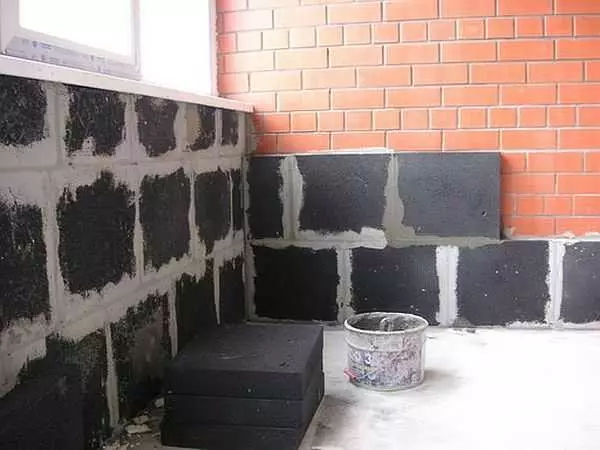
- Often, foam blocks are used for the insulation of balconies. For normal efficiency, their thickness should be about 27 cm. Nobody will select such an area in the size of the room, so that one of the foam concrete is still laying a layer of some of the thermal insulation materials described above.

Comparison of thermal conductivity of various thermal insulation materials. In centimeters, the required thickness of the material is specified to ensure equal heat loss
Any of these insulation can be used on the ceiling, semi or walls. For the floor there is a natural and inexpensive option - clamzite, but it is far from as effective as the materials presented above: the average thermal conductivity is 0.1 W / (M · K) (twice as high as Minvat).
How to put the balcony
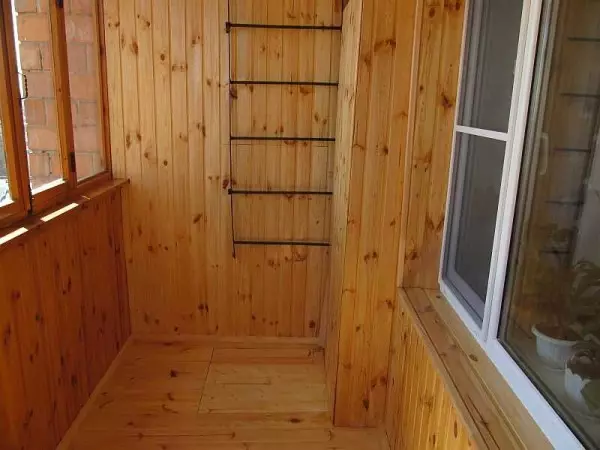
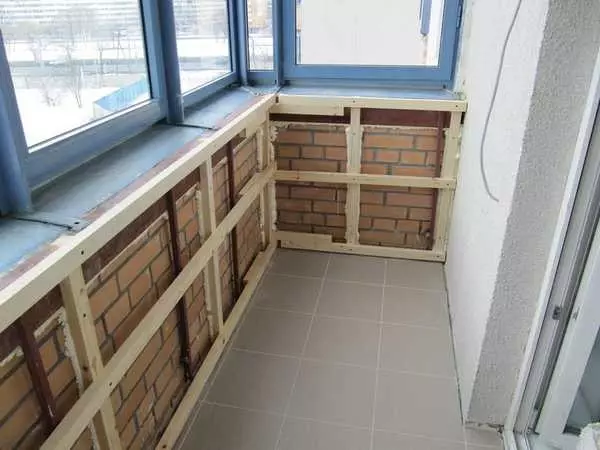
The lining of the balcony is technologically not much different from the finishing of other rooms: first the frame is going to, then the trim board is then nailed. It is necessary horizontally and vertically to align the crate, and then correctly set the first on the wall or ceiling bar, since the installation of all the others is conducted from it. Then the second board is nailed to the first board, then the third and so on, to the angle. On the next wall everything is repeated again.Make the crate
The lining clapboard begins with the creation of a frame - crates. It is most often made from Brousa. The cross section is selected depending on the thickness of the insulation (if any). The bar must have such a size in order to the surface of the insulation remained a gap of 1.5-2 cm. This gap will allow to maintain the normal humidity of the insulation and wood, which will prevent the appearance of fungi and mold.
If the bar of the desired size is too expensive, you can save. Under the crate take the bar of the same thickness as the insulation (or a little more). It is mounted between guides, and on top, perpendicular, stuff a counterclaim. It is made from slats with a thickness of 1.5-2 cm. They will give the required gap. Only at the same time it is necessary not to get confused with the direction of fastening the lining.
An example of a balcony crate under the lining
The lining clapboard can be vertical or horizontal. Planks of the crate under it are set perpendicularly. If the finish is fastened vertically, the doomlet should be placed horizontally.
If there is a counterbalax, the rules change: the primary doom is stuck also (vertically), and the counterclaim is horizontally. With such a system, the bar will be mounted vertically.
More often, the lining on the balcony makes vertically. Accordingly, the installation of the crates starts from the plank below the window block. It is exhibited horizontally, checking in terms of two planes. If the wall is uneven, wooden or plywood lining of the required thickness is installed in the right places. Fasten the crate of dowels.
The planks are necessarily stuck along the perimeter of the walls and the ceiling, retreating from the angles of 30-40 mm. Also necessarily stuff over the perimeter of window and doorways. The intermediate bars are fixed: one strap from the other should be at a distance of 40-50 cm. It turns out on the walls and ceiling frame to which the lining is then attached.
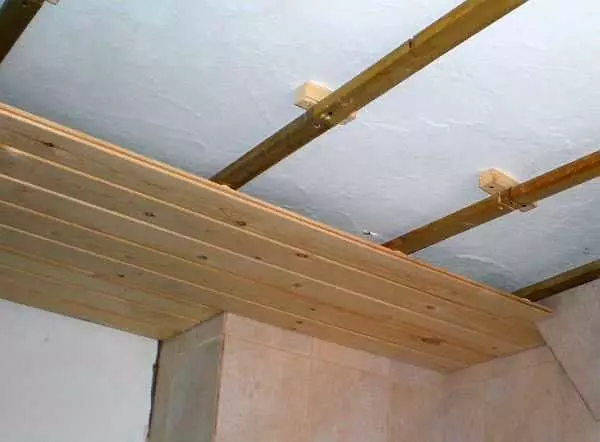
On the ceiling is going to a similar design
The boards of the lining are cut down on a little shorter of the required length (0.5-1 cm). It is necessary to compensate for resizing at high temperature and / or humidity.
Installation Intraction Lining
Fasten them with self-drawers or nails to the laminations of the crate. If you use nails, take a small hat with a small hat - the finish, self-tapping screws - on a tree (better - bright, not black). There is still a fastener option - braces of construction stapler. This is the fastest way and quite reliable. Staples Just take with a long sharpened leg, still suitable T-shaped.
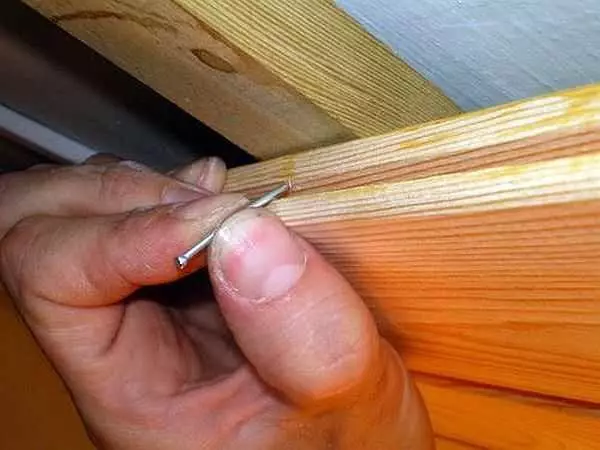
The first bar is installed in the most complex corner for operation. It is set in spike to the angle, check the correct installation of the construction level. They are naked into the ray (in the front surface), retreating from the edge of 1-2 cm. To the wood not split, the hole is pre-triggered by a thin drill. Then they twist the self-tapping screw or clog the nail.
From the opposite side (there is a groove) the lining is fixed with nails, self-drawing, brackets. They are clogged at an angle of 45 ° in spike. It turns out the hidden fastening - it is closed by the next board.
Fastening the lining nail (selflessness, bracket) in the groove
There is one more option - the lining clapboard using special mounting plates - kleimers. They keep well if the spike is long enough, and this most often can be observed from the Euro` Kleimers are installed in the spike (as if they wear on at it). On the other hand, they have a mounting plate with nails holes. This plate is scored one or two carnations with a small hat.
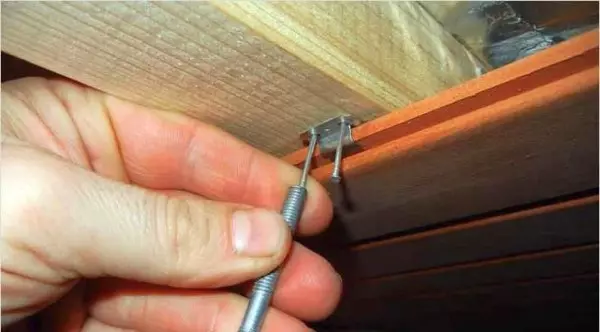
Mounting with kleimers
The first board is fixed to each line of crates, all subsequent - through one in a checker order (alternating). The second board is inserted into the spike first. If it enters a loosely, boils with a small piece of wood attached to the plank. and hammer. Stick with a hammer at the attached tree. Such difficulty is necessary not to damage the board. Torn the spike in the groove, check vertically, the plank became vertically. If necessary, adjust, then nourished. So the entire covering of the clapboard is going. The last bar is sometimes needed to trim in width. It is attached closer to the corner, as well as the first, in the ramp.
The process of mounting the crate and wooden lining is shown in the video.
Fully the process of plating the balcony - from the installation of the outer decoration and before the installation of slopes and platbands, see the video below. Only worked with PVC panels, but the finishing steps are similar. The only difference is the wooden lining there are no starting planks. All the tops and bottoms are closed by plinths, and the corners are corners.
What to handle the lining
When lining the balcony with clapboard, it is necessary to process with antiseptics not only finishing, but also necessarily all the slats of the crate. Below are the most popular protective impregnations and primers. Some of them can immediately give wood shade, not painting, but emphasizing the texture.
- Sezheng Aquadecor is a caloring antiseptic. If you cover the wood with this composition, it immediately protects against mold, fungi, insects, while giving one of the 16 shades. It does not need to use the finish coating.
- Aquatex "Soil Antiseptic" - high-quality protection of the lining under the subsequent finish coatings (for example, under varnish).
- Tikkurila Valtti-Pohjuste (Ticcurila Valtti-Lushyust) The primer antiseptic for wood, protects against bio lesions, but does not protect against ultraviolet. Therefore, the speedy staining is recommended.
- Impregnation manor "U-409". Creates a thin polymer film on wood, through which pairs penetrates, but this film prevents the penetration into the wood of the dirt, while maintaining the appearance of the finish. The composition includes additives protecting against fungi, mold and insects.
On the packaging of each product there is an instruction manual and application. It describes the rules for applying and consumption to ensure protection. Only subject to these rules, you can be sure that the lining and the framework under it will serve for a long time.
If we talk about the verses, most of the modern compositions simultaneously with the change in wood color has both protective properties. For example, Morilka Aquatex (analogue of Sezhen Aquadecor). It has a wide color range, contains a hard antiseptic, protecting wood from damage to fungi or insects.
Handling on the balcony can be made differently. It is convenient to use caloring antiseptics to finish the balcony. One-time processing will immediately protect, and the color will give. But they only give a shade, leaving the pores open. At these pores, dirt can be stuffed. And wash it from there is a difficult task. If you need a protective film that will prevent the penetration of dirt, you can cover the lining (tonned or not) varnish or dirt-sensitive impregnation of the U-409 estate type. The impregnation creates a polymer film closing the pores on the surface, but not giving gloss.
Often there are problems on the sunny side: how to cover the lining on the balcony so that it does not fade. The best tinting is best suited, which blends a little wood. The light wall is less heated and the fading is nestless. It looks such a clapboard wonderful.
If you want to have a brilliant surface, you can use any lacquer for internal work. About the types and types of varnishes Watch the video. It will be easier for you to understand what varnish covers the lining on the balcony.
Painting lining on the balcony of ordinary paint today is already irrelevant. Why spend money on wood, and then paint its texture?. Then you can immediately put PVC. So choose: toning, varnishing, or both.
Article on the topic: Wall panels for kitchen Glass: photos, with photo printing, reviews, video