
Invented in the US, the cabinet has become widely used as the main type of household storage and clothing. In our country, this type of furniture appeared only in the middle of the last century. It is amazing because many of us lived in small apartments in which its advantages are obvious.
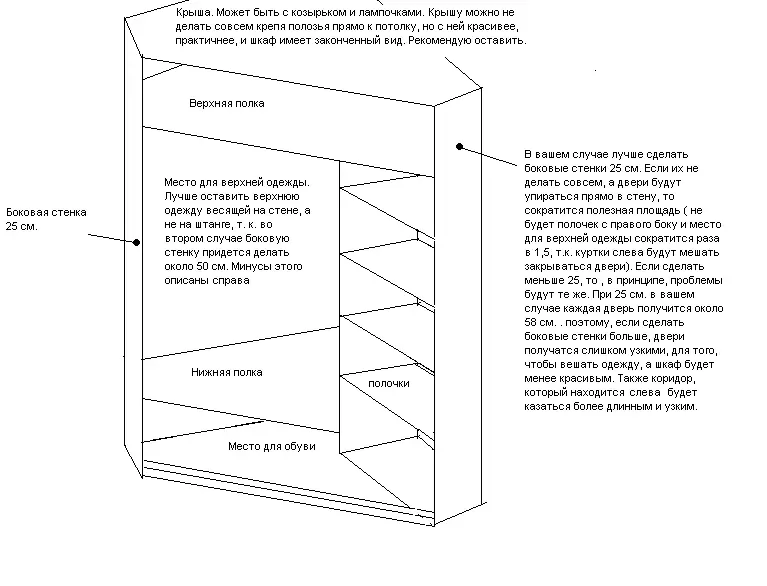
Planning the corner cabinet coupe with the distribution of places for styling things and shoes.
Domestic craftsmen did not hurry to make a wardrobe with their own hands. The reason is that the corpus option, except for sliding doors instead of slad, no more advantages over the custom cabinet for us.
It's much easier to make a built-in wardrobe with your own hands. For its manufacture, it will take significantly less material, and such a coupe can be done on your own even inexperienced joiner. At a smaller room occupied area, such a version of the repository will have a larger volume than the corpus.
Cabinet Couple Device: Distinctive Features
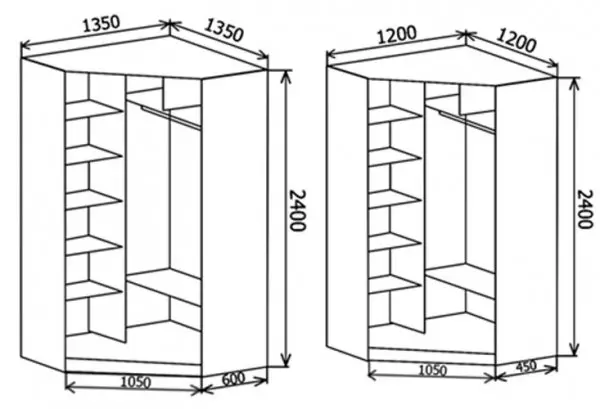
Drawing of the corner cabinet with sizes.
The sliding doors of the first cabinets produced by our industry did not have rollers for movement. Below was the longitudinal spike, according to which the door moved, had a groove along the bottom end.
Such a simplest design was quite reliable. Its disadvantaged it was that to move the doors it was necessary to apply great efforts, because the cabinet itself and the doors were made of heavy material, which at that time was chipboard.
Make a wardrobe with your own hands can be built-in or in the usual mobile version. The angular cabinet can also be independently made by built-in or enclosed.
Corner wardrobe with their own hands should be done with reference to a specific place.
In the plan, it may have a triangle shape, trapezoid, be g or p-shaped. From other species you can allocate a five-liter. This design has a pentagon shape having 3 straight lines and 2 stupid angle.
Article on the topic: Solar collector from aluminum cans for 7 steps
In this manifold and consists of a versatility that has a corner wardrobe. If everything is clear with other forms, the five-ranking requires clarity. This option of the wardrobe, occupying a little large area, is much pacifier than, for example, a triangular analogue.
Stages of preparation for the production of a five-ranger
Making a wardrobe with their own hands, do not try to pour the sheet material at home, from which the side walls and doors will be performed. Manually achieve the required accuracy of the size, especially the corner cabinet, almost impossible. Deciding with the sizes of its sidewalls and doors, it is advisable to use the workshop services, where it is possible to provide the required accuracy of cutting. There is also desirable to process and ends that will be visible outside. Elements located inside the cabinet can be made independently.
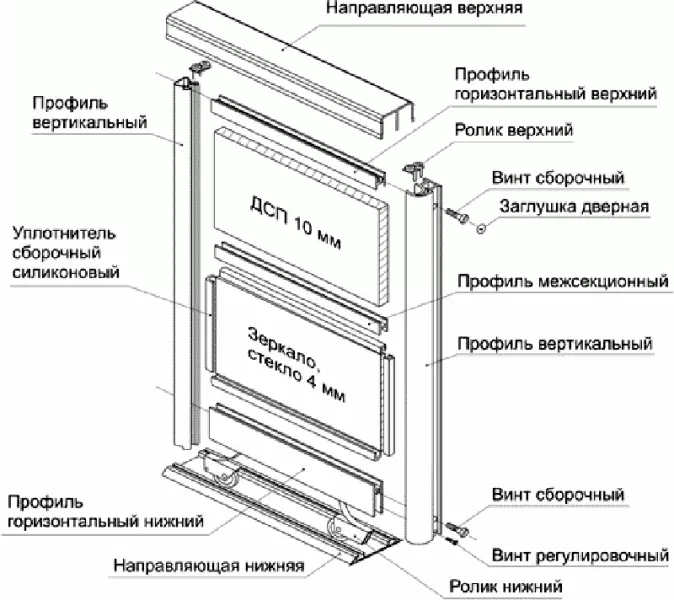
Coupup door assembly circuit for corner cabinet.
Before making an angular coupe with your own hands, check the installation location. This is especially important for the embedded option. Any unevenness of the floor or ceiling in a place where the doors will move, it is necessary to eliminate. Otherwise there will be problems with mounting guides to move doors.
Make sure there are no electrical outlets and other elements that can affect when mounting the wardrobe with your own hands. Consider the size of the plinth and, if available, modeling the walls under the ceiling.
It is impractical to save on the sliding door system. More expensive Italian or German structures pay off due to reliability and long-term operation.
Show a specific design of the carriage makes no sense. There are quite a lot of them, and each of them has its own characteristics when mounting. It is also necessary to figure out how to mount: the size of the cabinet elements will depend on it. More reliable is the option of doors with the upper chassis. At the bottom of the door there will be a roller moving along the guide.
Before you start making a wardrobe with your own hands, you should have an appropriate tool. In the manufacture of the built-in option requires a drill perforator. It will take power tools for screwing screws. It is desirable to have a manual circular saw with the guide line. A manual saw is also suitable.
Article on the topic: Making the metal detector do it yourself
The angular clamp, the roulette, stapler, a soft and solid hammer, drill with a drill set, hex key to turn the confirmates. To drill holes for configmatics to a predetermined depth, the confirmable drills will be required. For simple drill, a limiter can be used.
It is necessary to purchase seats, supports for shelves and selflessness.
Drilling holes in chipboard - main operation when assembling furniture
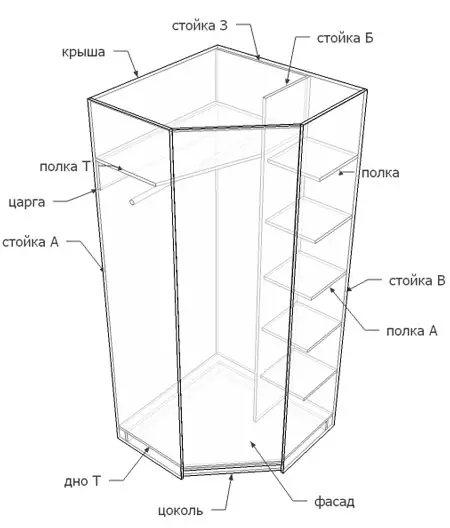
Diagram of the device of the corner cabinet coupe.
To bonded panels made for furniture from chipboard, use confirmates. Usually, confirmates are used for furniture with the size D × L = 6.4 × 50 mm. In such an attachment d = 4.4 mm. The diameter of the hole for it should be in the range of 4.5-5 mm. With a larger diameter, the mount will not be reliable, with a smaller - the confirmation can destroy the material Fiberboard.
For drilling holes, special drills are used, which are drilled to the depth L and provide the appropriate dimensions in the upper part of the confirmation (H and H). After the surface of the coat under the Hat is annpus. Complete confirmation, without applying great effort, a special hex key.
3 drilling options:
- drilling for full thickness;
- drilling in the end;
- Drilling in 2 details at the same time.
Another, the most difficult version is drilling under the sewage. A general condition for all types of drilling is the perpendicular position of the drill to the surface.
Consider the drilling option in 2 parts. The parts are applied to each other and fasten with an angular clamp or other fixture. After that, mark and drill. This option is the fastest and accurate. To determine the label in the thickness of the chipboard, it is desirable to make a pattern from a tree or aluminum corner. If the chipboard thickness is 16 mm, the center of the hole in the template must be smoothly in the middle.
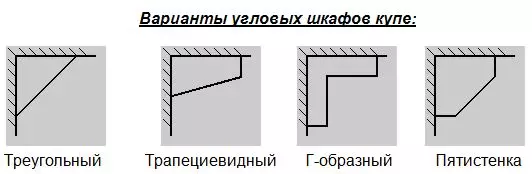
Variants of corner cabinets coupe.
If the parts are connected so that the holes are drilled apart, then the strength of the mount depends on the accuracy of the markup. So you have to drill when connecting parts to the seats. For example, to install the cabinet cover on the sews in it, first make holes with a drill with a diameter of 8 mm with a limiter that does not allow to drill it through. Holes from the edge of the cover are drilled taking into account the sidewall, if it is provided. The same drill make holes in the sidewalls to a depth of 20 mm. From the accuracy of markup and depends, whether the woven will fall into the holes. In the ends, the seats are put on glue. When assembling, pour glue into the holes on the wizard cover is not recommended, you may have to disassemble the cabinet.
Article on the topic: How to put a large layer of plaster?
Especially easy to assemble the built-in wardrobe, which will have only 2 sidewalls, enshrined perpendicular to the wall. These parts are fixed reliably to the ceiling, the floor and wall with the help of the corners. The corner is fixed to the base with the help of plastic dowels and self-tapping screws or screws. The sidewall to the corners are fixed with self-drawers. Between these elements and it is necessary to secure the door movement system.
With appropriate preparation of problems with the assembly of the cabinet should not occur.