
Almost every person who at least once in his life did something about her own hands, begins to experience his effort once again with time. After all, it is so nice, every day see the result of your work, especially if this workout becomes a noticeable emphasis in the interior of the house. Such an accent can be a new glass table. Some wonder how to make a glass table with your own hands.
The glass table does not absorb moisture and fat, and also very easy to care.
The process of its manufacture requires caution and accuracy, but the final result is worth it. A little time, and you can proudly demonstrate to familiar and relatives a new subject of the interior, made independently. Consider how to make a glass table.
Pros and Cons Glass Table
Advantages of a glass table:- Suitable for any interior;
- hygienic;
- easy to care;
- relatively light;
- does not absorb fat;
- Glass can be treated by any cleaning agents.
These tables have enough tangible minuses. Table tops made of glass do not quit the sound, so the operation of the table is accompanied by characteristic sounds. With bright lighting on the glass becomes noticeable divorces and prints.
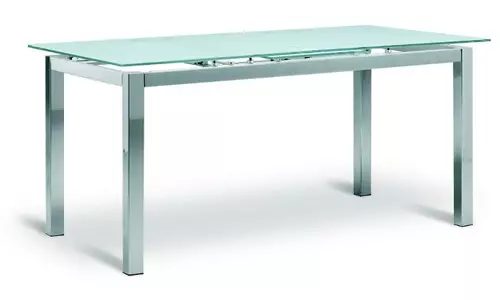
How to make a glass table with your own hands
Scheme connecting glass countertops and racks.
First you need to choose the shape, style and size of the table. It can be an ordinary rectangular glass table in the style of high-tech or in the style of an eastern fairy tale. It is necessary to decide what role he will play in the already established interior. After all the tasks are defined, it remains to prepare the necessary tool, materials and on the road!
Article on the topic: Arbor with mangal, do it yourself: drawings, photos and videos
For the manufacture of a glass table will be needed:
- glass cutter (it can be diamond or roller);
- Pliers with rubber gaskets;
- Metal ruler;
- rubber hammer;
- The material itself for the manufacture of the table (better if its thickness is at least 6 mm).
Glass for the manufacture of the table can be chosen any. It can be transparent and matte, colorless and colored, smooth or textured and many more options.
But if you take the usual transparent glass and then decorate it with any method, then you can get a unique object of the interior at the output.
The choice of material for the manufacture of the underground can limit only the fantasy of the wizard. For these purposes, you can use wood, metal, plastic glass. In addition to the main countertop, an additional shelf can also be included in the table design.
Cutting glass
Cutting glass countertops.
In order to cut the table top of the desired form, it is necessary to apply its future contours on the glass. It is better to produce these works on a special table so as not to tolerate the workpiece from place to place and not subject it to risk being broken. First you need to practice on the cutting of the glass, then the tabletop itself will be cut a little easier. The incision must be performed using a metal line. Pressing the glass cutter is determined by its sharpness. So, pressing the diamond glass cutter is required not as much as on the roller.
It is necessary to comply with safety measures when working with glass! Be sure to wear gloves to avoid hand injury.
After completion of the end, it is necessary to separate the edges of the glass. You can do it with your hands or using pliers. In addition, there is a special device needed on the glass cutter in order to split the thin edge. As a result, we get a glass countertop required size and shape.
The next stage of manufacture - processing the edge of the glass. You can perform this or manually, or using a special machine. For manual glass processing, you will need a file or elastic bar. When using a file, you will need a fluid for wigging. It can be turpentine or kerosene. It is necessary to work especially carefully. Movements should be uniform and smooth. After the rough processing of the edge of the glass, it must be seized and polished. You can do this with a drill or a grinder using a special nozzle. For grinding edges, the graininess of the emery circle is consistently reduced. Water surface with a special paste and felt.
Article on the topic: How to use bucket for plaster, manufacturing technology with your own hands
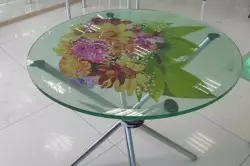
Figure 1. To make the drawing on the glass table damaged, it is necessary to apply it from the reverse side.
So, the base of the countertop is ready. Now you need to make a prestole. Options here can be a lot. It remains to attach a tabletop to the podstol.
The mount is carried out using special suckers and glue. In order to fix the suction cups on the legs, they need to drill or cut holes. The glass to the suction cups is fixed with a special glue, which dries under the influence of ultraviolet rays.
Glass table ready. It remains to decorate it. Here are the most common options.
Painting glass in stained glass
Materials:
- palette (it is better to use a piece of the same glass);
- stained paints;
- stencil drawing;
- contour paints;
- White paper;
- solvent;
- stationery knife;
- wool;
- ammonia;
- water.
First you need to deflect the surface of the glass well. Then you need to fix the pattern of the drawing and carefully translate it to the glass with the help of contour paint. If it turns out not very carefully, you can be removed unnecessary using your wool. If the outline is thin, it is possible to fix it using a cotton wand or toothpick.
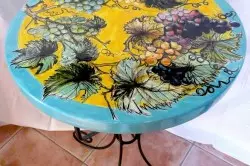
Figure 2. After painting the drawing, it is necessary to cover the layer of varnish.
After the outline is completely transferred, remove the pattern of the pattern and secure the glass to the leaf of white paper. We mix stained glass paint on the palette to get the necessary shades and apply to the prepared sketch (Fig. 1).
From the bubbles of bubbles, you can get rid of the toothpicks. Ready drawing must be finally dried. To decorate the countertops, this technique is better to apply from the bottom side of the glass (Fig. 2). For greater strength, the surface is to cover the layer of varnish.
Decorating tabletop sandblasting glass processing
The most important thing in this technology is the selection of the appropriate to the overall style of the interior.Tools and materials:
- quartz sand, sinking and dried;
- sandblasting pistol;
- stencils.
Article on the topic: Original hanging shelf for wine and glasses do it yourself
The surface of the glass is thoroughly clean and degreased. Stencil fix on the surface of the glass. Capacity of the sandblasting pistol on 1/3 fill sand. Connect to the compressor equipped with a gearbox. We begin processing the surface, which, depending on the size of the sand particles, can be a grainy or velvety. After the processing is completed, we remove the stencil. Tabletop is ready.
Technology etching glass
This technology is somewhat similar to that described above. Only to create a matte surface here is not mechanical, but chemical processing.
Materials and tools:
- brush;
- stationery knife;
- Paste for etching;
- copy paper;
- polyethylene film;
- latex gloves.
Stencil for decoration can be purchased ready, but can be made independently. It is best to make a stencil from self-adhesive film. It is necessary to firmly fix the stencil on the tabletop. Brush apply to free areas thick layer of paste for etching. IMPORTANT: Be sure to work in rubber gloves! Do not allow to enter the skin on the skin. In case of hit, it is necessary to rinse it immediately with a large amount of cold water. The exposure time paste is indicated on the package and on average ranges from 6 to 10 minutes.
After the end of this time, the glass must be rinsed with plenty of water. Now you need to dry the glass with a lounge fabric. When the glass finally dries, you can remove the stencil.