
Is it possible to perform bas-reliefs in the interior with their own hands?
Bas-relief you can decorate not only the facades of buildings, but also the walls indoors.
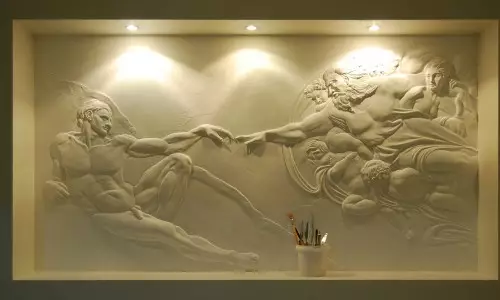
Each designer or the host of the room where the repair is to do, wants to decorate the room with an unusual method. It can be painted in bright and bright colors of the wall or unique furniture that residents of apartments could admire and their guest guests. Today at the peak of the popularity of stucco from plaster or clay in the interior. The correct name of this work of art is bas-reliefs.
They are now decorated not only the facades of buildings, but also the walls in the rooms, apartments, private buildings. Bas reliefs on the walls give the room solemn and majestic notes. Finished shapes, which are later simply glued onto the walls, can be purchased in a specialized store. It is also possible to make bas-relief with your own hands. There is no need to study the technique professionally. It is enough to carefully study the sequence of work and the structure of this decoration.
Bas-relief nucleation as works of art
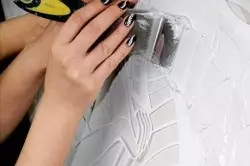
White clay is applied on a sketch with a spatula.
The bas-relief has a second name - the burner. The first name in French means "low relief", the second is "high relief." Bas-relief is a kind of sculpture relief, where the convex image performs from a flat background.
This type of art is deeply rooted in the Paleolithic era, where rock-relief images performed. Subsequently, this type of decoration has already acquired in the ancient East. There, similar reliefs reached huge sizes, not one hundred people worked on them. The founder of the bas-relief as decoration is an ancient Egypt. It is here that such a sculptural work of art began to decorate the tomb of pharaohs, their images are not solved to this day.
Varieties of bas-relief
The bas-reliefs are divided into species on the material used in the manufacture of this decoration.
They are sculpting from clay and gypsum, and also carve out of marble and cut out of wood. There are more complex species in casting from alabaster or bronze. To portray such a sculpture, you should have not only skill, but also professionalism.
Article on the topic: Transforming tables - 30 models
In addition, bas-reliefs are divided into species depending on the image itself:
- Scene-visual - pictures are displayed;
- Ornamental - draw patterns.
If you deepen further in varieties, you can see that similar reliefs are divided into:

The picturesque bas-relief will look beautifully indoors with high ceilings.
- flattened;
- scenic;
- Multiple and others.
Each of them has its own features. Some have the effect of applying shadows. Bas reliefs have many varieties. Each of them is unique in its own way.
In the modern interior, bas-reliefs are used from plaster depicting any plants, colors, sometimes fruits. Images of people or other complicated elements are purchased ready, in the form of a conventional picture in the frame. They are glued or hanging on the walls, or in the repair process insert into special niches to preserve the effect of carved sculpture.
Bas-relief with your own hands
Specialized stores offer a huge selection of finished sets that allow you to make bas-relief with your own hands. You can use separately acquired components to create this unearthly beauty.

The formation of the surface of the bas-relief can be achieved by applying a special varnish for cracker.
For the manufacture of bas-relief it will be necessary:
- Ready solution or individual components: Gypsum, cement, alabaster, etc.;
- wood cutters;
- transparent film or finished stencil;
- varnish or paint to impregnate the finished image;
- Tile glue, nails, screws and all the necessary tools for fastening the finished picture.
The manufacture of the bas-relief passes in a certain sequence.
Application of drawing
The process of applying the picture passes in different ways, depending on which type of bas-relief was selected.
If it was decided to make a picture, which is then attached to the wall, comply with the following rules:
- From the primary materials they collect a frame for a picture, he must resemble a certain tray with low sides;
- The shape is covered with polyethylene or food film, here the most important point is smooth flooring, that is, it is necessary to achieve the elimination of folds to the maximum;
- The solution purchased or prepared according to the instructions is poured into the resulting form;
- waiting for complete drying of the form;
- After complete drying with special suitable cutters, you need to apply the contours of the picture, here you can use the finished stencil.
Article on the topic: Patchwork, do it yourself: Sewing schemes, master class for beginners, how to sew, photo, step-by-step instructions, video equipment, patterns
After complete drying, the bas-relief can be painted by quick-drying paints.
If the bas-relief is made immediately on the wall in the form of stucco applying, surface preparation should be prepared. It is cleared of any contamination and old coatings. After reaching the perfectly smooth surface, the wall is ground and give it to dry.
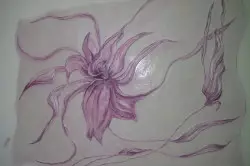
While the wall dries, you can make an outline of a future image. If it has small parts, you can use the usual printout printing on the printer in parts. Then each part to translate into a transparent film. As soon as the wall is ready, to read the line on it along the contour, collecting the whole drawing together. If one large figure is used, for example, a large convex flower, then you should resort to the children's way to translate pattern. For this, the wall is discharged into squares and carefully evaporate the image contour. To this method, you must contact the case when there are no painting skills.
Establishment of relief
In the first case, when the panel is created separately from the wall, proceed to the creation of the relief after complete drying of the shape and the application of the contour. From the newly prepared mixture, the volume is increasing in accordance with the contour. It is better to do this in several layers, each of which should face a little. It is easier to notice surplus and eliminate them. If deposits are assumed, here you can use in two ways. In the first case, the background in the same sequence as the relief of the picture should be built. After reaching the desired width of the recess, the background is thoroughly aligned and polished.When the image is applied on the wall, the creation of the relief occurs in two stages. At the initial stage, it is necessary to perform a rough version, that is, simply fill the necessary zones with a mixture, cutting off everything too much. After that, give a rough layer to dry. Next, proceed to the completion of the relief. It will take a lot of patience to achieve clear and straight lines. Therefore, it is not necessary to start fulfilling complex images. It is enough to use a simple bulk pattern in the form of an ornament.
Article on the topic: Install the slopes for the entrance door
There is a simpler reference method that is suitable for both cases. It is in the form of pre-prepared embossed areas. On the finished pattern, create forms that are poured with a mixture and give dry. The finished elements are glued to the wall or shape of the picture frame, and the seams are melted with plaster and are cleaned with eats.
Installation of bas-relief
Separately prepared picture glued to the wall with tiled glue. It is applied to the wall, and on the tile. If the resulting picture has a heavy weight, you can use nails or screws. They are driven down at the bottom of the bas-relief so that they come out only 2/3 of the thickness of the tile. In the case when the finished tile weighs too much, you should use the method of deepening into the wall. For this, a niche is prepared in advance and panels are glued into it. The seams can also be hushed out with a solution and to open.
With a bas-relief made on the wall, are applied as follows:
- Ready relief should be carefully taken by sandpaper.
- Then carefully clean from dust. All shutters and seams are cleaned here. To this process should be approached carefully and with responsibility.
- Bas-relief ground using a special brush.
- Next begin coloring the relief. Here we use water-emulsion paints. If there is no staining in several colors, it is necessary to use white paint. It covers protruding elements. In this process, it is better to use the sponge, it will be able to put the paint with a smooth layer without surplus.
Of all the described, it becomes clear how to make a bas-relief. It is not imperative to make it. With this can cope any person who has never been dealing with stucco. The finished bas-relief will delight the owner and bring the guest guests delight.