
For the manufacture of such doors, various materials are used. You can choose violent, panel, single-tree, veneer, from MDF, chipboard, plywood or connecting several materials. The device of their design, the opening method is important for those who want to save space, in addition, some such doors are stylish, trendy and beautiful. In the latter case, we are talking about sliding or sliding doors. To set the skill doors with your own hands, you need at least skills and tools.
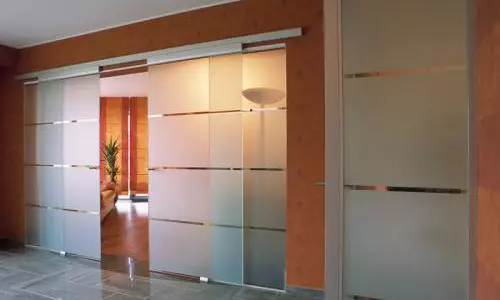
Retractable doors are very comfortable, as they help save space in the room.
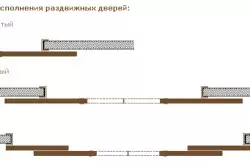
Basic characterizing data
To make the installation qualitatively, you should know the basic structural elements. Such doors are bivalve, single-student. Their fastening and guides can be upstairs or lower or there, and there. If desired, the guide can be drown in the floor or ceiling. It is important to determine them with high quality, because sometimes they rattling, this especially applies to the doors with one guide. There are harmonica doors, they consist of two and more folding sash. Doors consist of sash that happens:
Design of retractable doors.
- parallel-sliding;
- Sliding-folding.
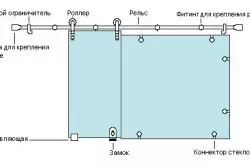
Interior doors are movable, most often for them use lighter material, although some options are made of solid woody arrays and glass elements. Wood board, glue composition of wood, chipboard, veneer is most common in their manufacture. There are also options from shockproof glass, connecting it and wooden parts. Original and simple execution of such a device from the frames like the bagent, covered with a special cloth. Retractable design consists of such elements:
- Rails under the carriage, rollers;
- fastenings, restricters fixing parts;
- sash, planks, platbands;
- Fittings (lock, handles).
Sliding mechanisms exist two species:
Article on the topic: Balcony and loggia What's the difference: Detailed review
Retractable doors have bad sound insulation, so it should be considered when they are installed.
- built-in (hiding in the wall and invisible);
- Hinged (visible on the wall).
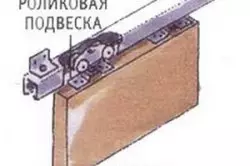
The design of these elements may differ for each type of doors, but the principle of action is the same. Rollers are performed from the material covered with silicone, silent bearings are located inside them, so there are very few noise when the doors are working. Folds have at least two such rollers. If the doors are heavy, about 80 kg, or large dimensions, then they are equipped with a large number of rollers - four on the sash. Positive features:
- Space is saved;
- Easily open, resistant to drafts, air turbines;
- You can install an automated system.
They have some negative moments:
Return door mechanism.
- low noise and thermal insulation, they do not put them on the bathrooms, bathrooms;
- Castles and fittings are more expensive than for ordinary;
- The wall plane, along which they move, should be free from decorative items, wires, etc.
The roller mechanism can be both the top and bottom or at the same time place and at the top and below. The advantages of the top only - in additional aesthetics: the doors are hung over the surface, there are no thresholds, but the design is a bit unstable.
Tools and installation materials
- Screwdrivers of various sizes and species.
- Screws, bolts, screws.
- The cutter or parquet saw, if the canvas is independently made.
- Drill and drills for fastening holes.
- Pencil, roulette, level, plumb - for marking and checking evenness.
- Door design (canvas, guides, box).
Installation: Practical recommendations

Fastening for the door leaf need to be chosen depending on what material the door itself is made.
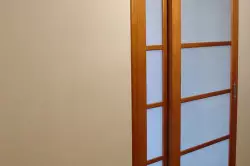
The interroom can be made independently, it is enough to have some skills and necessary tools. Basically, the design of simple doors consists of two or one sash moving on the guides.
Article on the topic: Stencils for the ceiling with your own hands will help in the room design
Installing them is not so simple, as it seems at first glance. Below is a phased process of fixing them and bringing a functional view with some independent work on their manufacture.
The design is attached to the wall surface. Its level is noted. Now it is trying in the opening, it is noted on top. It is necessary to carefully make sure that it will rise smoothly. 70 mm are counted to the ceiling, this mark is indicated by direct horizontally. It is here that a profile fixation place.
Fucked by self-drawing to the wall of the timber 50x50 mm. It is widerly twice in length than the opening, and is also set strictly horizontally. The profile is fixed to Brusa, his end. It is important to ensure that it is direct, and to arrange it as much as possible regardless of other elements, including the bar.
Then calculate the place under fastening on both sides of the profile (the thickness of the web is divided in two, the distance from the wall is added to the result). It is easily fixed by self-drawing. They do the same on the other side.
Options for performing sliding doors.
Bolts are inserted into the carriage not to the end, they face a little. The collected carriage will turn inside the profile, check slip.
Rail parts are installed to limit the stroke. Next, 15 mm are counted from the frame edge, in the middle drilled on the sides of one hole. Under the profile below there is a groove strictly in the center. The carriage fixation elements are mounted in the middle on the canvas, while retreat from the ends of 2 mm. Cutouts in brackets are turned to the wall. The design is hung, it is attached to the profile, the cutout on the bracket on the right is combined with the carriage bolt on the right.
Nut with a washer is placed on the outside of the bracket, the bolt is screwed into it.
Staples are fixed, the bolts are not delayed. A part of the bottom is set down, the profile in the lower groove is mounted. It is then with an adjustable blade returns to a horizontal position. The blade latch is installed in the "open" state. The gap between the wall and the doors is adjusted to about 5 mm, this is done like this: the part of the sash is deflected from the bottom until the wall is reached, the blade place is noted. The nuts in carriages are unscrewed, the door is removed and the bottom profile is fixed on the self-tapping screw.
Article on the topic: Homemade simulator Hyperextension (drawings, photos, video)
The sash is plugged again, the carriage bolts are at the holes of the bracket, the nuts are not turned off completely, the gap between the sash and the floor is adjusted, it is 5-7 mm, the nuts are fixed. Mounted cover-platband. It is made folding to get to the sash if necessary. The above installation method is suitable for self-made sliding doors. And in the finished form they are sold complete with all the necessary spare parts. It includes standard:
- canvas, box;
- Accessories, guides, rollers, bolts, fasteners.
Mount the finished interroom door will not work. Stages of the installation of doors look like this:
- The guide is fixed on top, between it and the wall is left 15, 20 cm to install a platband or plinth;
- Sliding interior doors are mounted into the guide, limiters are recorded on the edges;
- At the top of the retractable mechanism, the fastening brackets are fixed, the lower profile is fastened on the lower end;
- Staples are put on, interior doors suspended on a carriage boot for adjustment, leave the gap between the web and the surface;
- When fixing and installing the guide on the floor, the axis along the retractable canvase should be symmetrical;
- Stroke limiters are attached using a special screw;
- To give an aesthetic type of construction, decorative overhead elements are fixed on the mounting bar.
Next, fittings are mounted, the design is ready. Good luck in repair!