
Those who love to make and make repair with their own hands, may have a desire to get acquainted with how to collect and install interroom doors. In fact, this process takes a certain time and requires effort. Therefore, at the very beginning, you should familiarize yourself with all the stages that have to go, and then be accepted for work.
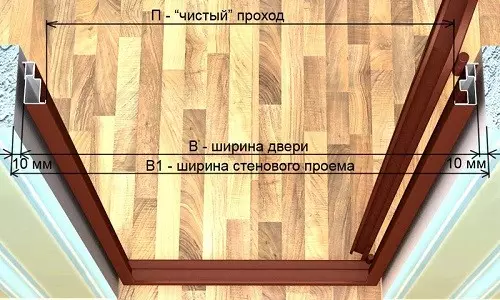
Right measurements of the doorway.
First of all, the interroom door is collected, and then they are engaged in installation. So that the products are without gaps and other defects, you need to perform the following steps:
- Prepare a premises;
- Prepare a doorway;
- Processing consumables and tools;
- Collect the product taking into account its design features.
Stage first: Premises preparatory work
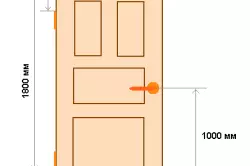
Scheme with the size of the placement of loops and handles.
Buying a new door, you should be prepared for the fact that the doorway may not match the size. Therefore, before going to the store, it is advisable to remove the size of the opening, and then the new door is taken into account, which will have to be installed in place of the old one.
Next, pay attention to which the doors are selected: in the kitchen, bathroom, restroom, etc. Why is it so important? Because in each room has its own communication, which by the time of installation should already be ready. The same applies to the pipes of the water supply or heating. They are installed taking into account the necessary inclination, and it is better to entrust this to a professional.
Exclusive lovers should pay attention to wiring. Now it has become fashionable to design interior doors with backlit. So, all wires must be pre-divorced to the necessary points.
Door installation scheme.
And how to prepare a doorway? Above it was indicated that special attention should be paid to this place. First of all, you should remove the old opening. At this stage, it is possible to damage only the box, the walls themselves should be preserved. Many are trying to save by installing a new door to the old jamb. As practice shows, it does not lead to anything good. The door can at least not enter the box, but as a maximum - in the closed state, leave significant slots or not closed.
Article on the topic: Fantastic living room in the style of Hi Tech do it yourself
After dismantling the old frame, markup is made, with the help of which the location of the door handle is designated, the opening method (inside or from the room), etc.
We should not forget about stripping, which implies the removal of excess finishes, such as slices of hanging cement, etc.
Installation and tools for it: Recommendations

Table size of doors in GOST.
Regardless of the type of door installed, the installation has the main classic stages:
- Assembly and installation of the door frame.
- Door hanging.
- Installing enough details.
- Fastening of platbands.
As for the toolkit, he is as follows:
- drill;
- screwdriver;
- Perforator;
- a circular saw;
- Wood hacksaw;
- building level;
- a hammer;
- yardstick;
- nail holder;
- kiyanka;
- Stuslo;
- chisels;
- Dowels, selflessness;
- Scotch, which is used in painting;
- foam assembly;
- Wooden struts and wedges.
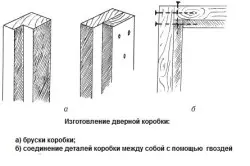
Door box making scheme.
A small advice from specialists: to control the smooth installation, it is best to have a plumbing at hand. If you use a rubber image, there is a chance that traces will remain on the surface, so it should be replaced with a wooden one.
To secure the frame, the dowels are best suited. And when it comes to the loop, it is better to trust this task with yellow-fashioned galvanized self-robes. Standard fasteners are not particularly reliable.
In order not to purchase separately wedges and struts, they can be made independently, and the entire process of the workpiece should pass along with the installation of the door itself, as it is that way that you can choose the right dimensions.
Stage Second: assembly and installation of the door frame

Scheme of maximum gaps when installing loops.
First of all, the process of placing gaps is carried out, while it is necessary to take into account the flooring. If interior doors are designed for residential premises, then the gaps are best done in 1 cm.
The order of collecting the box is as follows:
- The pouring bar is roasted under the looping, that is, two elements need to be adopted, then the line marks, after which the neat propyl is made and from the end it is cleared with a chisel.
- Next, the pouring and looping bars are connected by self-drawing, and the connection angle should be 90 °.
- After that, loops are attached to the looping bar.
- Then three logs are connected and the door is put on. Ceiling Lutka is adjusted at the end.
Article on the topic: Warm floor in a wooden house: species and country appliances, electric heated air, private house
To lock the box, it is recommended to use pieces of cardboard or organic, but only so that they all have the same thickness. This will help ensure gaps between the edge of the door and the box itself. They will be 0.3-0.4 cm. But here you should control the wedges during the twist of the screws so that they do not go freely.
To the door correctly function, special attention is paid to the cutting of fittings.
To mount the lock, you need to perform the following steps:
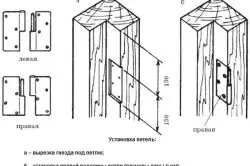
Installation of loops per box.
- Checked door fit. For this, the door leaf is inserted into the box, after which the loop edges are connected. From the top and on the sides, the intervals are measured, which should be equal: from the floor - up to 4 mm, the remaining 2 mm. If they do not correspond to these sizes, the edges of the canvas are plane.
- Next is the placement of nests. To this end, the loop side is carried out by a line, measuring from the top pre-15 cm. Then the loop is applied along the contour and the lower side of the element is marked. After that, the reysmaus is installed between the central and edge parts of the plate, the line from the front side along the edge is stated. Next, two contours are connected. As soon as work with the basic markup is completed, the location of the subsequent loop is measured, while 22.5 cm is receded from the lower edge.
- Then deepening with the help of the chisels, bevel and the xy. Recovering the edges by 0.2 cm, the material is cut into a depth equal to the plate thickness. In order for the process to be correct, the chisel is held at an angle of 45 °, and the blows are applied clear and sharp. We should not forget about the evenness of the edges, for which the chisel on the line is installed vertically and cleaned chips.
- To hang out the interroom door, the loop is placed in the upper socket, while placing future holes for the screws, after which the loops are fixed. Next, the door canvas mounted in the box itself, wedges with wedges, similar marking is done on the jam. Then the loops should be fixed on the sash through screws.
- Work occurs on the layout of the location of the castle, spindle and wells under the castle. After that, the holes are drilled at the prepared points. The lock is fixed using screws. The last moment at this stage is the attachment of the taking overlay.
- With the help of chisels make notches for the tongue of the lock and the tie. To fix the door frame in the opening, use wedges. Their fixation should be tough. So that the Lutka does not lose its form while strangling by mounting foam, the struts are installed.
Article on the topic: How to make a luminescent lamp with your own hands?
Stage Three: Flashing of the Cloth
After the doorway is equipped with a box, and it, in turn, is fixed by the wedges and is suspended with struts, you can hang the interroom door. But first, the distance between the box and the opening is melted and the time is given so that the filler is removed.
So that the surface is not spoiled by the mounting foam, it is pre-wrapped with painting tape.
Then the door canvas are hung to see how smoothly the box is made, whether the door will be freely open and closed. If everything is in order, it is removed and carried out work on the appearance of seams. For this, the remnants of the hardened foam are cut, the seams are placed, after which the door is completely hung.
Then the installation of platbands. But before being taken for them, all the works with the walls must be completed, whether it is pasting wallpaper or something else.
Collect and install interroom door does not hurry. After it is installed in its place, it is recommended that it is recommended for it 3-4 days to observe if a poor-quality cloth was used, it can skew it or it will not be well open and closed. In this case, everyone will have to do first.