
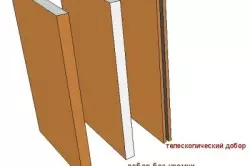
The installation of interroom doors can be performed in the opening of the wall of arbitrary thickness. At the same time, the boxes for interior doors are offered with just a few standard depth rates, which almost never exceeds 100 mm. On the remaining part of the opening, you can perform slightly, but it is long and difficult for a novice master. A much more technological and aesthetic solution will be the installation of a good.
Door box with bad peers.
Tools and materials
Before starting work on installing interroom doors, you need to stock all necessary.
List of tools:
- roulette;
- level;
- pencil;
- hacksaw;
- drill;
- chisel;
- a hammer;
- Stuslo;
- Corolnic;
- gun for glue;
- Electrolzik or disk saw.
List of materials:
DOWERS for interroom doors.
- carton set;
- hidden fastenings for a box or direct suspension;
- canvas;
- Dobly planks;
- platbands;
- Sheds;
- Scotch larger;
- Saws.
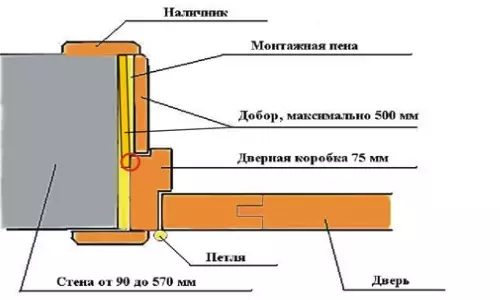
Before purchasing interior doors, it is worth carefully to measure all the parameters of the opening and adjacent wall. For the normal operation of interroom doors, they must be installed strictly vertically flush with one side of the wall. The wall itself is very often rooted in one or the other side. As a result, the platband does not fit to the wall in the upper or lower part. The problem is solved by installing telescopic platbands.
The same applies to the challenges. When using a box with a groove for a good, focusing deviations in the wall geometry will be easier. It is not worth buying a box without a groove even when installing interroom doors in the opening of a wall with good geometry. Dog joint with a box through the groove allows you to customize the items to any width of the opening.
Special hidden fasteners for installing the box to purchase in any store will not work, but these elements allow you to hardly fix the side planks with a specific gap and set them in terms of level. In fact, most installers are perfectly bypass without them using traditional fixation methods.
Article on the topic: Store things on the wall: Organizers, buckets, baskets and other storage ideas
Assembling boxes
If a block with a universal box is purchased, before the installation starts, it must be adjusted under the size of the canvas and collect. The box is laid out on the floor. The canvas is placed between the side planks on the bee. The top plank is applied in its place. On the perimeter of the canvas, 2,5 mm cleaners are set to side straps and 5 mm to the top. On the upper trim, marks are made in the target with the side.
Installing a good door to the entrance door.
From the bottom end of the canvas on the side planks, 10-15 mm is postponed. For kitchen doors and doors of rooms with boilers and gas speakers, this size is increased to 40-50 mm for normal air flow through the gap between the web and the floor. 20 cm from the ends of the canvas marked the locations of the loop.
According to the marks made, all 3 strips are shortened. To perform perpendicular cut, it is better to use a stubble. Otherwise, you need to schedule lines on the coal and try to keep the knife vertically. The upper floor is cut with a hacksaw on the labels and shut off by the chisel in the zones of the upper and side planks.
Under the standard carports of the chisel, excess material on the canvas and one of the side planks are selected. After that, they are fixed by self-drawing in the prepared seats. When using "canopies, butterflies" is not required to choose the material. They are just screwed. To eliminate the cracking of the material of the hole under the self-tapping screw, is pre-drilled.
Drill holes and screw the side planks to the top better with the canvas attached in its place and the gaps. To connect the parts into the ends of the side elements through the top, it is screwed up by a pair of sampes on a tree of 75 mm long. In the upper jumper you need to make rugs to combine sobers. DOORS Better to cut down the length of the box elements before its installation, the width is determined later.
Article on the topic: Nutrition curtains in the interior - advantage and photos
Fastening boxes
Door design.
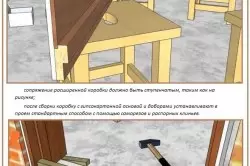
Installation starts with a plank mounting with canopies. It must be set up in the level in two planes and in the target with the wall. With a mounted wall and installation with telescopic platbands, the box is installed at the twelve point itself. You can even drown a little more so that the taper is not stuck in the eye. The remaining elements of the box are exhibited with a hungry canvase. If there is a correct primer and gaps, then the planks in their place.
To fix the box, the selection of hidden fasteners are used, direct suspensions screwed through the material of the self-tapping screw or dowels. The latter are hiding behind a removable entrance. If the bee and the box are made in a solid part, for hidden installations, they are placed behind canopies and a retaliatory latch. This variant of the arrangement of hardware is suitable if the outlook material is not inclined to cracking or in the right places there are mortgage parts.
In the mounting position, the box is crushed, the clearance around the perimeter is wetted and filled with the mounting foam. The extrusion of planks inside the opening can be prevented by closing the door. To prevent the canvas to prevent the canvas in the gap between them, tile crosses, cardboard, matches and the like are invested.
Fastening of Dog and Put
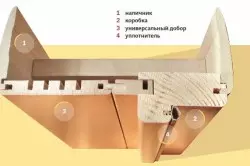
Types of kind on interior doors.
Dobors are inserted into planting grooves. Each of them has two extreme draft labels in the plane of alignment with the wall. For the accuracy of finding the desired point to the wall, any guide is applied. Dobors are removed from the grooves. To get finishing labels, you need the distance from the outer end to the draft tag to postpone from the inner end. According to new final labels, the line is carried out, on which is cut off superfluous.
The obtained parts are installed in place. The clins are placed between them and ends of the opening, which eliminates the gap in the place of adjustment to the box. In such a position, the goodness is intercepted by painting scotch for the adjacent wall. We need to try to arrange the goodness exactly perpendicular to the wall. To do this, you can use the coal.
For final fixation, mounting foam is used. It should not fill in the groove completely. The foam is made point in 10-15 cm increments.
This will allow her to work like glue. Expanding, foam will fill out free space and do not block thin strips.
Article on the topic: How to choose curtains and bedspreads from one bedroom fabric: specialist advice
The upper platband is cut off exactly at the distance between the side. Side shortening to the altitude mark of the outer end of the upper platband. Pitch and proper landing of lateral platbands is achieved by removing spikes above the side planks. Fixation is made on glue. To simplify future repair, stick the platband is not in the groove, but along the wall. This will save it when updating the wall decoration.
Do not be afraid to install interior doors with your own hands. The exact following instruction and understanding of several subtle moments will allow you to perform work efficiently. The technology of installing doors with a good one is noticeable easier for the disposal device and forces to everyone.