
The interior update is largely one of the most important components of the repair work. After all, I do not always want to get rid of the usual and, most importantly, your favorite detail of the room.
Facing the furnace tiled is best to spend during the construction of the furnace.
That is why the process of refining and the so-called revival of the already familiar interior and the subjects of it is an integral part of the life of each homeowner.
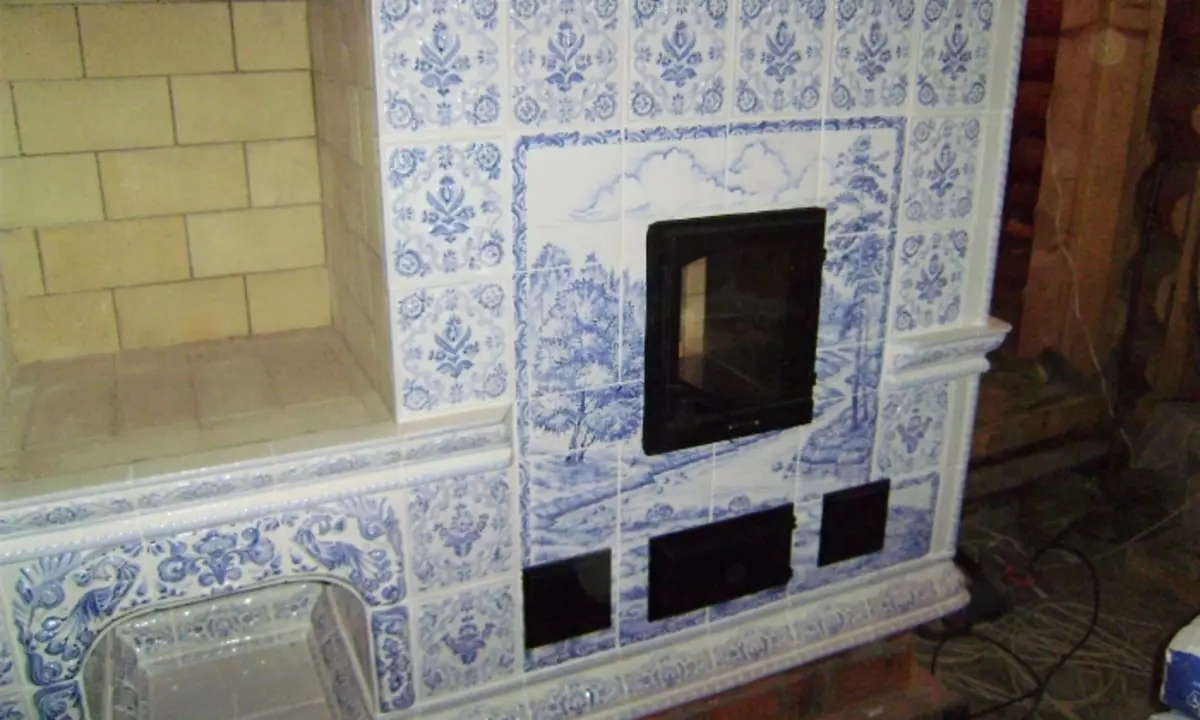
How can masonry tile can transform an old oven?
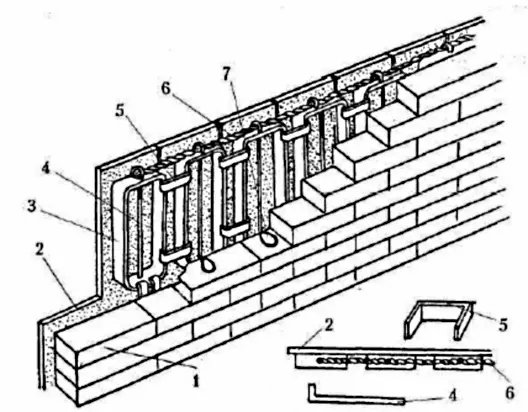
Tile facing diagram simultaneously with brickwork. 1 brickwork; 2 tiles; 3 Rumpa; 4 pin; 5 bracket; 6 wires for mating rows; 7 fasteners.
Most often to such events are resorted to when one thing or another is still able to perform the main functions, but as a result of some damage it becomes difficult and even dangerous. Such elements of the interior include furnaces.
To date, it is almost impossible to meet them in the house or in the apartment. They are assigned a place in country houses, at dachas or in villages where city residents come to visit parents and other relatives. If the furnace is already stopped fit into the overall interior of the room, then there are 2 options that will allow to change the current situation.
The first one is connected with the fact that you just break the oven and install something that is most complied with all other decorative elements. The second option is not so radical, but it can become the most correct in this case - the restoration of the furnace with its own hands. At this stage, many may think that this process is only professional restorers or designers. But this is far from that. Carefully transform an existing furnace in your home can a regular ceramic tile. The furnace laid it becomes the most practical and effective design.
How do you put the furnace with ceramic tiles?
Facing the lesion to the long process, no more than 2-3 rows are stacked per day.
The laying of furnaces is a rather complicated event, however, the fact that the furnace was erected in all the rules, can serve as a guarantee that this building will serve you within a few decades.
Article on the topic: How to put a tile on the wooden floor in the kitchen correctly: can I put, instructions, video
But even later, a small amount of time, everyone strives to ensure that the things around him and items change over time, they acquired new forms and paints. In addition to the fact that the furnace laid out a cafeter will be aesthetically more attractive, it can also provide better heating of premises and will allow you to maintain warmly for a whole day with one furnace.
In order for all the above you could continue to pursue, it is necessary to qualitatively and maximize responsibly perform the main stages in which the masonry and finishing of the furnace tiles are. These include:
- Calculation and selection of materials for masonry kafel furnace;
- acquaintance with the main stages of work;
- direct laying of tiles with their own hands;
- Finish work on the decoration of the furnace.
To begin with, it is necessary to solve what material will be carried out a telding.
Choosing and calculation of materials for masonry tile on the furnace

Currently, there is a large selection of color gamut for ceramic tiles.
How it becomes clear from the name, the main element and material for the implementation of work is a ceramic tile. In addition, you will need to use other materials and tools, such as:
- Tile glue;
- water;
- electric drill;
- Construction mixer;
- putty knife;
- building level;
- chisel;
- plastic cross;
- lace;
- rag.
Tile, as already mentioned, is suitable for masonry well.
This is due to the fact that ceramics, and the brick from which the masonry was made are almost the same thing. And in that, and in another building material there is clay.
From these data, it can be concluded that at the laying stage, and during operation of an updated furnace will not be observed any damage due to the fact that the temperature of the surface and the furnace, and, accordingly, the tiles will be too high. As for the choice of color and the size of the tile, these indicators will be entirely dependent on your own preferences, although there is a universal size of the ceramic tile, which is intended for use as a stove as a plane. These sizes are approximately 20 * 20 or 20 * 25 centimeters. In any case, you can hardly be able to cope with the masonry without resorting to trimming tiles. In order to implement it, you will need tools such as:
- glass cutter;
- slab;
- Bulgarian;
- Metal rail;
- Drive for stone thread.
Article on the topic: Ways to protect the car from corrosion
The first tool is suitable when the tile is made on a glass basis. Then you will only remain to read the line at first, in which you need to cut off one or another part of the tile, apply a metal rail to it and spend several times with a glass of glass cutter. So that the rake does not slip on the smooth surface of the tile, you can glue the rubber strip to the rail. Next, it will also be left to try to knock on the place of the outbreak, and the extra part of the tile will fall. Exactly the same manipulations are carried out with clay tiles. But the use of glass and stovetures are not suitable in order to carry out curly cuts on the tile. But in the process of masonry, you will probably need these details. To do this, use saw-bollard with a disk for a stone thread. You will again need to draw a line on which the cutout will be carried out. At the same time, it is necessary to remember that the thread should be carried out on the backside of the tile, so that the paint will not spare from the front side of it.
After you decide on the size and texture of the tile, it's time to start the choice of tile glue. As already mentioned, the surface of the furnace as a result of the furnace will be heated to sufficiently high temperature indicators, so not every mixture of tiled glue can be a key to high-quality and long-term exploitation of the erected furnace. The most qualitative for such purposes will be the glue that will be both refractory and frost-resistant. Such requirements satisfy the Fixator brand glue. It not only has high strengthening properties, but after drying has a neutral light gray shade. And since when laying up a furnace, the grout tile is not used, then this option is ideal compared to others, which, hidden, become too dark.
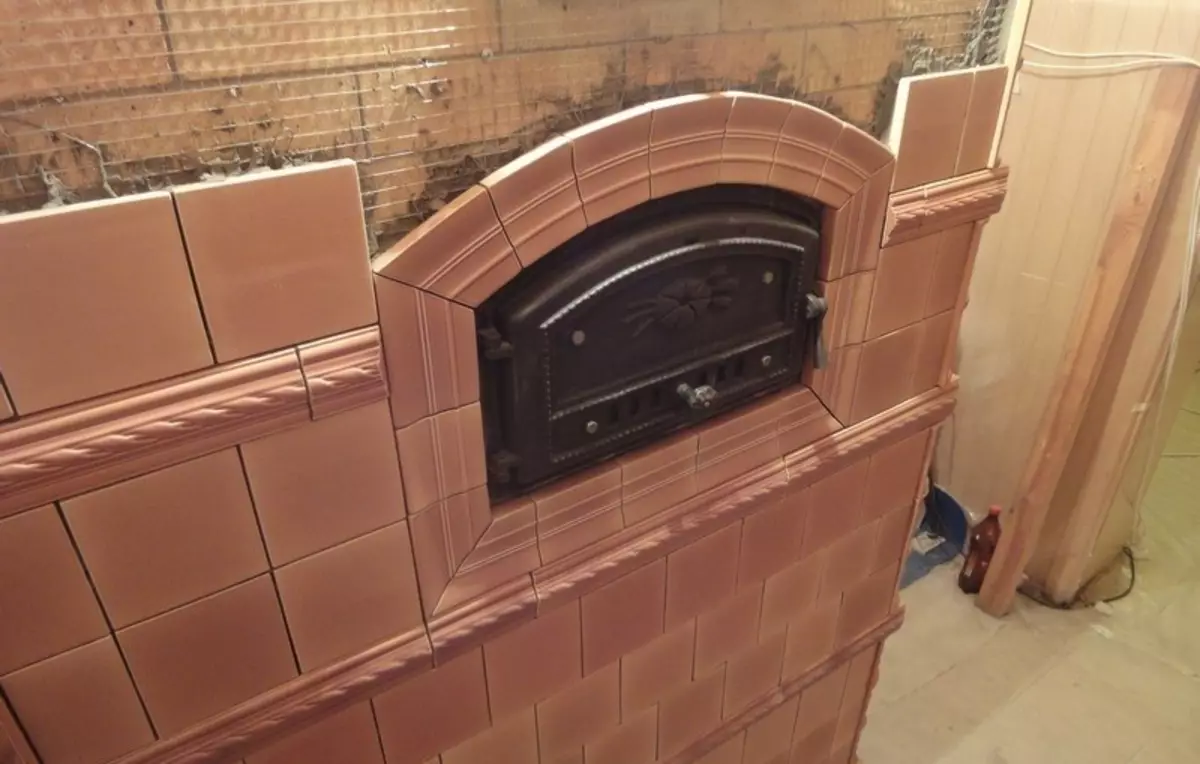
Kafel Laying and its main stages

Step-by-step furnace: 1. Furnace plaster; 2. installation of the frame; 3. Repeated shockting and one more layer of the mesh; 4. Facing tiles; 5. Grouting seams.
To put the furnace with a tile beautifully, it is necessary to try to do it in such a way that on the front part of it all the tile turned out to be integer. This process is quite difficult, and in most cases, no matter how hard you try, the cut parts will still remain below.
Article on the topic: how to paint the lining inside the house at the cottage: options
This option is the most optimal, and to implement it, you will need to first measure the entire height of the furnace, after which you divide the resulting value (usually 200 cm) on the length of one tile (for example, 25 cm). The resulting number will show you how many pieces of solid tiles will fit on the furnace. You will need to lay out 1 vertical range of 8 tiles without any shortguings. But do not forget also about the fact that there should be a small layer of glue between them (approximately 1.5-3 mm).
Therefore, you count the number of gaps between the tiles, and there will be 7, and multiply this figure to the size of one seam (take a maximum of 3 mm). It turns out that 2.1 cm will go to fill the seams between the cafeter. Therefore, the lower row of masonry will be shorter than everyone else for such a magnitude.
Further actions are associated with the preparation of the surface of the furnace. It must be as even as possible to make the tile on it carefully. With the help of a chisel or a chisel (you can use and grinding machine) It will be necessary to remove all uneven protrusions on bricks, influx of the solution or some other formations. After these actions are completed, it will be necessary to moisten the entire surface of the furnace, which will be covered with a cafeter, water. To do this, it is necessary to use a rag or a spray with a rack in a small amount of water.
As soon as you prepare a tile and treat the surface of the furnace, it will be possible to knead the solution: you dissolve dry tile glue in a certain amount of water (the proportions are indicated on the package) and mix it with a drill and nozzle - a construction mixer. After that, it will be possible to immediately proceed to the masonry.
It begins at the bottom. A layer of glue is superimposed on each tile, after which it is necessary to turn it with a gear spat over the entire tile and glued it to the oven. It is necessary to press hard enough so that the excess glue slightly got out of the tiles. Next is the adjacent tile. The distance between them is regulated with the help of special plastic crosses or wire trimming. When the whole oven is covered, after some time, the tile will need to wash away from the adhesive again moistened in the water. So, this masonry is carried out with a tile using a special tile glue.