
Table of contents: [Hide]
- Wooden beams
- Polyurethane decorative beams
- Falc beams from plasterboard
Repair of premises, including trimming of ceilings, often arise questions on the use of various materials.
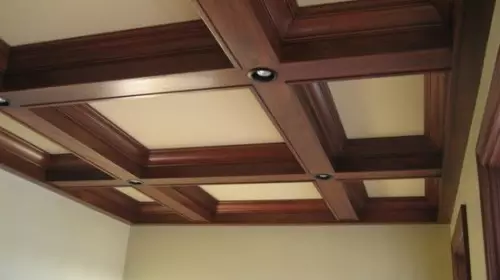
The ceiling beams most often performed the decorative function in the house.
One of the options for decor in the style of the country, which is greatly popular today, are ceiling beams.
In modern housing, they are most often decorative function. In some cases, the beams can serve not only with decoration, but also have a functional purpose. Make the beams on their own not so difficult. First you need to decide on the location of their location on the ceiling, appointment and material for manufacture.
This or that location of the beams can visually change the room:
- The transverse placement of beams visually expands the room;
- the elongated room will make beams located along the long side;
- The cruciform location of the beam does not change the geometry of the room;
- Speakingly increase the height of the room will help designs, moving from the ceiling on the wall.
The choice of material depends on the appointment of ceiling beams, features of the room and financial capabilities. The most common materials are wood, polyurethane and plasterboard.
Wooden beams
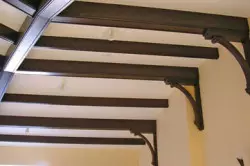
Wooden beams from a solid bar are installed during the construction of the house.
The beams on the ceiling from a solid wooden bar are installed during the construction of the house. Installation of these expensive and pretty heavy structures is justified only if necessary, and it is better to entrust this work to professionals. If you wish to decorate an apartment or house beams from the tree, the best option will be false structures collected from the boards. They will no less effectively look at the ceiling.
It is very important to use a well-dried tree, otherwise due to warm air, rising to the ceiling, after a certain time, the junction between the boards will become very noticeable.
Article on the topic: Patterns Curtains for the kitchen: Simple secret
The appearance of wooden false beams depends on the way of docking the boards. The most inconspicuous is the option of docking at an angle. The edges are trimmed at an angle of 45 degrees and are connected. However, it is possible to accurately and qualitatively, such a compound can be possible only under the condition of the presence of special equipment. At home, it is almost impossible to do this. It is much easier to connect the boards with the help of bars, which requires small labor costs and the most ordinary tools.
For work you will need:
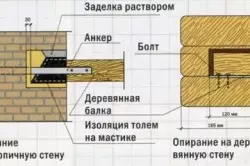
Wooden beam fastening scheme.
- bars;
- Dry boards;
- plane;
- sandpaper;
- self-tapping screw;
- screwdriver;
- drill;
- Glue for wood.
The procedure for performing work:
- The lower part of the design and its sidewalls should most close up to each other. To do this, the end part of the side panels is customized using a planer and sandpaper.
- Bruks are screwed to the side panels, having a self-tapping screw in about 15-20 cm.
- The drill is drilled in the holes of the hole for fastening the bottom of the beam. They are located after 15-20 cm, perpendicular to self-pressing, bonding bar and sidewall, at a distance of at least 5 cm from them.
- Loss of glue places connecting parts. Glue must be used in accordance with the manufacturer's instructions.
- Details of false beams are connected and twisted with self-drawers.
To install such structures on the ceiling, you can strengthen the wooden blocks, the width of which corresponds to the width of the internal emptiness of the box and connect them with self-draws. You can also use a crate of bars or a metal profile, which can be easily attached with self-draws.
Back to the category
Polyurethane decorative beams
The easiest and fastest way to install beams on the ceiling is to use polyurethane false beams. Today manufacturers offer a fairly wide selection of these products of various sizes and colors. Of course, this is not a tree, but polyurethane products have low weight, easily and simply mounted, do not require additional finishes. In their "entrails" you can hide electrical wiring, telephone wires and even a small diameter pipes. The size of the beams is chosen depending on the room and the desired effect.
Article on the topic: Curtains of two colors in modern interior design
For the installation of polyurethane beams, it is necessary to prepare the following:
Polyurethane decorative beams outwardly resemble a tree, but much easier by weight and cheaper.
- Wedge-bars;
- pencil;
- roulette;
- drill;
- screwdriver;
- dowels;
- self-tapping screw;
- glue.
Installation work:
- On the ceiling, the lines of the installation of polyurethane beams are placed.
- On these lines, wedge-bars strengthen, using dowels and long screws. The distance between them should not exceed 1 meter. The length of the standard polyurethane beam is 3 meters, therefore, it will require 3 wedges for its installation. Before installing the wedge-bars in them, the holes are drilled by 2 mm less than the screw diameter, after which they are screwed to the ceiling.
- If there is a need to connect beams, the wedge is necessarily installed on their junction.
- Special glue ("Liquid nails", "moment") lubricate wedges and installed at the bottom beams.
- With the help of screws, screw the beams to wedge-bars.
- For greater decorativeness, the polyurethane consoles can be installed under the beam.
- In order to hide the cables in the beams, it is necessary to make a longitudinal cut in the wedge and consolidate the cable in it.
Back to the category
Falc beams from plasterboard
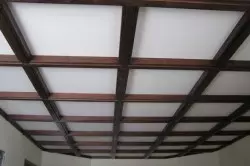
As decoration, you can install plasterboard beams on the ceiling. A little patience and time - and with the help of putty such a beam, it is quite possible to give the look of a wooden surface. The main condition for creating imitation beams is a smooth ceiling, which can be done with the help of all the same plasterboard. In this case, the false beam will be the second tier of the two-level ceiling.
Before starting work, it is necessary to prepare materials and tools:
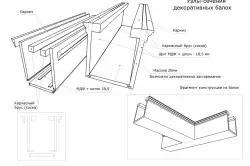
Scheme of node section of decorative beams.
- plasterboard;
- metallic profile;
- fastenings;
- self-tapping screw;
- dowels;
- Perforator;
- Drill or screwdriver;
- roulette;
- pencil;
- sharp knife;
- Hack or Bulgarian for cutting profile.
The procedure for performing work:
- The ceiling is placed on the lines for which the beams will be located.
- Alonga, fastening of the suspensions to the surface of the ceiling by dowels and collect the design of the future beam made of metal profile.
- From the drywall, the lower surface and the sidewalls of the beams of the required size are cut by a sharp knife.
- Screwed gypsum parts to metal design with screws.
Article on the topic: How to make a dressing room: layout and filling
Such false beams can be made of any desired size - there are no restrictions. The final stage of the work is primer and putty. Their surface can be smooth or textured - it all depends on the overall design of the room.
Regardless of the material chosen in order to make it yourself beams on the ceiling, they will look very impressive, creating a homemade comfort and a calm atmosphere.