
Table of contents: [Hide]
- What is the air bubble panel?
- Main features design
- Step-by-step instructions for creating a bubble panel
A bubble panel, with their own hands created, is a container made of triplex or plexiglass of increased strength. Both materials have similar properties, therefore, of any of them, it turns out equally good water bubble panel. In such a reservoir, water or air flows are in permanent movement, due to which the impression of a small waterfall is created. This decor element fits perfectly into any interior. The finished product is quite expensive and not for many on the pocket, so the bubble panel, with your own hands made, will not just be a wonderful decoration of the room, but also will save a significant amount of money.
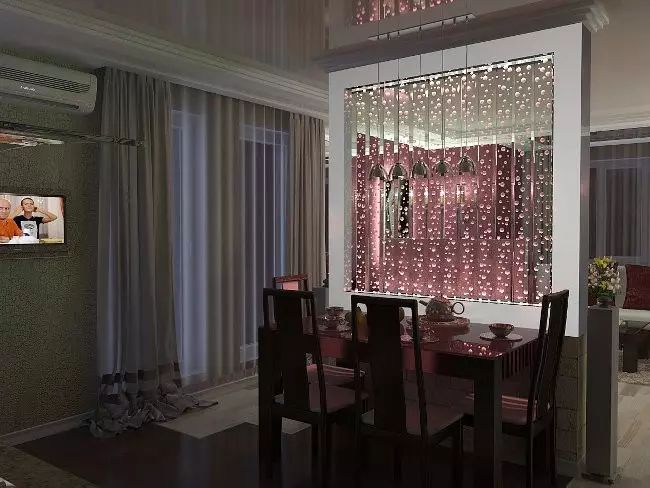
The design of the air-bubble panel will not be much difficult. It is enough to make the podium on which the panel itself will be, and the lid.
What is the air bubble panel?
You can make a bubble panel with your own hands, however for this you have to work well. If possible, it should be previously accessed on small-sized structures to understand the physics of bubbles. The bubble panel is made with their own hands using the following tools and devices:
- Cellular Organic Glass;
- vinyl hose;
- glue;
- silent compressor;
- illumination;
- Simple sprayer.
As you can see, the bubble panel is collected from simple and affordable elements. The design includes the podium (it is on it that the panel will be fixed), the cover that protects the system from entering foreign objects from above, and the panel itself.
One of the most important design elements, without which the air bubble panel will not look so effectively, is the backlight.
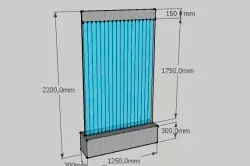
Drawing of the water bubble panel.
Think what color the backlight you would like to install in the panel do it yourself. Also select the optimal type of backlighting.
Article on the topic: Repair of headphones
The most economical option is LEDs. However, they are capable of highlighting water no more than 30 cm. That is why there are often people who have decided to make a bubble panel with their own hands make a choice in favor of LED lighting based on the use of neon lamps.
They need to be equipped with a RGB controller, due to which lighting control will be controlled. Such a backlight can be installed in almost any part of the design.
Back to the category
Main features design
To understand the specifics of the work of this design and independently assemble the panel, you need, first of all, familiarize yourself with its main elements. The main element is a cellular two-layer acrylic. To create an air panel, a 16 mm thick material can be used, 980-1200 mm wide and up to 7 m long.
The end of the cell acrylic sheet is sealed on the one hand. Only if this condition is met, the bubble panel will work. To the shear's end, it is necessary to glue the transparent bottom of the bubble panel made of acrylic. This uses special glue. It is on the bottom that the most important functions are imposed, namely: increased rigidity and sealing of air-bubble design. In addition, this part provides the fastening of LEDs and the unimpeded flow of lighting into liquid with bubbles.
Also, the injectors are also fixed to this element. Their function lies in the dosed supply of compressed air into the channels installed inside the panel and filled with water. Injectors need to pay special attention, because The work of the entire system directly depends on their quality and reliability.
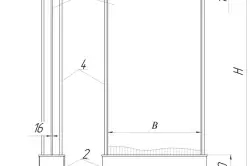
Technical parameters of the modular bubble panel: 1-panel bubble; 2- top housing; 3- lower case; 4- Pipe nickel-plated D25mm - 4pcs.
No less important than nozzles, is an air compressor. As a rule, the height of bubble panels is at least 2 m. In order to pump the air through such a layer of water, it will be necessary to install an ordinary aquarium compressor, but more powerful and if possible, the least noisy device.
Article on the topic: Tips on the use of batteries 18650
If necessary, the compressor can be installed not in the panel itself, and at some distance, connecting it with the design with the air hose of a small diameter, laid in a plinth or mounting case. Between the hose and the bubble panel, it is necessary to establish a non-return valve that will prevent leakage from the channels.
The panel may not have its own backlight. However, only by installing LED lighting, you can achieve the maximum visual effect. The design is equipped with a controller that will allow you to set combinations of colors and create interesting and unusual options for highlighting air bubbles.
Think about the way you decorate your panel around the perimeter and purchase reliable fasteners.
Back to the category
Step-by-step instructions for creating a bubble panel

Diagram of the device of the bubble panel.
First of all, you need to install a power supply unit, compressor and aeration system into the podium of the future bubble panel. There is also an inserted backlight module with RGB controller and check valve. If you set the compressor in the upper part of the structure, the check valve will not need. After turning on the compressor, the liquid will remain at the same level without any lowering on the tube.
The pallet is made of transparent organic glass, thereby ensuring the necessary visibility of the backlight. To ensure the constancy of the state of the water column, leave some water in the pallet. Lower the compressor tube. Due to this tube, bubbles will fall into the holes of the plexiglass. Many homemade masters face a typical problem in the accumulation of air in one place. To prevent such a situation, use an acrylic sprayer, in which you first need to do the holes. A very important point is to regulate outlet holes in all tubes. Thanks to this, you can set the desired bubble size.
Commier in advance about the location of the tank. Over time, water will evaporate. This process will not be avoided, because Ensure the absolute tightness of the bubble panel is impossible. At least minor holes and cracks will take place in any situation. You can set the tank at the top or bottom of the panel. For greater convenience, equip the design valve. He will facilitate the descent of old water.
Article on the topic: Tumben under the washbasin
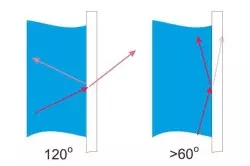
Backlight distribution scheme in bubble panel.
You can make a bubble panel yourself, but you need to be patient and preferably, because This is a sufficiently long process. You must be most concentrated and neat, because The process of manufacturing the panel has many important nuances, such as: sealing structural elements, composition of liquid, backlight, pipe supply, etc. It is best to fill in a bubble panel with pure distilled water. It should not be any garbage. Professionals are recommended to add glycerin into water. Thanks to him, bubbles will be better to repel apart from each other. However, it is important to add it exactly as much as you need. And non-owner, and the bust in this case will give the same negative effect.
Now you know what the bubble panel consists of how to make it yourself and what to pay special attention to the manufacturing process. This is a difficult design, over which the creation of which will have to work pretty. But the miniature waterfall created by their own hands will cost several times less than its ready-made store analog. If there is time and desire, then why not try. Good job!