
Photovideo
During the installation process of metal-plastic windows, it is impossible to avoid damage to the outlook itself.

Window scheme
These are cracked and potholes that need urgent elimination. An excellent solution to this serious problem is to install slopes. They will help the windows to fulfill their functions over long years. However, before starting installation, you should figure out what slightings are and how to install them.
Sucks is the surface of the opening, which is inside it. This is not only aesthetic, but also a functional finish. You can put plastic or wooden slopes, you can launch them or dry by plasterboard. Now the most popular material for decoration is plastic. He is durable, durable, and you can be sure, will not miss the cold in your home.
Advantages of mounting
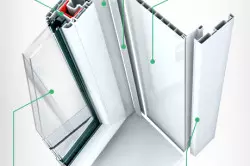
The scheme of the window structure with plastic slope.
If you choose exactly on PVC slopes, then the installation technology will pay you with their simplicity. But it should be paid to the fact that the windowsill must already be installed, since the slope must be located on it.
Do not forget that the installation of slopes with their own hands is not always simple. It requires concentration and a large concentration of attention at work. Often the slopes made by their own hands, with the wrong installation, can deteriorate. In order to avoid this, you need to clearly follow all the rules. Measure and fix everything is necessary only strictly according to the recommendations. Only then work done by hand will bring aesthetic pleasure. If you agree with all the requirements and are not afraid to risk, then in this case you receive many advantages, because the installation of slopes on the windows with your own hands is cheaper than if professionals are produced. And who does not want to avoid the extra costs and other headaches related to the hiring of workers and the control of work?
Article on the topic: What are the main features of the Loft style
Independent installation
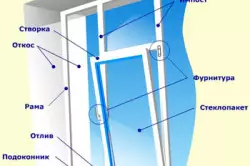
Window design circuit.
Before mounting, plastic windows often have a non-primary look. Do not immediately grab the head, because In the process, all this will disperse and go out of sight. You won't watch any sticking foam and laid windows.
To begin with, you will need the following tools:
- Perforator (with a brown);
- Self-timber 40 mm - 12 pieces on the window;
- Drill (needed with a nozzle to twist the screws);
- saw on plastic;
- Dowel;
- saw on a tree;
- building level;
- screwdriver;
- a hammer;
- roulette;
- stapler with brackets;
- pencil;
- construction knife;
- "Sandwich" (large sheets);
- Rake 40x10x300 mm;
- decorative corners (latch);
- Cylinder with mounting foam.

The layout of the main elements of the window.
- You need to take a knife or hook and make a small empty in the foam. It can be 1-1.5 cm in width, but it serves to insert there already ready or made with your own hands plastic slopes. For details you should take a roulette and make the size of the opening of the outer edge (width in the diagram). The obtained data is needed in order to cut the desired piece from the pre-cooked rail. Then you should apply the resulting rail to the desired location and fix the perforator. You should also not forget that it should pass along the edge of the wall.
- Each of the plates should be mounted on 4 screws if the standard size window. After the first rake fastened, the same should be done with side. Meal to do from the windowsill until the upper rail. Fix the side rails is needed on 4 self-proof, but you should not twist them or score to the very end.
- I exhibit racks by level. For this purpose, the lowest level of the upper rail is determined along the horizon, and then the screw is twisted to the end. The rest of the screws do not need to be touched. And in the formatives you can insert pieces of rails that remained. Further is also done with side rails, and then strengthen them with foam. She must not give a rake to progress or swim.
- Install the profile. It is needed in order to maintain plastic slopes that will rest in it. It can be found on an absolutely any construction market with corners. If we talk about corners, you should choose latching. They are much stronger than their relatives - glue corners.
Next, you need to measure the distance at the top of the windows from the left and to the right rail for fastening the upper slope. After that, it is necessary to cut off from the profile exactly as much as received in the results when measurements, and then direct it with a latch to yourself.
Next, it should be applied to the upper rail and move into the windows somewhere for 1 cm, after which it is necessary to attach a profile to the rails of the stapler (every 6-7 cm). The same is performed with side rails.
- Insert plastic slopes into the gap, made at the very beginning of work, and then fix it with small carnations.
If you want to cut the slopes from plastic yourself with your own hands, then you need to take a sheet of the sandwich panel and make the appropriate measurements (from the deepening to the latch on the profile, take 5-7 mm and cut the rectangle from the sandwich panel by the standards).
Next should be attached to the plastic slope, feeding it to the installed rail.
Measures are made for side panels, cut, are inserted and fixed as the top.
Article on the topic: American-style bedroom interior: High Beds, Design Features
Final stages
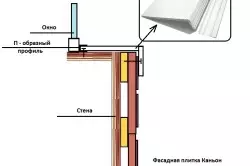
Framing scheme with plastic slope with a platband.
At the final stage of installation, plastic corners are performed. They must lightly go beyond the window frames about 5-6 cm. And at the place of his joint with the side panel you need to adjust the inner part and gently snap it, for the corners are very gentle and have a habit of bursting. Similarly, it should be done with side corners.
Usually corners enter each other outside the window. In this case, you should take the knife and cut off the pieces of plastic corners.
Then it remains only to go through all the joints with silicone. You need to spend your finger on the seam and close all the gaps that may arise. At the same time, a rag is all the time you need to wipe silicone from the surface, so that you do not swap the picture with your own hands.
It should also be noted that for the installation of slopes for windows does not suit any PVC panel. It is necessary to choose resistant to ultraviolet rays and mechanical damage to plastic (for example, a sandwich panel, which has already been mentioned above).


Load more