
Table of contents: [Hide]
- Types of plastic panels
- Installing frame for ceiling panels
- Installation of plastic panels do it yourself
Bathroom renovation using plastic panels is much more common than other embodiments of this process. It should be noted that the installation of panels is made by both experienced specialists in this field and lovers who have decided to fulfill everything with their own hands. This material is very practical, relatively inexpensive and can be applied to the decor of walls, cabinets and, of course, to create a ceiling. In addition to all this, the attractiveness of plastic is that it is very easy to mount it (you can even perform this repair alone, and it is absolutely optionally to have some professional skills and skills).
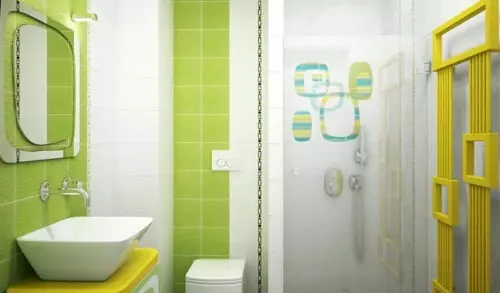
The option of finishing the bathroom with plastic panels is very practical. The panels are easy to clean, easy to install and relatively inexpensive.
The superiority of the plastic bath finishes are quite obvious, so the fans of such repairs are constantly becoming more and more. In order to carry out the installation of ceiling panels with your own hands, you must first prepare the framework to which they will be attached. The most suitable material is a tree.
Types of plastic panels
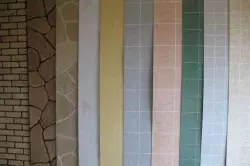
Plastic panels are presented in stores in a large assortment, visually might look like various materials: stone, wood, tile, etc.
Standard plastic bathroom panels are presented with the following dimensions:
- width - 25 cm;
- Length - 270 cm;
- Thickness - 1 cm.
But at the same time, it is sometimes possible to detect in stores and non-standard panels. For example, it can be 260 cm, and 300 cm, and even 600 cm. Installation of these ceiling panels is carried out on a wooden frame with a bracket. As for their width, it is sometimes 10 cm, but more often, of course, you can buy a panel 20, 30 and 50 cm. Very original and fun will look a combination of panels on the ceiling in the bathroom of various colors and even textures.
It is also allowed to combine narrow and wide panels among themselves.
Back to the category
Article on the topic: Door handles Sirius: How to disassemble them with your own hands?
Installing frame for ceiling panels
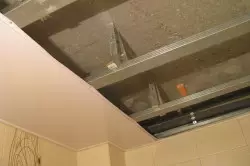
Before securing the ceiling panels, it is necessary to mount the framework for them.
Fastening such finishing materials on the ceiling is made most often to the wooden frame, which should be erected in advance. So, for this you will need:
- wooden bars (4 x 2.5 cm);
- nails;
- boards;
- building level;
- lace;
- saw;
- a hammer.
Initially, you need to decide on what level a new ceiling will be. Depending on this, it will be necessary to make marking on all walls of one or another room. This is done either with chalk or a simple pencil. First, determine which of the corners of the room below the rest (if they are all at the same level, then go directly to the markup). Then retreat from this angle about 7-8 cm, in which bars, boards and panels should fit. Next, from this mark using a building level (which will allow you to make a new ceiling smooth), spend the lines on all other walls. These limiters will indicate you exactly where the new plastic ceiling will be located.
Step-by-step instructions for mounting plastic panels on the ceiling.
But these are only external borders, and it is also necessary to establish boundaries that will control the ceiling level in the center of the room. To do this, use the shoelace. From one corner to another, it is necessary to stretch 2 cords crosswise. The shoelace should be very tensioning, in order for the ceiling to be seen. Only after that it will be possible to start mounting the frame for the ceiling panels.
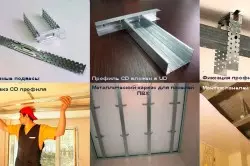
The distance between the bars should be no more than half a meter if you are going to attach GLCs immediately on the ceiling frame, or you can distribute bars at a distance of 1 m. In the second case, it will be necessary after fixing the bars to fill the boards on them. They are already attached more often. Depending on which material is built with a rough ceiling, you can use different tools for mounting frame. So, in order to nail the wooden bars to the ceiling, it is suitable for nails and a hammer (or tapping screws and a screwdriver). For the concrete ceiling you will need a perforator, dowels and self-tapping screws.
Article on the topic: Liquid waterproofing for the bathroom - types and methods of application
Back to the category
Installation of plastic panels do it yourself
After the framework is prepared, it is necessary to attach to the corners between the ceiling and the walls of the guide rails for plastic. They are attached by conventional brackets and stapler. To begin with, they need to be carefully measured, because, despite all the tricks, with which the builders leveled the ceiling, it will still be a bit uneven, one wall will be longer than the other. It is in these guides and panels are inserted. With one edge they are attached to the castle, and the other to the frame of the brackets. At the same time, each time you need to use the construction level, which will show you exactly where you need to put the rail if necessary, in order to align the surface of the ceiling. Only after you bother it, you can mount the panel.
It is due to the fact that the ceiling surface may not always be smooth, you need to immediately cut the panels at one measurement. Each time, attaching 1 segment, it is necessary to make the next measurement, which will avoid excessive waste of the material. Measuring 1 panel, it is necessary (preferably on the wrong side) to make a marking with a simple pencil or chalk (depending on the color of the panel). If there is no such possibility, then mark the fine dash right on the front side. After all, the panels are smooth, so there is a simple pencil with them very easily. After that, using the cocencher, you need to draw a straight line across the entire width of the panel. Then, according to the mark, it will be necessary to sprinkle the extra piece of plastic. This can be done using conventional hacksaw. In the case when it is difficult to approach some sides to plastic with a stapler, it is necessary to use small carnations and a hammer.