
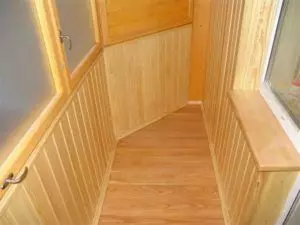
If you want to transform the balcony and create a beautiful place to relax over a cup of tea from it, then it is better to use natural and eco-friendly to finish it. This includes lining.
The balcony clapboard is a solid task for everyone who can use tools at least at the Novice Level. The use of insulation will provide the ability to keep the temperature on the balcony above 10-15 degrees. If you put high-quality windows and warm the floor, then the room will be warm enough and comfortable in winter.
Advantages of clapboard
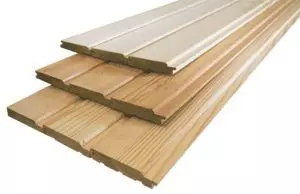
Let's first find out where such a strange name has come from. Everything is simple - earlier the walls of the wagons were froghed with wooden dug. Hence the current name. What advantages have lining?
- Naturalness. The lining is made of natural wood.
- Safety. This material does not allocate harmful evaporation for a person when heated.
- Ecology. As mentioned above, the lining does not highlight harmful vapors, and also easily recycled and does not harm nature.
- Durability. The lining can serve for a very long time. Once every 5-7 years you can re-pollute it and cover with varnish. The appearance of the room will be updated.
- Resistance to rotting.
- Ease of installation and processing. You can easily separate the room with your own hands.
- Beautiful appearance. Especially well the lining looks in country houses, on terraces, loggias.
- Excellent thermal insulation qualities.
- Soundproofing with the use of lining is also evaluated by masters for excellent.
Recently, the so-called Eurovantia appeared in the store assortment. Its main difference is that it is produced by the Ghosts of European countries.
Eurovantia is considered better than the wagon of Russian manufacture. However, the domestic material for the trimming of the loggia is favorabled with its value.
Touching balcony
Evroleagilka quality, but not cheap material
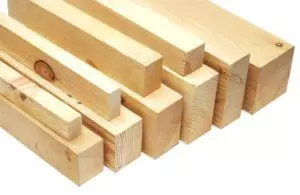
The first step is to purchase materials and selection of all the necessary tools. The lining of the balcony is preferable to carry out boards made of hardwood, as pine lining with increasing temperature begins to evaporate resinous substances.
Before purchasing, it is primarily to calculate the decoration area. We multiply this figure by 1.3 - the quantity that will be needed for the subgone, taking into account the 30% of the stock. Try to pick up the length of the material so that less waste remains.
Wedding Variety "Premium" - the best material
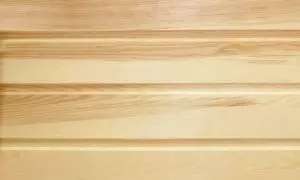
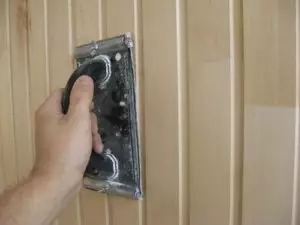
Board grade can also be different. For example, the variety is more than the varieties of B and C, but it is processed much better and will not require additional grinding. You can save and buy boards in, and then polish it after finishing the finish. What do the variety of lining categories differ?
Category Premium and Class - the best material. The board has a uniform color, they do not have bitch and irregularities. Class A lining is somewhat cheaper than premium class.
Article on the topic: Repair of laminate without disassembly: how to make it yourself
The classes in the class may contain up to 4 bits for every 1.5 m. It is poorly processed by the planks and a bit inhomogeneous color.
As for the casing material Category C, then this is the cheapest and not quite a qualitative option. A large amount of bitch, inhomogeneous color and lack of processing of planks - this is its distinctive signs.
Moreover, the purchase of such lining ultimately will not be economical - it is necessary to spend time on its grinding and painting, if you want a beautiful appearance. So it is better to buy the first two categories.
Separate a balcony or loggia
How to see a balcony with lining yourself? You only need to show accuracy, patience, and of course, acquire finishing materials:
- Bar 50 per 40 mm for central beams;
- brackets for attaching plasterboard material;
- Cutting boards 20 mm for lag per floor;
- Board or plywood sheet for floor;
- polyethylene to perform hydro and vaporizolation;
- insulation;
- foam assembly;
- corners for fastening lag;
- Self-tapping screw 3.5x5 mm and 3.5x7 mm;
- Dowel nails for mounting brackets and corners to concrete;
- Nails 35 mm for mounting lining.

From the tools that will be needed to trigger the balcony with their own hands, you should cook:
- Drill either perforator;
- Lobzik electric;
- screwdriver;
- stapler;
- level;
- Roulette, as well as joinery tools.
Preparation for finishing
In front of the lining of the balcony, it is necessary to prepare it: dismantle the window slopes and the inner finish, remove the old coating from the walls with their own hands. If the balcony is located on the cold side, it is necessary to process the floor and the walls with a special primer from the fungus.
In particular, this concerns cities with high humidity and a cool climate (for example, St. Petersburg). If the balcony fence is made of sheet metal, it is necessary to make a factor of foam blocks, in one block thick. They are placed on cement, be sure to apply the level. We wait for the final drying of the solution and put the double-glazed windows.
Before weching the balcony, it is extremely important to pre-inspect the glass of double-glazed windows or balcony frames.
If you have wooden frames on the balcony, look at them for rot. If the percentage of the lesion of the surface is large, it is necessary to change them.
In the case of small foci, it is necessary to clean the tree and treat special solutions.
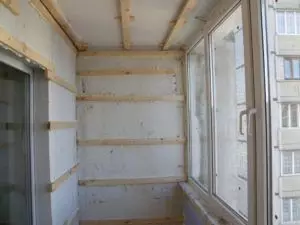
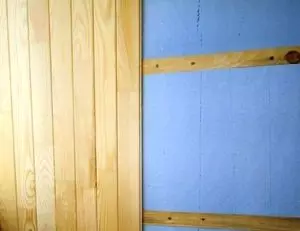
Installation of guides and insulation
Fix the lining with their own hands on the guide bars 50 by 40 mm. If the lining should be placed perpendicular to the floor, the guides are attached horizontally. The interval between the bar is appointed so that later it was convenient to lay insulation.
If the insulation uses polystyrene foam, the interval must be equal to the width of the insulating material sheets. When choosing a mineral insulation, it is advisable to remove 0.5 cm. The mats that were laid with a slight compression will be kept tightly and without additional fastening. If you are not going to warm the balcony, the distance can be any. One condition is at least 60 centimeters.
Article on the topic: Turkish tulle with embroidery - a new way of interior transformation
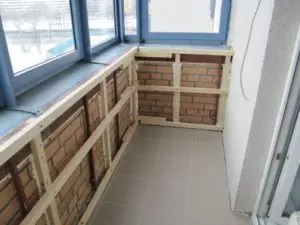
Starting with your own hands is necessary with attaching brackets for drywall. Then we put the guide bar from the bottom, attach it to brackets.
Using the level and auxiliary bar, in the same way we put the bar to the top. Medium guides must be set, simultaneously smoking them with the help of an additional bar.
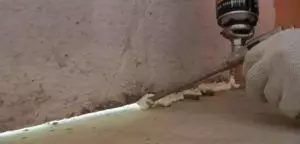
After the installation of the guides is completed, the polystyrene foam is put in between them. Then free residues stretch out and thickening all the slots with a mounting foam. The remains of the hardened composition cut the sharp knife. Read more about Mounting Looking in this video:
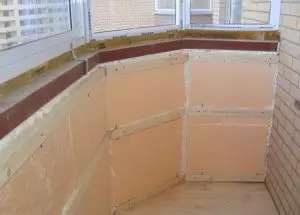
Walls overlooking the street, you need to warm. If you wish to get a really warm balcony, it is important to insulate the floors and the ceiling. If you apply mineral material, it is necessary to put a waterproofing film for it. It is important to do so that the moisture from the street does not penetrate inside and does not spoil the material. The insulation is very sensitive to water.
It is impossible to skip the waterproofing stage! Otherwise, after a few wet seasons, all insulation will need to redo - insulating materials do not tolerate water.
On the surface of the insulation, we laid the film for vaporizolation. It protects from evaporating moisture inside the loggia.
Mounting guides on the ceiling will be convenient after the completion of the wall decoration. You need to lay them on the length of the balcony. The extreme bars are attached tightly to the trim, and intermediate - at some distance. This will allow to put insulation without problems.
Floor finish clapboard
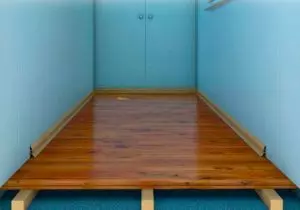
Before finishing the floor with the trap itself, it is necessary to put lags from the board with a size of 20 mm. The width of the boards should be selected depending on the floor level. The optimal value is 10 cm.
The board is put on the end and attaches to the floor with a corner. To attach the latter to concrete, we use a nail dowel, to the board - self-tapping screws for a tree 3.5x35 mm.
We begin to install lags, making a frame base along the perimeter of the floor of the room with an indent to a couple of centimeters from the walls. Inside it, lags are installed across the distance, which will be equal to the size of the width of the insulation blocks. Attach them to the right places with a corner.
All gaps are treated with foam. Between the lags, insulation and film vapor barrier, which are fixed using a construction stapler.
For the floor, you can take any floor board or moisture-resistant faeer. The last material is covered with acrylic varnish as soon as all work will be completed.
Wall sheat and ceiling
Now we are wearing a balcony with lining. Start the skin and finish the surface of the walls and the ceiling is preferable from the most complex angles. If you leave them at the end of the work, it will be difficult to get to this place. Starting board put strictly in terms of level. Inaccuracies and skews can lead to what you have to, ultimately, redo all the work. Remember that the Euro male pumps for ventilation is on the inside. It is needed for the right air exchange. If such is not, the appearance of rot or mold may appear.
Article on the topic: chair bed do it yourself - drawings and work (video)
The lining is attached to the guide bars using special carnations. They are small and their hat is the same. Nails install boards in the groove at an angle of 45 degrees. Attaching the initial board is performed to all guides, subsequent - strictly to the upper and lower. To intermediate boards, boards are attached in a checker order.
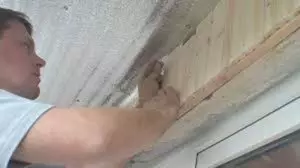
Each next plate is raised in a groove with a spike, and then climb a light hammer through the bar, so as not to get defects. After that, you nail nails for the final stage.
So, the lining of the balcony is finished, now we can finish the ceiling. We put the guides using the level, then deposit the insulation (if insulation is planned). The final stage is the use of mounting foam. Separate the ceiling is best produced in the transverse direction. Such a simple reception visually expands the room.
Finishing and processing
At the end of the walls of the walls and the ceiling, we carry out the final finish: put the plinth, if required - corners. We should not forget about the slopes. They can be made of lining or from another material.
It is possible to purchase ready-made products in the manufacturers of window systems. According to your parameters, they will produce them of the desired size.
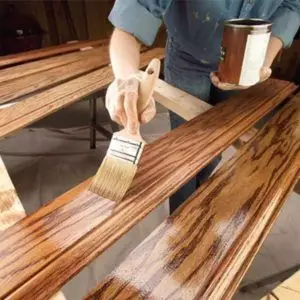
So that the lining does not lose its appearance is important to cover it with the finish line. It may be acrylic based lacquer. Pre-thoroughly clean the surface of the tree and remove the dust with a soft cloth.
Then we apply a coating in 2 or even 3 layers. If you want to preserve the natural look of the tree and protect it from dust and dirt, just apply several layers of PVA glue on the lining. It is not necessary to dilute it, simply wash the surface with a smooth layer. As soon as he dries, we apply another one.
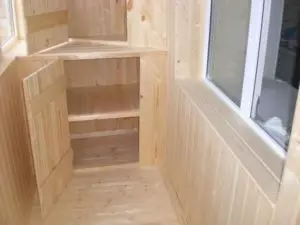
With the help of a lining on the balcony, you can make a locker or a shellf for fitness fittings.
And how to properly care for this material?
- I don't need to wipe the lining with wet rags. Delete dust should be removed with a dry tissue or vacuum cleaner.
- If stains appeared on the tree, try to remove them with a special solvent. Moisten a rag and lean to pollution. If the stain is not displayed, it makes sense to repaint clap in a darker color with varnish.
- If the appearance of the walls have deteriorated, it is best to open the surface and cover the walls with varnish again. In stores, you can now find a varnish or even a sve smelling.
Now you know how to put a balcony with a balcony. We hope that our tips will help you save on the services of professional brigades. Especially since it is not so difficult to make such a finishing of the room itself and with the involvement of assistants. For details on how to handle the lacquer with varnish, see this video:
The main thing is to have all the tools at hand and work carefully and does not hurry. The balcony was brought by natural trees to please you with an impeccable appearance.