
Pipes of various kinds of communications on the walls most often can not be transferred even during overhaul, and this problem can only be solved by creating a drywall box on the wall. Modern finishing materials allow you to create a high-quality renovation.
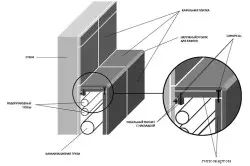
With the help of a plasterboard box, you can hide pipes, wiring or ventilation system.
The drywall box is not the only possible solution. You can hide the pipes in a frame of plastic, plywood or chipboard. But experts agree that it is the drywall that is best to handle, even a beginner can work with it. Plasterboard surface can be fried tiled, wallpaper or painting, it will be a durable and reliable box.
Dancer from plasterboard: Required materials and tools
By making such a box, you can not only improve the aesthetics of the bathroom, but to some extent secure the pipes from mechanical damage. To work will be required:
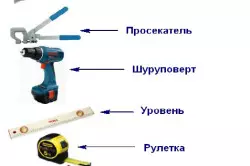
Tools for the manufacture of the box.
- Sheet of plasterboard;
- Bar wooden;
- Wooden antiseptics;
- putty;
- spatulas;
- plumb;
- mites assembly;
- roulette;
- level;
- drill or perforator;
- corner;
- knife;
- a hammer;
- dowels;
- Euro Shurus;
- self-tapping screw;
- pencil.
One sheet of moisture-resistant GLC standard size for wall processing is usually enough. For work in the bathroom or in the kitchen, it is best to choose the moisture-proof option, since the condensate on the pipes is almost always formed. Both in the bathroom and the kitchen zone humidity is most often increased, so the impact of moisture will be in this case to go on both sides.
Wooden bars with a cross section of 40x40 or 50x50 can be used for frame or mounting walls along with a metal profile. The profile is specifically designed for the work of this nature, and the tree is recommended to be pre-covered with antiseptics so that its service life increases, and the surface has not become rotten and mold. Therefore, in some cases, the metal profile is the best option and it is much more convenient to work with it. Required 2 types of profiles: guide and for the formation of a frame.
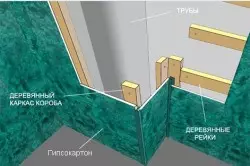
Digital circuit of plasterboard.
Article on the topic: Kanzashi for curtains do it yourself: Masters Tips
Dowels and Euro Shrup, which are clogging, are used for fastening the framework elements on the walls. To connect the parts of the box among themselves, special self-tapping screws are used for wood, they must be kalen.
The drilling of holes in some types of concrete walls is very difficult, and the drill will be useless. With such walls will have to cope with the help of a perforator.
Manufacturing of a box of plasterboard: wall markup
Marking starts to produce on the floor. According to the intended line, the profile guide (or support bars) will be laid. From the size of the circuit marked with a sheet of plasterboard, the final size of the box will differ, since the material is coated on top of the frame. This should be considered when marking. The perpendicularity of the lines of the walls, the ceiling and each other is tested by the level, plumbing and the square.The drywall box should not at the finished way to touch its pipe cover even on a small area, the distance must be at least 3-5 cm. The width of the external frame is chosen, given the subsequent finish. When finished with ceramic tiles, the size of the box can be adjusted so that the stacking tile does not have to adjust further if the width of the box will not contradict the previous points.
It is convenient to use a plumb to transfer marking from the floor to the ceiling. If additional marking for the walls is required, it is made using a strained between the floor and the thread ceiling, which is located between the two deposited points at an equal distance.
Dancer from plasterboard: Frame fixing
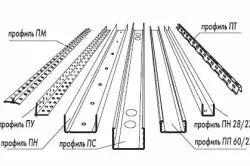
Types of metal profile for drywall box.
The box is a fairly simple design attached to the frame, but the features of all pipes that can be closed during its help are different. Therefore, when installing, you need to know well and take it into account.
Profile or bars located along the walls are laid out first. After them, the racks are fixed, which form the protruding front of the box. If the width of the box is more than 25 cm, and its height exceeds 1.5 m, it is recommended to enhance the strength between the supporting racks to make jumpers. The distance between each jumper should not be more than a meter.
If a wooden timber is used, then it, in addition to the original coating with antiseptics, is required to be processed and in places of sleep. Specialized masses for wood cope with this very well, as they are easy to apply and dry them very quickly. In addition to high-quality wood protection, such mastic guarantee the lack of a violence during deformations from heat and humidity, since when using them, the box will not creak and will be more stable.
Article on the topic: Miniature cross-strokes Schemes: Free Little pictures, Teapots with photos, download Rosehip Fruits
If the box is located in the corner of the room, then the profile is first attached to the wall of the dowels. After that, they put the guides on the ceiling, checking the angle to be 90 ° on any side.
Then where the profiles on the removal from the wall intersect, set another segment of the profile, which is attached by self-draws. The next step is to install the jumpers, if necessary.
In the event that the box is not in the corner, but in the center of the wall, the initial stage of fastening the frame remains the same: the profile is attached to the wall using a dowel. The semi profiles and the ceiling are installed in the following with strict control of the angle of 90 ° wherever it is necessary. The jumpers on the floor and the ceiling are installed with the necessary distance from the walls, are checked using a level and secured. Vertical racks are installed in the crossing places of the guides, if required, the jumpers are installed.
How to mount a plasterboard box on the walls?
Coloring plasterboard sheets is best so that the box consists of entire layers, and not from several pieces. Therefore, the stripes that will be sideways are cut off first. The width they should be equal to the frame (so as not to perform at the same time for the limited boundaries of the supporting racks). The dimensions of the remaining face are marked on the remaining sheet and cut on it only after that. The edges of the verge should close the edges of the strips, so the material is cut off for it, taking into account this.
Scheme of assembly and trim box of drywall.
Sheets are fixed using self-tapping screws, they are located every 15-25 cm. If the design width is small, then the sheets can be not fixed to the jumpers. When all sheets are fixed, you can start the putty and the formation of the corners. They must be smooth and in places of contact with the walls, and the box itself. In order to align the angles, use a metal corner or a special perforated plastic. Clean the corners on the fine layer of the laid starting putty, before it starts drying.
Article on the topic: Paint for wallpaper Painting: What is the paint, is it possible to glue wallpaper on oil paint, colors, photos, what wallpaper can be painted, video
How to hide sewer riser?
When installing the drywall box, in order to hide the sewage riser pipes, you need to take into account the need for an audit hole in the box next to the same existing in the pipe itself. This coupling with screwing on the bolts is used if you need to clean the blockage in the pipes. It is not recommended to close this box, it will be practical to purchase a special plastic door or make part of the panel shifting to the revision opening there was free access.It is necessary to ensure permanent access at the right moment to the place of sewerage, where it is included in the common riser. Often there are leaks, it is required to replace the elements. The door for accessing this part of the pipes should be located strictly on the front facing the outlet of the fabric of the manufactured box. Remove it into a more imperceptible place, most likely, will not succeed.
Plugs for water pipes
For these pipes, it is also required to install in some places of doors or technological holes. Access requires such places as counters of hot and cold water, as they need to take their testimony and checking performance. Additional holes will be needed if there are check valves, gearboxes, valves or compensators on the pipes. These doors can be located on the side of the box, so as not to rush into the eyes if the access to the necessary places is fully stored.
In order to manufacture such holes, it is required to cut holes in the sheets of drywall, which in size by 1-3 mm must exceed the size of the size prepared to the installation in the door. It is more convenient to make these manipulations before the drywall sheet will be installed on the frame in the required place. The door can be placed in advance and cut only after the material is mounted on the frame.
The space inside the rising professionals are recommended to fill in mineral wool. It exits the transmitted pipes vibration and noise of water, which are sometimes very strong.
Following this, you can apply the finishing putty and prepare the surface of the box to further finishing works, for example, to laying tiles.
Having reached this stage, you can consider the installation of the box complete.