
How to sew a wall with plasterboard, interests those who solved in a short time to cope with the repair in the house without significant labor costs and large financial resources. GLC well levels surfaces and serves good base for finishing coatings. Sewing the walls by this material, you lose only in one - room area, which will slightly decrease after the carcass equipment under drywall.
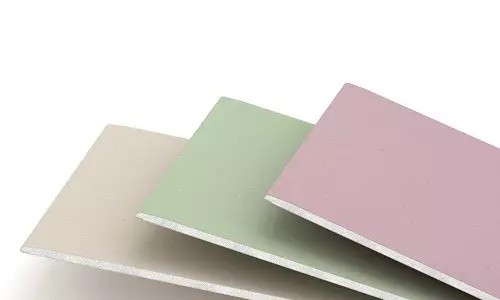
Plasterboard sheets have a fairly flexible structure, due to which they are excellent for alignment of the walls.
Construction of frameworks from profiles
Now how the frame is mounted, according to which the sewing walls will be conducted. To build it, you will need:
- UD profiles (guides);
- CD profiles (rack);
- Direct suspensions (P-shaped);
- single-level connections ("crabs");
- self-tapping screws with press-washers for metal (3 x 9.5 mm);
- Dowel-nails (6 x 40 mm).
Prepare:
- level;
- plumb;
- roulette;
- a piece of chalk;
- shock drill;
- screwdriver;
- Scissors for metal.
Mounting frame under plasterboard.
Mounting the frame starts with the installation of guide profiles. On the ceiling, swipe the parallel wall of the line. Using a plumb, make marking on the floor. Attach a dowel-nail to the floor and the UD profile ceiling. The fasteners should be placed in a step of 30 cm.
Install the rack profiles to the guides. Their base should be directed towards the future skin. The distance between CD profile centers should be 60 cm. The rack profiles are attached to the guide brands for metal. The vertical of the planks is checked by the level.
The foundation plane is almost ready, but it must be enhanced by attaching the CD profiles to the wall of P-shaped suspensions. They are installed along the CD every ½ m. The first bottom of the straight suspension is attached to the surface of 30 cm from the floor. With a wall of P-samples, a dowel-nail is connected, and with racks - screws for metal. Satisfied for the plane of the slaughter the suspension mustfit. Additional stiffness of the design will be given the installation between the CDs of the jumpers from the rack profiles. They are tightened with "crabs" verticals.
Article on the topic: The substrate under water heat
Profiles must be installed along the perimeter of window and doorways, but when they are installed, it should be borne in mind that the GCC joints cannot be located on any circuit line, since this location will result in the formation of cracks in the drywall wall. The nearest bog of GLC from the vertical or horizontal line of the window or door opening should be removed by 40 cm.
For cutting profile, it is possible to use grinders, but in the room it is still better to use scissors for metal, especially since the thin metal profiles cuts very easily.
Installation of plasterboard panels
Digital circuit of plasterboard.
After installing the frame, you should sew the wall with plasterboard. On the correctly installed cladder, standard sheets of plasterboard are perfect. Yes, and this material is trimmed very simple. For this, a construction knife is suitable. They make a deep incision on a sheet. It follows the knife by applying a ruler to the cut line. After that, the plasterboard is reduced and the knife cuts the cardboard on the reverse side. I cut off the sheet, you need to handle its edge. It should be somewhat beveled so that the seams between the GLC after the installation were easier to spit. In addition to the knife, emery paper (or outgoing rules) for the installation of GLCs will be needed:
- Self-tapping screws 3 x 25 mm;
- Long line;
- pencil.
Having applied GLC to the frame, screw the screws. In the perimeter of the sheet, they should be located at a distance of 15 cm from each other, and in the profiles in the center of the GLC Self-tapping screws each 25 cm. The distance from the edge of the drywall to the self-samples should not be less than 1 cm. In the angular parts of the panel, the fastener is screwed out no closer than 5 cm From the corner. Screws are screwed perpendicular to the profile, and the screws of the self-tapping screws must be somewhat recessed in Glk, but they should not break through the outer layer of cardboard. If the self-tapping screw is incorrectly (failed into emptiness, etc.), it should be removed and screwed, retreating from the previous place 5 cm.
Article on the topic: Illumination of the mirror in the bathroom: the best ideas and methods
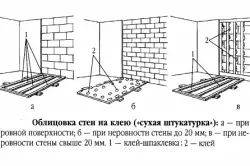
Mounting plasterboard for glue
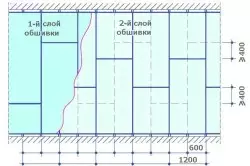
It has already been written about how to place GLCs when the opening of the openings has already been written on the installation of the panels, when 2 or more sheets are installed in the vertical row. In this case, horizontal joints in neighboring rows of drywall should not be coincided. Cut the wall so that these seams are as spaced as possible from each other. It should be added that between GCLs you need to withstand a gap in 2-3 mm. In the openings, the facing can be attached to the crate or adhesive mixtures.
Upon completion of the walls of the walls, it is necessary to shade GLC. Initially, the primer is processed by all joints, deepening, spots of impulses and installation of fasteners. Sulfayanka is glued along the seams. All that is listed above is sticky. As soon as the putty dries, the entire surface of the GLC is primed and another layer of putty is applied, which after frozen swelling the sandpaper.
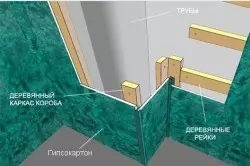
Construction of plasterboard partitions
A separate section must be devoted to the construction of partitions, in which the GLC is almost the most indispensable material.
Plasterboard partitions are erected when it is necessary to divide the room with a light wall that does not have a greater load on the overlap.
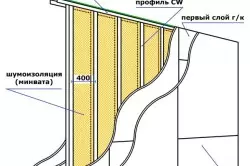
The diagram of the device of the partition from drywall with noise insulation.
For the construction of walls of this kind, guides are used, rack profiles and wooden bars, which will help to increase the doorway. In addition to the usual set for mounting drywall, you will need:
- Penropopy tape;
- Soundproofing (mineral wool).
Apply the wall on the floor. Using a plumb, make marking on the ceiling. Attach a dowel-nail to the surfaces of the guides. Their rear side should be saved with a ribbon to improve sound insulation. Install the guides by the walls and secure them.
UD profiles must be installed on the site of the doorway. Their bases should be directed towards the door frame. Check them with vertical levels and insert inside the profiles at the opening of the floor of the floor to the ceiling. Turn them with guide screws.
Article on the topic: Alignment of the floor by self-leveling mixture: Screed and time of drying in bulk, better gypsum and cement
Now insert the rack profiles in UD and secure them with self-draws. You can put in the frame of electrical wiring cables and communications. Strengthen the design with horizontal jumpers and cut one of the sides of the frame of plasterboard. It remains to lay mineral wool and fully sew the partition.