
If you are striving for the creation of an individual and extraordinary interior, then you just need to know how to make a bas-relief with your own hands. Such work requires a creative approach and certain skills, but you should not despair, you just need to study the technology and practice a little - then everything will succeed!
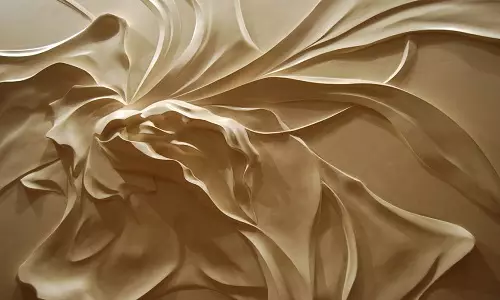
For the first time it is recommended to use patterns with a small amount, such as a flower, a branch with a bird.
Making bas-relief from plaster
It will take:
- tracing;
- copier;
- Malyary Scotch;
- Spatulas and masticines of various values;
- soft brush;
- self-tapping screw;
- plaster;
- finish putty;
- Construction mixer.
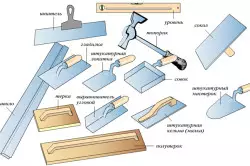
Tools required for plaster.
Before you start creating a bas-relief, you need to prepare a sketch. For this purpose, it is best to use a tracing sheet. If you are a novice in this matter, do not use too complex drawings with multistage relief. For the first time, it is enough to take a pattern with a small volume, for example, a flower, a branch with a bird, etc. Transfer the pattern on the tracing with a simple pencil.
The bas-relief is made on the surface prepared in advance, the wall must be aligned, plastered and primed up at least 2 times (it is necessary to improve adhesion). If you plan to make a panel indoors with high humidity, use antifungal primer. It is embarked after the complete drying of the primer layer. With the help of paint scotch, attach a copy of the film and the wall to the wall, transfer the drawing. In order for the bas-relief not collapsed, it is necessary to insert a dowel in the thickest places and tighten the screws (not to the end). This is a kind of fittings that will not allow plaster to crumble.
Divide the plaster on the attached instructions, let it stand for about 5 minutes, mix again with a construction mixer. Apply the bottom layer of plaster in the drawing, let him dry well. After that, apply the second layer, as if stuck elements. To work, use a spatula, masticine or your own hands, try to feel the material. In order to give relief elements with extra strength, use the bandage moistened in the plaster. You can prevent cracking if it takes from time to time to make ready-made parts with a wet brush.
Article on the topic: Arbor scheme: Various design options
The last layer of bas-relief is desirable to make from the finish putty, as this material is easily grinding. It is best to use the ready-made composition. The putty is applied by either a spatula or brush. At the finish stage, the extra lines are discharged, close the slots between the wall and the bas-relief. After drying, the putty panel is grinding in shallow sandpaper. Next, the surface is ground, then coated with acrylic paint.
Bas-relief in the technique "Terra"
To create a bas-relief in the tech "Terra" you will need: dry flowers and herbs, plaster, finish putty, PVA glue, acrylic paints.
It will take:
- Dry flowers and herbs;
- PVA glue;
- plaster;
- finish putty;
- acrylic paints.
Make a bas-relief in the tech "Terra" for everyone, for this you do not need to have a talent of an artist or sculptor. In this case, nature will do everything for you, you will only need to be dried with dry flowers and herbs. Silent spikelets, roses, leaves of beautiful shape, cereals, sand, etc. after the material is assembled, you can start working. First of all, prepare the wall, it should be aligned, plastered and primed. In this case, the PVA glue, diluted with water in proportion of 1 to 1, can be used as a primer.
Spread the grass on the table, make up the composition of them, mark the place on the wall under the panel. Instruct the plaster with water according to the attached instructions, add PVA glue so that you have a consistency of thick sour cream. Apply the resulting mass on the wall, press herbs into it, fill in the emptiness sand, seeds or cereals, leave until a complete burden.
In order to give the strength of dryers, it is necessary to primitive with the PVA glue 3-4 times.
Next, divert the finish putty of the PVA glue to the state of the liquid sour cream, with the help of a tassel, cover all the elements, leave until a complete burden. Cover the bas-relief acrylic paint.
Article on the topic: how to get rid of rats in a private house: folk remedies
An interesting effect can be achieved if you apply dark paint on the entire surface, for example, brown, then wipe it with a damp cloth in such a way that only deepening remains to be scratched. After that, emphasize all the bulbs with a light tone (white, dairy, lilac, beige, gray).
Making bas-relief using stencil
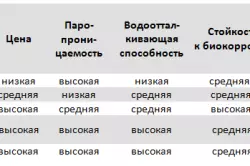
Table of indicators of different types of decorative plaster.
It will take:
- Penophol;
- sharp stationery knife;
- Stucco or putty;
- Malyary Scotch;
- Sketch with a pattern;
- Spatula or Mastichin.
Making bas-relief with the help of a stencil will not be much difficulty. You can use the finished stencil or make it yourself. First of all, you need to choose a drawing, print it on the printer or draw from hand. Then, with the help of painting scotch, you must attach the sketch to the foam, cut the stencil with a sharp knife along the contour of the pattern. In this case, it is better to use the insulation, and not the film, since the thicker stencil, the more convex it turns out the panel.
The wall is cleaned of dust and the previous finishes, align, sweep, covered with primer at least 2 times. Next attach the stencil by construction scotch. Such a bas-relief can be performed not only from plaster, but also with a putty. The choice of material in this case does not matter, since the thickness of the derived relief will not be too large. The plaster is bred according to the instructions, withstand it at least 5 minutes, it is stirred again. The putty is good because it is sold already in the finished form and does not need dilution. The composition is applied to the wall with a spatula or mastikhin. At the same time, try not to enter the boundaries of the stencil. It is not necessary to align the plaster, as it will smooth the volume. Immediately remove the stencil, if this is not done, he will seek to the bas-relief, and it will be difficult to tear it off.
Article on the topic: The importance of the passport of the facade
Give the work to dry, after which the surface of the fine-grained sandpaper moistened in the water, cover the primer. Further it depends only on your fantasy, you can paint the bas-relief in any favorite color, supplement the composition of the mosaic elements, etc. According to the same technology, a stove-bas-relief is made only as the basis is not a wall, but a sheet of plasterboard. Using the councils of specialists outlined above, you can easily make a wall panel with your own hands.