
In order to make her housing original and beautiful, there are many ways. A significant popularity has acquired a decor of the walls of walls using stencils, which are quite accessible. It is not difficult to handle them. Thanks to the application of the drawing on the walls, you can select any zone without overloading the space. If you carefully consider the selection of the ornament, you can emphasize the originality of housing, give the interior a certain mood. Such templates for painting walls can be made with your own hands. Learn to work with them very simple.
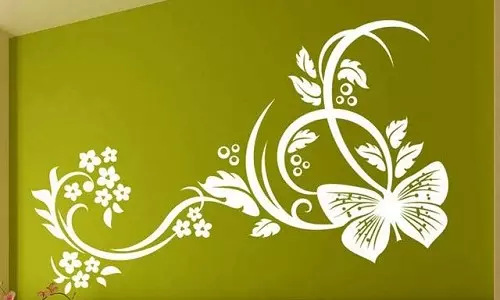
With the help of a wall stencil, you can perform a variety of drawings.
What are stencils?
Most often you can meet monophonic stencils: for them, one tone of paint is enough, the drawing turns out quickly and easily.
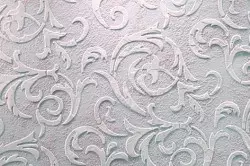
Using the stencil and putty, you can perform a bulk drawing.
Multicolor paint stencils help to create pictures on the wall with plenty of shades. To do this, we need to be patient and make a lot of effort, but the result is worth it. It will take to make not one, but several stencils, create drawings on the wall it is necessary, overlapping one stencil on another.
Using volume templates for operation, the drawing is applied using putty, the ornament thickness is obtained by 1-3 mm. Despite the fact that it is very easy to apply such an ornament, it looks quite unusual and produces an amazing impression.
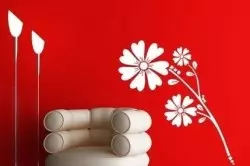
Anti-thin so named because of the way to work with it. It is necessary to paint the surface outside the stencil, it turns out something like illumination. To create a neuropa, a calm atmosphere in the bedroom such stencils are ideal.
How to choose a stencil for the room?
Select the stencil for decorative wall decoration with your own hands, depending on the general style, the destination of the room. This is completely the case of the taste of the owners, but you can bring general recommendations.
As you can take care of the details: if you need to overload the space with small elements, a beautiful ornament will become similar to graffiti.
In one room, you should not combine too many different drawings.
Article on the topic: How to choose an electric garden vacuum cleaner blower
Laconicity looks much better.
In one room, only one type of ornament should be applied to the walls. Do not combine geometric pattern and butterflies, flowers and trees.
No need to depict very small details on the walls. They are not easy to cry, and they published they will look inefficient, remind of paint stains.
There are no clear recommendations on where a certain ornament is appropriate. Usually, the decision to create a pattern on the walls is taken depending on their own preferences.
Manufacturing of stencil
Building stores can usually offer a rather extensive selection of stencils. But if you wish, you can and independently take care of their manufacture. To do this, you will need to be as follows:
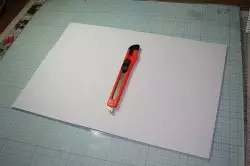
In the manufacture of the stencil, the stationery knife will help you.
- The drawing that you would like to place on the wall;
- Material for the manufacture of the stencil itself (cardboard, film or plastic);
- Stationery knife;
- pencil or marker;
- duct tape.
To begin with, it is necessary to determine which drawing will be used for the manufacture of a template. If there is abilities, you can and independently draw it. This picture is printed on the printer and in the future they work with this image.
The material for the stencil can serve as a simple cardboard, dense watman or plastic. Plastic folders are well suitable. To simplify the task, try to contact the advertising agency. There will help and create the image you need, and print it on any material.
To transfer the ornament to material, take the usual tracing. For plastic, the necessary figures are cut out of the paper, and then fasten with scotch tape or clips to a plastic basis and along the contour are shown by felt-tip.
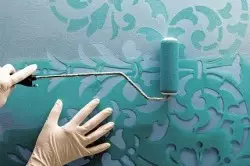
To apply paints to large stencils it is worth using a roller.
Sometimes the drawing needs additional design: it is required to draw some lines, jumpers. Depicting a stencil on cardboard, paper, take it on both sides by a self-adhesive transparent film or illuminated. Otherwise, the paint will be absorbed into the paper, jumpers will be twisted, and the prepared template will not last long.
Article on the topic: how to make a blank for hats with your own hands
Cut out the cut as closely as possible, without burrs, excess cuts, otherwise the drawing will look inactive, with lochmatic edges. For cutting apply a knife Stationery or a razor blade. Under the stencil it is necessary to put something smooth and solid, for example, a piece of glass so that the lines are obtained more even and clear.
How to perform pictures on the walls using the stencil?
Prepare stencils for painting walls, glue for it, roller or brush. Suitable aerosol or acrylic paint.
Prepare the surface to staining. Clean it from dust, pollution, wash, if necessary. On the cleaned surface, apply markup. If possible, apply the level: so less danger to squeeze the drawing or apply it incorrectly. Mark the pencil extreme for the point of the point, to then fix it on the surface exactly.
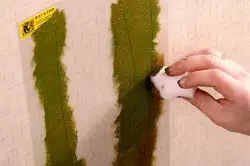
Application of paint on the stencil can be performed using a piece of pararal.
Before proceeding with work, practice a little. To do this, you can use a piece of wallpaper or find a unauthorized section of the wall. Preliminary work helps to practice a little regarding the application technique, and choose the desired color of the ornament. Experienced masters are trying to perform several ornament options in different shades to see what will best reflect the idea on the wall surface.
To secure the stencil on the wall it is better to use a special aerosol glue. It will not remain non-accurate traces, after the stencils removed. Neither wallpaper nor paint will leave the wall. The glue with a smooth layer is sprayed on the manufactured stencil, after which they pressed to the surface. For the suspension, you can additionally use scotch. It should be borne in mind that the glue does not save the glue to the paint under the stencil.
Performing staining through the stencil, remember that the high-quality painting of the walls does not tolerate the fussiness. To do this, it is better to choose paint based on acrylic: it will dry faster, acceptable for any surface. You can apply paint with a sponge, brush or roller. When working, dial the coloring substance little by little (this eliminates the risk of inclusions).
Article on the topic: How to make a liquid acrylic for bathing with your own hands
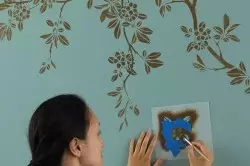
Working with minor stencils, it is recommended to use a brush to apply paint.
Working with a brush, it is necessary to keep it perpendicular to the surface of the wall. The paint is applied by the method of packing, so neither the pork, nor the coloring substance fall over the edge of the product. When staining with the use of sponge, the first prints should be made on a separate sheet of wallpaper. So it will be removed with an extra paint. When using a roller, it is necessary to ensure that the paint distribution can be obtained as uniform as possible. Especially neatly need to handle corners, small parts of the stencil. Roller is better to apply for products with a large drawing.
To stain with the use of an aerosol coloring mixture, try to hold the canister at a distance of 30 cm from the wall. Sometimes the wall requires to protect the paint from the edge of the stencil.
The drawing is saturated with color in several stages. Upon receipt of not very distinct boundaries, it is necessary to draw them with a thin brush.
To create a bulk pattern on the wall, a acrylic putty is suitable. It is necessary to apply it using a spatula. This is done by a layer behind the layer until the required thickness is possible. To create a volumetric pattern it is 1-3 mm. The putty is seized after 2-3 minutes after applying, but does not fully free. At this time, the stencil should be carefully removed so that the ornament does not turn out to be damaged. Not a very smooth layer, after the putty will dry, can be aligned using fine-grained emery paper. The resulting pattern can be painted or toned.
After completing the work, the stencil must be washed and dried. In most cases, it can be reused more than once again.
When working with a stencil, sometimes allowed errors that can not be done. For example, this is a displacement of the product or the flow of the coloring agent. To avoid this, it is necessary first of all to securely fix the stencil. Cancel a lot of paint, when staining, do neat movements.