
The problem of hot water in the absence of central water supply can be solved by independently and without long cash costs, having minimal skills.
Scheme of the self-made generator of rectangular pulses on the chip.
Of course, if you are not limited in our financial capabilities, you can completely acquire the boilers of industrial production. But with this option, you need to immediately count on serious cash costs.
A good exit from the situation can be a cumulative water heater, the price of which is quite democratic, but the complexity of its use consists in the fact that for normal functioning it requires pressure of water supply for at least 1 atm. Therefore, such systems are good if there is already an existing water supply or regular pressure pumping station.
Such an option as a flowing water heater, if you do not have a water supply, considering the meaning does not have, moreover, the electricity consumed is high enough, and in the assembly, a similar homemade unit is complicated. And its price will not be much lower than that of manufactured.
That is why it is worth considering the possibility of collecting a water heater with your own hands.
Whatever the system for the assembly you chose, without electric tan (tubular electric heater), which must be purchased in the store, you can not do. But it will be the most serious cash costs during self-assembly of the water heating system.
How to choose a tan for a water heater?
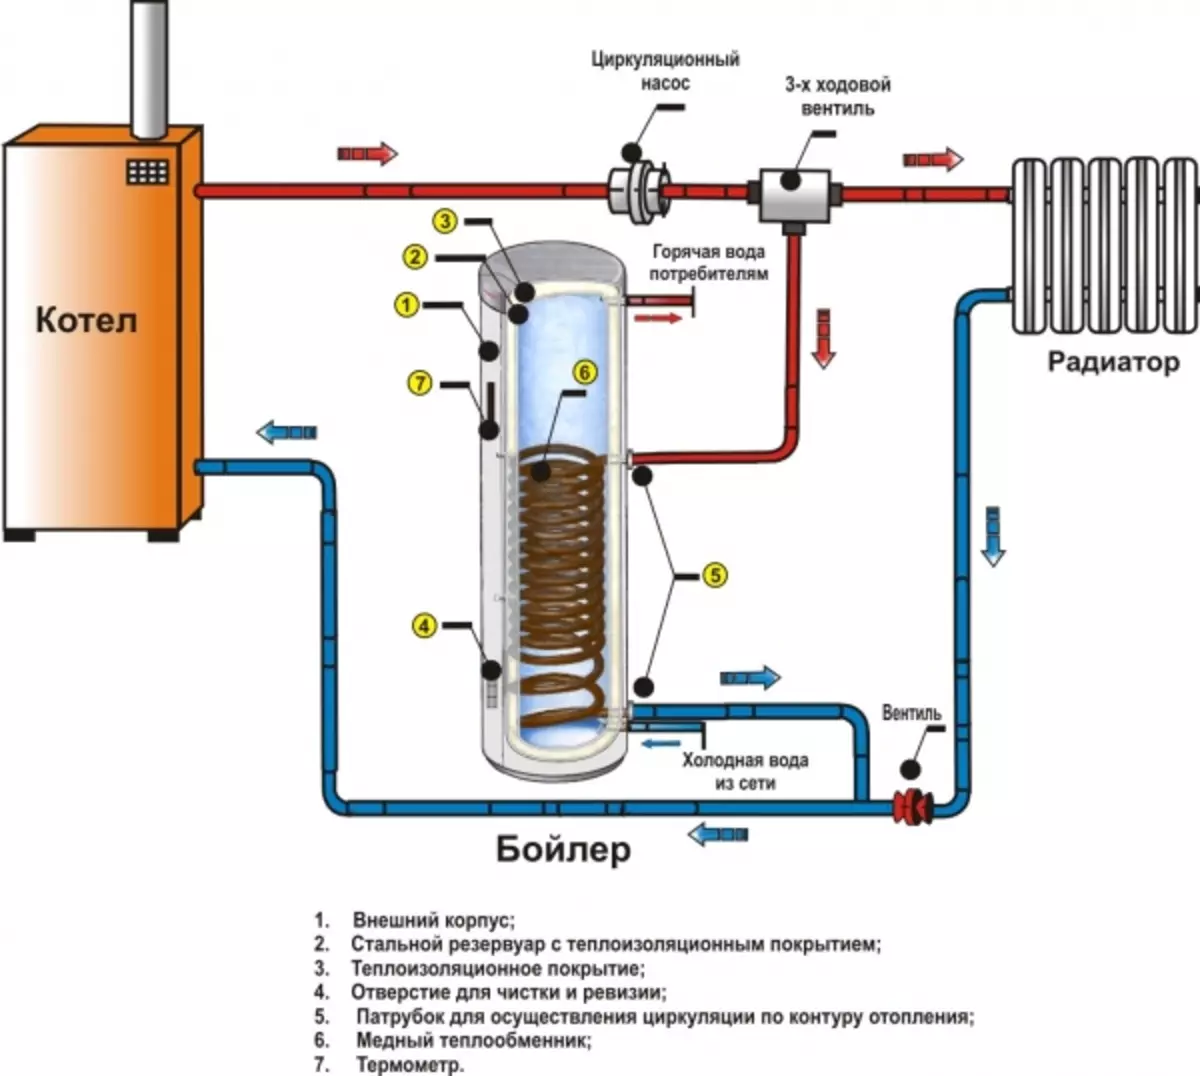
The scheme of the boiler of indirect heating.
Tennes for such devices are a copper tube or stainless steel design, both end of which are fixed on the flange. Heating occurs due to a conductive nichrome thread, which is located inside the tube. In order to protect the system from the electric current, the thread is paved with an electric insulator, which should also have sufficient thermal conductivity. That is why it is independently such insulation to make problematic, Tenni and recommend buying, and not to produce themselves.
It should be noted that the flowing electric heater differs from the accumulative type of Tan. At the first type of systems, the heating element is enclosed in a special flask, through which water flows.
The choice of this element depends on its power, on how quickly the homemade unit will heat the water.
The optimal power for the homemade water heater should be 2 kW, although there are ones from 0.9 to 6 kW. But if the power is less than 2 kW, then waiting for water to warm up for too long. With the greater power of the wiring of the house (or apartments) can be overloaded.
At the volume of the tank in 50 liters and 2 kW, the water will heat up approximately 1.5-2 hours, at a speed of a slowly boiling kettle. At the same time, the load on the power grid will be optimal, and electricity will be required approximately as much as the same kettle.
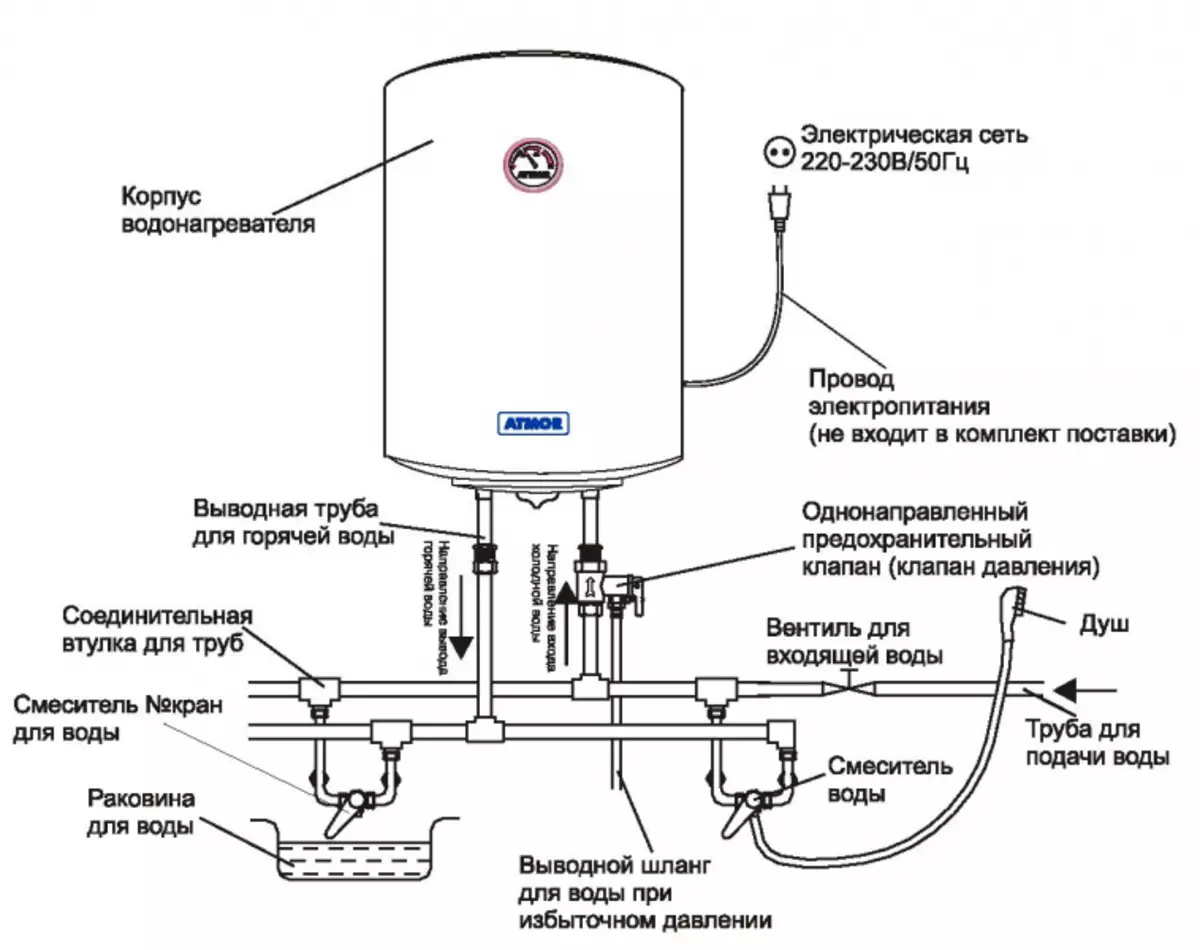
Electrical boiler connection diagram.
The most reasonable to buy a heater with an already mounted thermoregulation system. Such a system should heat the water to a predetermined temperature, whose range varies from 35 ° C to 85 ° C, then disconnected. As soon as the water temperature in the tank is reduced by 0.5-1 degrees, the TEN automatically resumes its work.
Article on the topic: How to lay folds on the curtains: step by step instructions
It is worth paying attention to the length of the Tan tube: the smaller it is, the smaller the area of its heat transfer and above the temperature on the heating surface. Accordingly, there is much faster on the basis of such configuration. In turn, the scale worsens the parameters of heat transfer from the heating element to water and if it is presented, the TEN will almost constantly work for heating, which will greatly increase the electricity consumption. Yes, and broken due to the scale of the TEN is easier and cheaper to throw out than to repair.
Cumulative water heater with independent filling function
To mount a similar system, you can buy a ready-made fishing machine with a built-in tenan, usually its drive is designed for 10-12 liters. Either the water heater can be constructed independently, by purchasing only a TEN and selecting a suitable container.
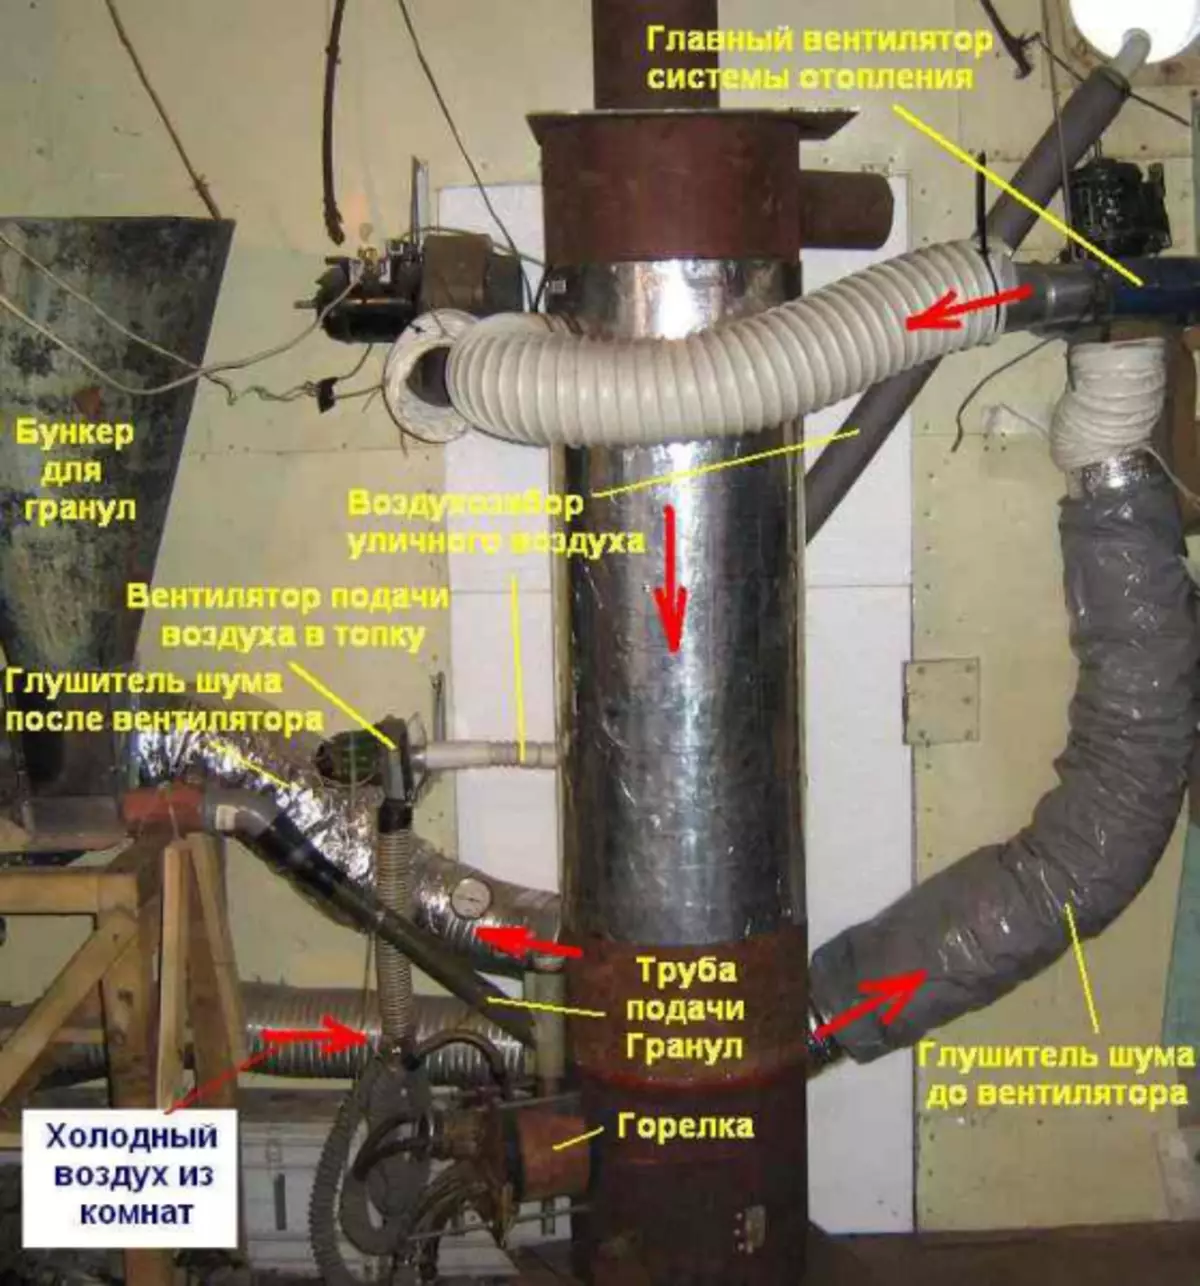
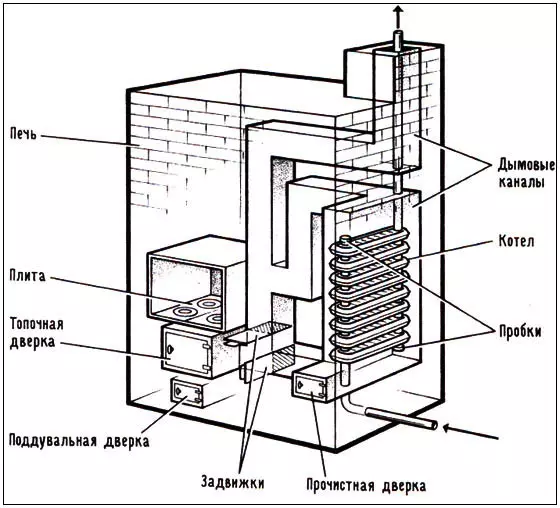
Scheme of a homemade boiler on firewood.
Many craftsmen collecting the homemade vehicle apparatus, misses this moment - and in vain. No wonder when leakage and breakdown of the water heater made by an industrial way, if this anode was not replaced once a year, warranty service for equipment does not apply.
The magnesium anode is a steel rod with a tip, covered with magnesium. Anode and is this tip. It is necessary for splitting water and neutralizes particles that form a scale, entering them into the reaction. If you mount the water heater without anode, then the Ten will fail very quickly.
Therefore, acquiring a tubular electric heater, prefer the models on which the magnesium splitter is already installed or acquired an anode separately.
Tank for automatic water heater
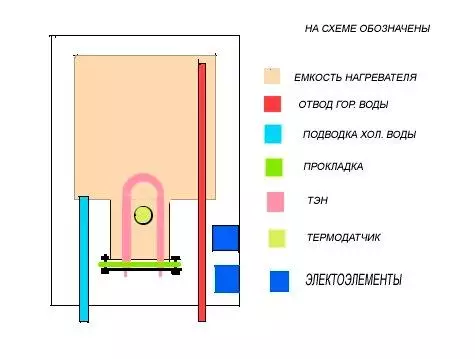
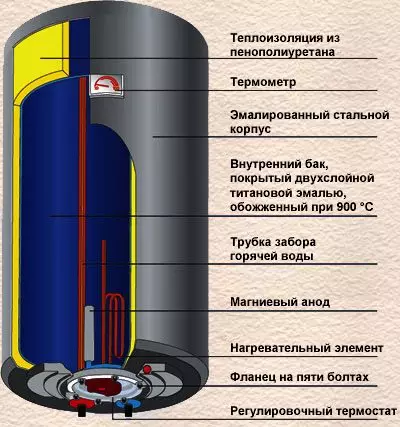
Scheme of the homemade water heater.
Materials:
- Electric TEN for a water heater.
- Magnesium anode.
- Capacity for water heater.
- Clamp flanges.
- Gaskets for fastening the Tan.
- Flexible hoses for water lining.
- Accessories for connecting water supply hoses (compression sleeves with sleeve, cape nuts and fittings, seals).
Instruments:
- Spanners for installing flanges.
- The tools needed to do the holes in the water heater tank (they depend on the material of the selected capacity: for plastic - knives and ordinary scissors, for a thin "stainless steel" - scissors for metal, for sheet steel - cutters, cutters, and the like).
Operating procedure
Scheme of the homemade boiler made of cast iron batteries.
It is not difficult to assemble a homemade heater. Capacity under homemade water heater can be purchased in the store. For this purpose, a plastic or stainless steel is well served. And you can cook the box you need from steel sheets you need if you allow skills and means. The main thing, the water heater must be hermetically sealed from all sides. Therefore, if it provides a cover, then after assembly it is necessary to weld or equip a reliable locking device, otherwise the water vapors will not create the sauna effect.
In the future, the tank needs to do the holes for installing the Tan and connect the filing hoses and water removal. Serve water is intelligent through the lid (top) of the tank, the water challenge hose is best located in the side wall at the bottom. The TEN also needs to be located below by mouncing it into the side wall or bottom of the tank.
Article on the topic: How to glue vinyl wallpaper on paper based correctly: reviews, video, what glue is better, how to remove, is it possible to paint how much dry
If you are going to install a homemade water heater to the room, which is not heated in winter (at the cottage, for example), then do not stop your choice on the plastic tank. If the water drain system is located at some, even minimal, distance from the bottom of the tank, then some amount of water in it will still remain. In winter, these residues freeze and plastic container will simply crack.
A hole for the TEN is made on the diameter of the heater itself, for the hoses - by the diameter of the storker fittings.
The heater itself is installed, the pressure flanges, not forgetting about the laying, tightly tightening the retaining nuts. Water eyeliner is mounted using flexible hoses. After assembling, the water heater tank is checked for tightness: water should not leak in any connection.
Installation of automatic water heater
Materials:- Tank drive.
- A large pot for cold water (with a capacity of at least 50 liters, it can be any capacity, such as a barrel).
- Unitaase valve with float.
- Materials required for installation of water supply (flexible hoses, fittings for connecting water supply hoses (compression sleeves with sleeve, precipitant nuts and fittings, seals), mixer).
- Materials required for installation of wiring (wires, terminals, light bulbs, automatic protection RCD).
- Plywood (or other material) to create a heat insulating box.
- Material (for example, foam) to create a heat insulating box.
- Fasteners for tanks. Their appearance depends on where and how you plan to have a homemade heater. Usually, if the design provides a suspension system, use steel corners.
Instruments:
- To create a thermal insulation box: a jigsaw, a joiner, a hammer;
- To install wiring: screwdrivers, pliers, tester screwdriver or probe;
- For installation of the water pipeline: adjustable keys, pliers, stationery knife;
- To install fasteners: perforator or drill, hammer, pliers.
Operating procedure
In order to mount a float unitage valve (which will adjust the automatic water supply) to the water heater, you will need to do another hole in the tank. It should be located at the top of the structure, under the capacitance itself.
It is possible that the existing design of the valve will have to remake a little, as it may not approach the size of the tank. So, most often by the bar, the float has to shorten, and if the ribs are provided in the tank, the fastenings of the float must be slightly bent under that form that has a water heater.
This design does not provide for pumps and water supply under artificially created pressure, the design should be placed stepwise. Above all, it is necessary to position the tank with cold water (consolidating it on the wall or raising the elevation). Thermal heater tank is suspended, below the level of the largest tank is approximately 0.7-1.2 m. And at the lowest level mixer and sink is mounted.
In order for water in the tank in the tank too quickly, it is necessary to make a heat insulating box, drinking from plywood walls with the calculation to be between them and the container "stood" heat insulating material, for example, foam. The box is going with the calculation so that all electrical wiring is outside, for safety purposes.
Article on the topic: Window decoration for the new year
Next, you can mount the wiring and water supply system.
Heater type "Boiler"
Materials:
- Capacity for boiler housing (gas cylinder).
- Nut (32 mm).
- 2 trimming of a metal pipe, a diameter of ½ inches (about 15 cm).
- Electric TEN and thermostat.
- Pacle or special lubrication for insulation of the heating element.
- Fastening for a boiler on the wall.
- The heat insulating substrate for laminate.
- Plastic pipes for water liner.
- Wires and terminals for wiring.
Instruments:
- Welding machine.
- Lerka for cutting threads.
- Drill and drills for metal.
- Screwdrivers.
- Gas keys.
- Screwdriver tester.
As a container under the boiler tank, a large gas cylinder with a 50-liter filled with a valve can be an ideal option. The used cylinders use is not recommended, otherwise the water that passed through such a boiler, designed independently, will have a stable gas smell.
You can get rid of it, cutting the container in half, thoroughly flushing and squeaking the surface, and then apply a layer of nitrogrinting on it and welds the design. But it is much easier to contact the service of refueling and distribution of gas cylinders, and to purchase a new, not used container there. There, by the way, you can buy a cylinder without a crane, and the need for its independent removal will disappear.
Order of assembling boiler
Electric TEN is installed at the crane attachment site. To do this, the nut is brewed with a diameter of 32 mm. So that in the process of further assembly, the water heating element has not been "led" and it accurately stood up in its place stipulated by the structure before welding the nut, screw into it a safe thread.
Metal pipes are spawned so that one of them is 2 cm for 2 cm to the top of the balloon. The hot water supply tube should not be resting into the boiler cover, but too short to do it should not be, otherwise the cold water will be mixed with heated. The second should be long, approximately 15 cm. It is intended for cold water. From one side, the plug is mounted (the pipe is searched), on the other, at a distance of 5-10 cm from the bottom of the boiler, the divider is formed: two slots are made or holes are taken. It is not necessary to cut the pipe at the bottom: in this case, there is a possibility that the sediment from the bottom of the cylinder will be mixed with clean water.
At one end of the trimming of a metal pipe with a lark, a short thread is cut.
Under the water supply pipes in the water waters, the holes are cut through the hole, after which the entire design is welded.
Finished finishing corners for boiler are welded. You can also make them alone, cutting out of sheet steel.
In the previously welded nut, the heater is screwed down, isolated its pacles, a special lubricant or a plumbing ribbon, the thermostat and signal LEDs are installed.
Next, the boiler must be wrapped with thermal insulating material, for example, a substrate for a laminate, strengthened the first layer with a brilliant side to the walls of the cylinder, and the second is outward.
Installation of water supply must be carried out only with the help of plastic pipes. A check valve is installed on the cold water inlet to the water heater. Otherwise, the TEN can burn when the system does not turn out to be water.