
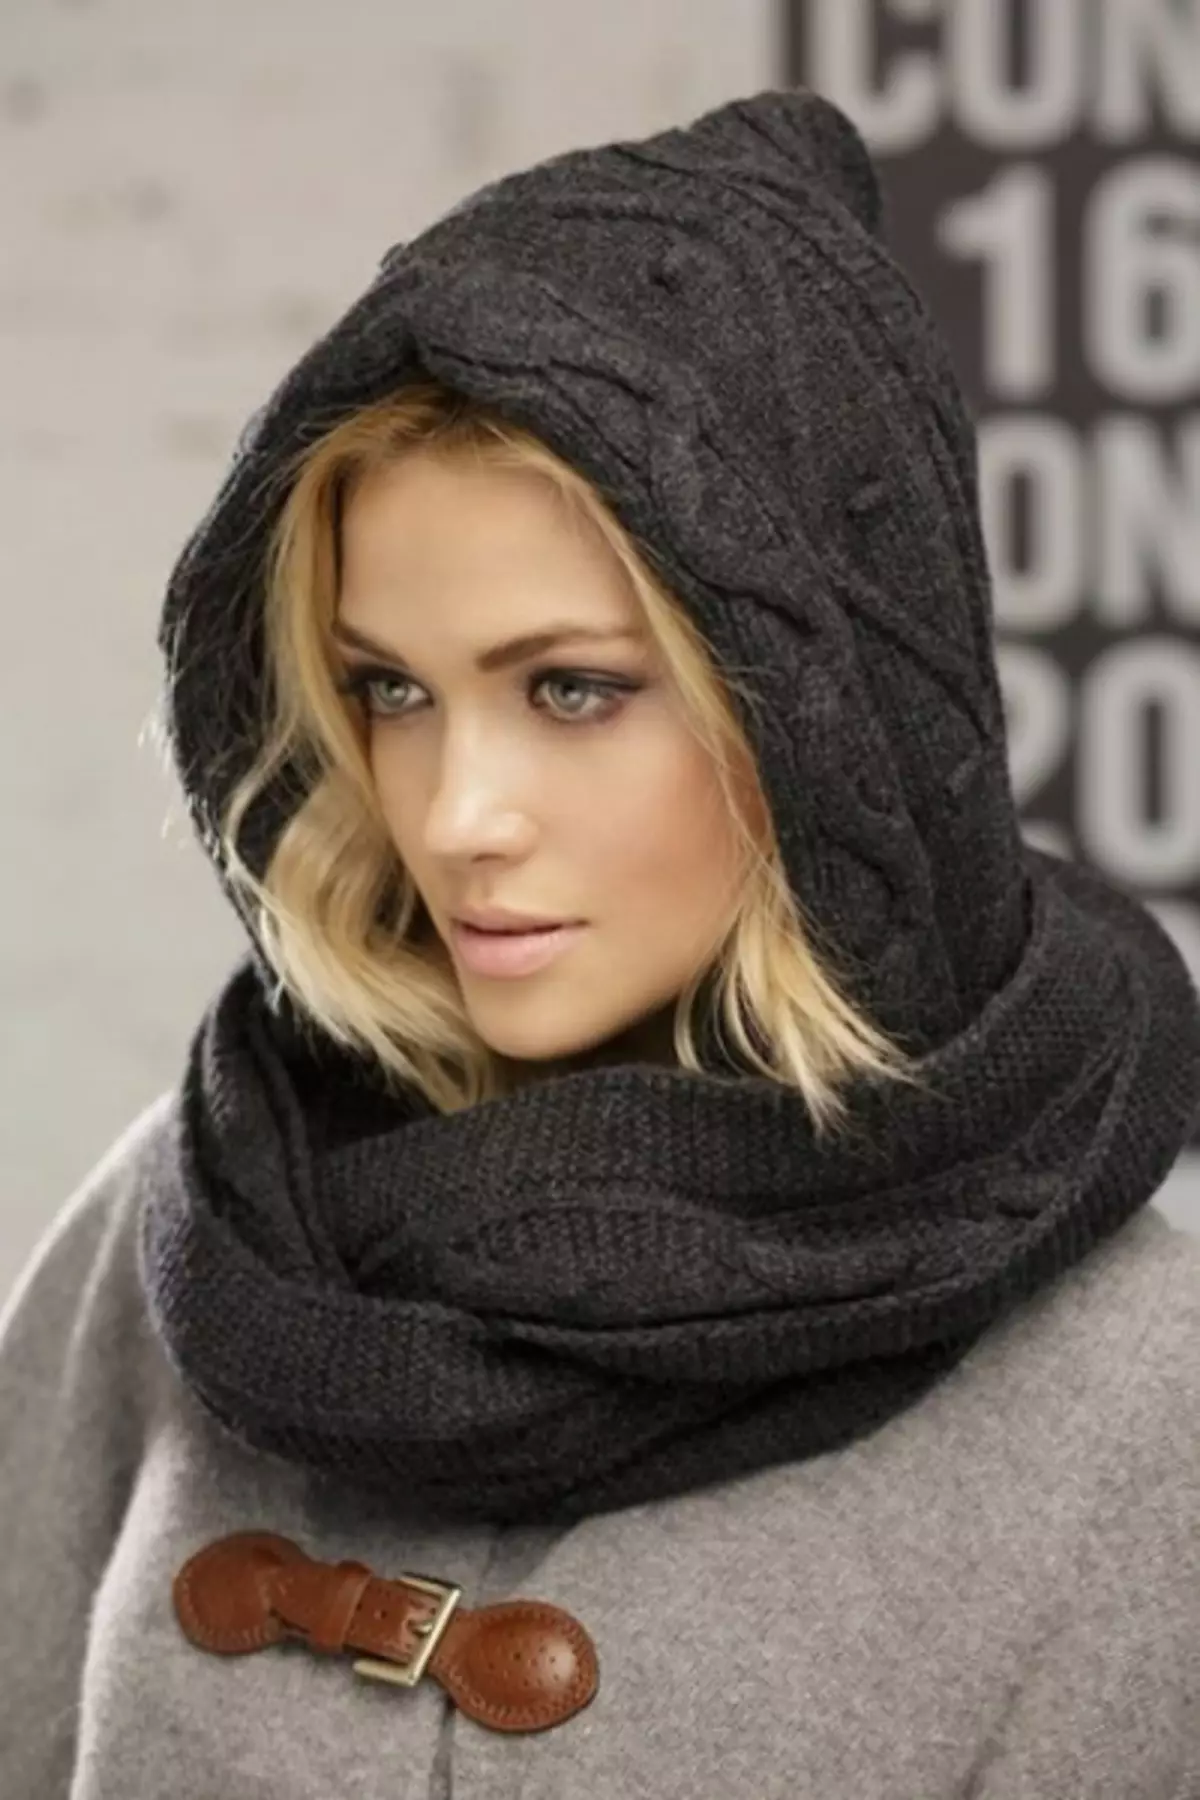
This species of the cap is very practical, because, putting it on, you keep not only your head in warmth, but also neck. In this article we will tell and show in the photo how to tie a cap-capping with your own hands.


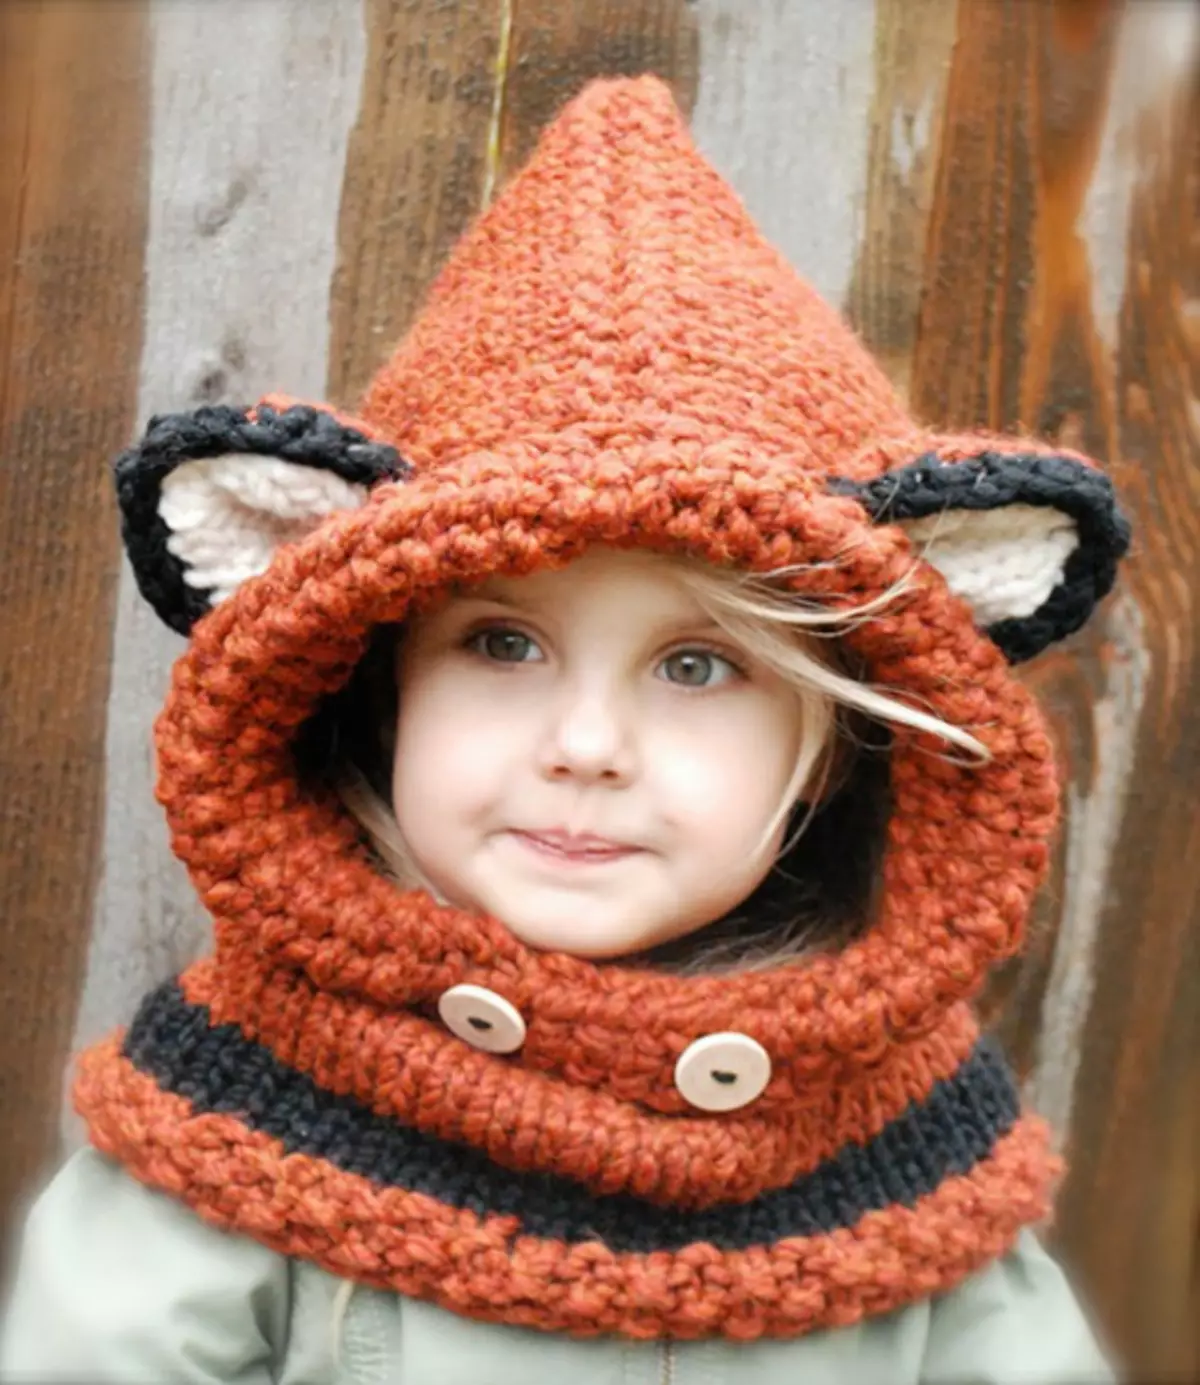
Children's model
For this product, we need to stock by any needles or crochet and wool yarn. Please note that the cap is tied not only for the girl, but also for the boy.
Measure using a centimeter the scope of the child and, based on this, type the loops. With the help of an openwork pattern, knit a height of about 10-13 cm, then divide all your knitting into three parts and knit only the central part of the openwork pattern. To do this, check at the end of each row an extreme loop with 1 loop from one or another third of the strip. Tied the occipient part of the cap, type a new row of loops on the bottom of the band and knit the collar with a bustling viscosity to a height of 6-7 cm, add 1 loop in each row on both sides of knitting.
Next, knit 10-13 rows in the openwork pattern and finish with tooths. Type a new row of loops on the front edge of the cap and around the edge of the collar and tie the strip face. Decorate with a hat with ears. Our capor is ready. If you want to warm the cap even more, then make a lining from the fleece.
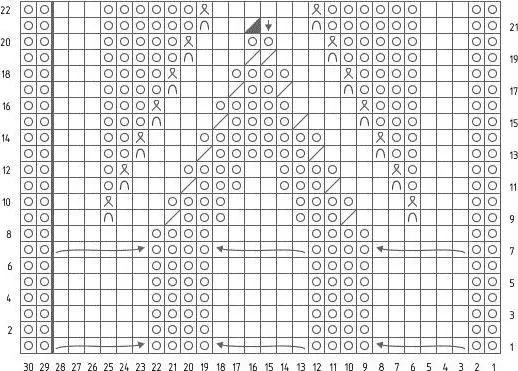
Knit ajura
The number of loops in this master class must be multiple 9. 1 row - check 2 facial loops, 2 together facial, Make 1 Nakid, 5 facial loops, * 1 Nakid, 2 loops together face, 1 facial loop, 2 loops together on the left front , 1 Nakid, 4 facial loops * Repeat from * to * (Rapport), 1 Facial loop, Make 1 Nakde, 2 loops together with facial, 3 facial loops. 2 and even rows are so, depending on which side, work is turned to you. Poured loops - facial, facial loop - involnenny, nakida - involnenny. 3 row - check 2 loops facial, 2 loops together face left, Make 1 Nakid, 1 loop face, 3 loops together, 3 Nakida, 2 loops Together with facial, * 1 Facial loop, 1 Nakid, 3 loops together facial, 1 Nakid , 1 facial loop, 3 loops together facial, 2 nakida *, repeat from * to * (Rapport), 2 loops together with front, 1 facial loop, Make 1 Nakid, 2 loops together face, 2 facial loops.
Article on the topic: Step-by-step algorithm for conducting general cleaning
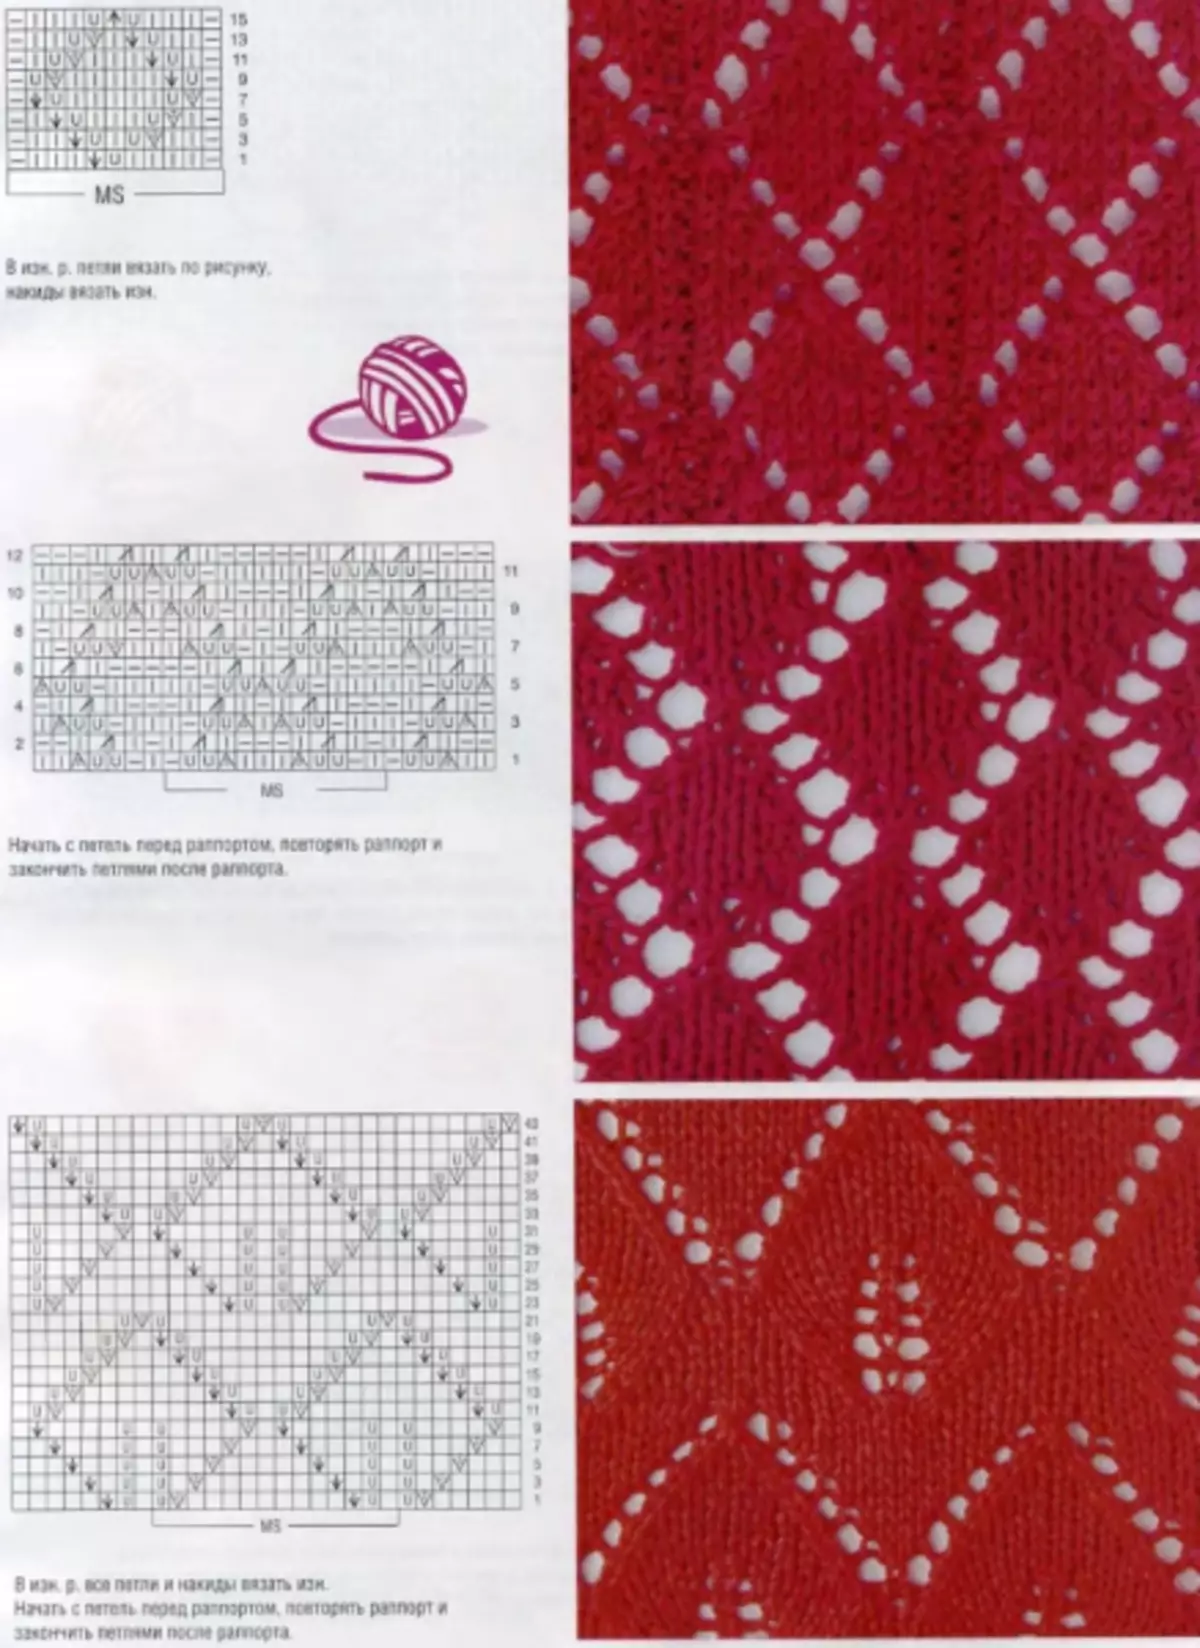
5 Row - Check 4 Facial Loops, 1 Nakid, 2 loops Together Left Facial, 3 Facial loops, 2 loops Together with facial, * 1 Nakid, 3 Facial loops, 1 Nakid, 2 loops together on the left face, 3 facial loops, *. Repeat from * to *, (rapport), 2 loops together face, make 1 nakid, 4 facial loops. 7 Row - Check out 5 facial loops, 1 Nakid, 2 loops Together Left facial, 1 facial loop, 2 loops Together Left facial, 1 Nakid, * 5 Facial loops, 1 Nakid, 2 loops Together Left facial, 1 facial loop, 2 loops Together with the left face, *, repeat from * to *, (Rapport), Make 1 Nakid, 5 facial loops. 9 row - check 6 facial loops, 1 nakid, 3 loops together face, 1 nakid, 1 facial loop, * 3 loops together face, 2 nakida, 2 loops together on the left face, make 1 nakda, 3 loops together face, make 1 nakid , * Repeat so from * to *, (Rapport), 6 facial loops.
11 Row - Check 4 Facial Loops, 2 Loops Together Left Facial, 1 Nakid, 3 Facial Loops, 1 Nakid, * 2 Loops Together Left Facial, 3 Facial Loops, 2 Loops Together Left Facial, 1 Nakid, 3 Facial Loops, * Repeat From * to *, (Rapport), Make 1 Nakid, 2 loops together on the left of the facial, 4 facial loops.
Second pattern
The number of loops foundations should be divided into 4 (+ 3 edges for alignment). 1 row - check 1 column with an outline on the 4 loop of the main chain, * on the next 4 loop, check the rapport: 1 Stage with Cathoid, 2 air hinges, 1 tuberculosis of 4 loops and 4 nakids, 2 air loops and 1 column with Nakid *. At the end of the row, check 2 columns with an attachment on 2 extreme loops of the main chain. 2 row - check 1 column with an outline over 2 columns with nakid * 2 Air loops, 1 column without a Caida, 2 air hinges, 1 column with an attachment to the gap between the bars of the previous row *. At the end of the row, check 1 column with an attachment over the extreme columns, then tie 3 air loops. 3 Row - 1 Stage with Nakad over a column with Nakid *, over the column without an ingredient, check the motive (repeat the first row), 1 column with an attachment over a column with an attachment. *
Article on the topic: Openwork tunics Spokes for girls: Schemes and descriptions with video
Repeat the motive twice. At the end of a number of 1 column with an attachment over the extreme column and three air loops. 4 row - check 1 column with an attachment on a second column with an embedder of the previous row, * 2 air loops, 1 column with Nakid *. Repeat the motive twice. At the end of the row, check one column with an extreme column, conclude 3 air loops. This pattern is repeated from the third row.
Capor-scarf
This method of caps is perhaps the easiest. It is suitable for both men and women. Lies in crosslinking two rectangles.
The length of this cap, when using this option, should be at least two meters. Choose an arbitrary width. You can decorate it with various patterns.
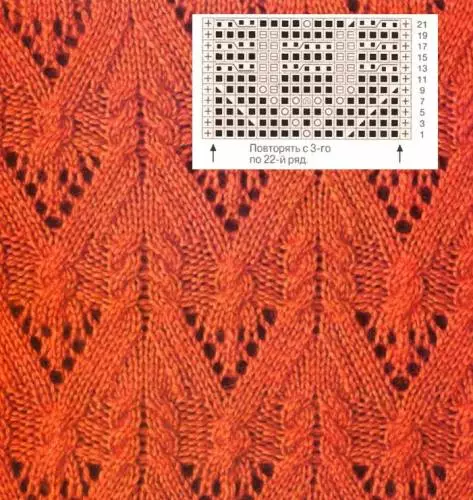
Here is the scheme of the pattern proposed by us:
Video on the topic
Thematic selection of video lessons with a detailed description, pay attention to the headdress "Daisy":