
Suspended ceilings are not only drywall, as they usually think. Attractive and aesthetic modern robes, produced on the basis of aluminum panels. They are easily mounted with their own hands, absolutely not afraid of moisture, they have a small weight. Today you can choose any kind of it, which will give the room the necessary appearance. There are attractive options with a mirror or metal surface that imitating various materials, including a tree. They can be used for narrow corridors, bathrooms, kitchens. Perfectly suitable diagonal laying. It is better to install a rush ceiling from the bands of different colors, combine them with metal inserts.
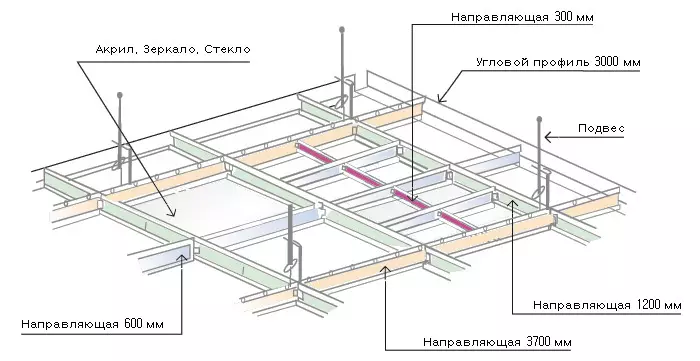
Scheme of the installation of a wavelength ceiling.
How to choose Rakes right?
Today, the cutting ceiling is used diverse, it is necessary to focus on such parameters:
- Length rail. Panels are available with a length of 3-4 m, for installation it is necessary to use special connecting elements.
- The width of each rail can range from 9 cm to 20 cm, but it is best to take the optimal width of 10 cm (it looks best).
- The thickness of the coating depends on the thickness. The optimal option is 0.5 mm panels, more subtle are not recommended.
The device of the suspended rush ceiling.
The surface of the rail may be as follows:
- Closed panels similar to the surface of the usual wooden lining.
- Open panels on the place of the joint have cavity, but it is recommended to put them only in those rooms where the height of the ceilings is significant.
- The panels with inserts are characterized by great attractiveness, often such inserts are made of mirror, with a metal surface. After mounting the ceiling acquires a beautiful and stylish appearance. Usually the rails are used for diagonal styling, they give the room a certain style, bold and beautiful features.
- The panels can be smooth or perforated, have a surface with imitation of natural wood.
Article on the topic: How does the smad-free gas column work
Tools and materials for the cutting ceiling

Tools and materials for the cutting ceiling: Bulgarian, perforator and screwdriver, construction level, metal scissors.
To install the rush ceiling, it is necessary to prepare such materials and tools:
- panels for the ceiling of the selected type;
- guide profiles and suspensions;
- Traverts for fasteners panels;
- special self-tapping screws with plastic dowels;
- building level;
- long metal ruler, plumbing;
- simple pencil;
- Perforator and screwdriver;
- Scissors for metal to chop profile and aluminum rails;
- Bulgarian, circle for metal.
Mounting diagram of a multi-level rush ceiling.
The installation of rush ceilings begins with marking. This uses a construction level, a simple pencil, a long metal line. The first markup is applied to the P-shaped profile around the perimeter of the room, after that the mark for the suspensions is made. . At the same time, the surface horizontal surface is measured. The walls are marked, which will indicate the level of the future ceiling. It is important to provide for the surface to be smooth and neat.
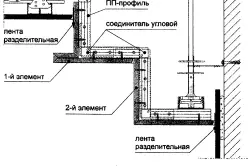
If a two-level ceiling is installed, then the markup is performed differently. On the ceiling with a pencil, its first circuit is placed, after which the mark is placed for the second level. To this stage, it is necessary to approach responsibly, use the initially composed diagram or sketch of the surface. Such a scheme will allow you to correctly perform materials calculations.
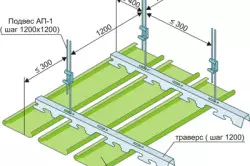
Fastening carrier elements
War ceiling design elements.
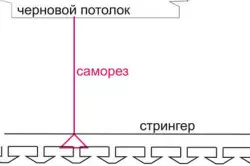
The installation of rush ceilings is that special guide elements are first fixed on the surface. First, the profiles of the P-shaped form are attached, from the edge, it is necessary to retreat 5 cm, drill holes that will be located at the edge of fasteners. The step is about 50 cm for the first hole, after which the rest is drilled. Holes are made from the outside so that burrs do not appear, and the appearance remained attractive.
After the installation of this profile is over, you must apply markup on the suspensions. You can use various options, ranging from wire and ending with the plates. It is best to apply adjustable suspensions, they will allow you to change the height if necessary. The points along the edges should be at a distance of 30-40 cm from all end walls, but for intermediate it is necessary to observe a step in 1.2-1.5 m.
Article on the topic: Decor do it yourself: Accessories and furniture from rope, rope or jute in the interior (45 photos)
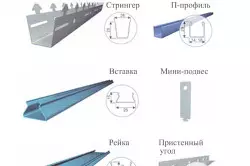
After that, you can already do the installation of stringers, i.e., the guide tires that have locks-grooves. It is on them that the ceiling rails will be attached. For fixing, the gaps must be observed at least 1 cm. This will allow not only easier to strengthen the rails in the grooves, but also protect them from temperature deformations. When the montage of the frame is carried out, the step between the points of the suspension is recommended to do in 1.2 m for the side, along which the rails will be laid. In the transverse direction, the step between points will be 0.3 m. The height of the suspension may be different, it all depends on the individual conditions. Already guides are attached to the suspension themselves for the P-shaped panels. Traverts have a special form that allows panels to be comfortably snapped.
Stepped ceiling assembly
Mounting scheme of the suspended rush ceiling on the self-tapping screw.
The assembly of the rush ceiling does not deliver difficulties. First you need to put markup on the panel, cut them with the necessary length. Usually they are made by about 3-5 mm shorter than it is necessary, as they will be inserted into the guides. Assembly is simple, it is necessary to start from the far wall. Rakes are inserted in one end in the stinglers grooves. If there was a click, the panel was securely fixed in special tires. Similarly, all other rails are mounted, creating a beautiful and neat coating.
It is important that the rails entered tightly, the locks snapped firmly and reliably. If special panels are used to overlap the joints, then they are mounted differently. First, 2 neighboring wide rails are set, after which the narrow is neatly mounted between them to close the junction. Usually this method is used for a beautiful ceiling with diagonal stacking. The main panels are made of white or other color, and the rails that imitate the mirror surface are installed between them. The installation of rush ceilings ends with the fact that the last rail can succeed, the second guide is attached, all joints are decorated with a special plinth.
Article on the topic: how to wean a dog nibble and tear wallpaper
Useful advice
When the installation of the roll ceiling is performed, then it is important to take into account the direction of the strips. It is worth considering the configuration of the room itself.
For too narrow, it is recommended to use a diagonal laying, but for large rooms you can use a combined and unusual option with color combination.
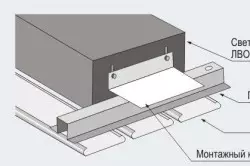
Mounting diagram of the lamp in the cam ceiling.
You can purchase white and red or turquoise, taking into account the rest of the interior.
If the room is too big, then you need to use special liners, they are supplied separately. In this case, the joke will be neat and almost inconspicuous that for the ceiling is so important. For rush ceilings, point lights can be applied. It should initially perform the marking of the base surface, on the panels themselves to make cuts for the installation of lamps.
Typically, the installation is performed as white, but other options can also be applied. In the case of rush coatings, you can make combined two and three-color coatings, where the bands will be alternate with each other. It is necessarily taken into account the general style of the room so that the ceiling is harmoniously fit into the situation, and was not an alien element.
Installation of the wave-type suspended ceiling is not only simplicity, but also reliable. Such a coating is obtained light, durable, it can even be attached to the wooden dilapidated overlap, absolutely not creating heavy loads. The appearance of the ceiling is unusual and attractive, it is perfect for a modern and bold interior.