
The ceiling is an important element in any interior. Its clearance can completely change the room: visually expand a small room or make a more cozy huge hall. Everything will depend on what type of ceiling design is selected for this particular room. Recently, a lot of attention is paid to the installation of suspended ceilings. Thanks to these designs, the problem of interior decoration is easily solved and the ability to hide not only the shortcomings of the base ceiling, but also various communications: wiring, various pipes, ventilation and air conditioning systems, additional sound and thermal insulation. In addition, it is possible to arrange various lighting options.
Thanks to the suspended streams, the problem of interior decoration is solved and the ability to hide not only the shortcomings of the base ceiling, but also various communications appears.
Types of suspended ceilings
According to constructive features, suspended ceilings can be divided into solid and modular.
Solid are similar to ordinary, with the exception that they have a perfectly smooth surface, and modular are structures that fold from individual modules. Modules can be a square or rectangular shape and attached to a special framework. Everyone without exception is one plus - simplicity of installation. In addition, the installation of ceilings can be carried out in several levels. It will make it possible to completely change the design of the room, give it a unique view.
The species of the material used allow to divide the suspended ceilings into several main types: plasterboard, stretch, robes, polystyrene foam plates, cassette, from plastic panels, grille lattice ceilings and Armstrong ceiling.
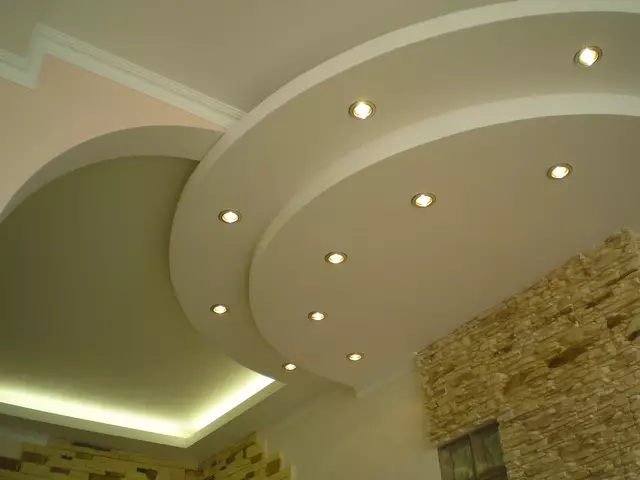
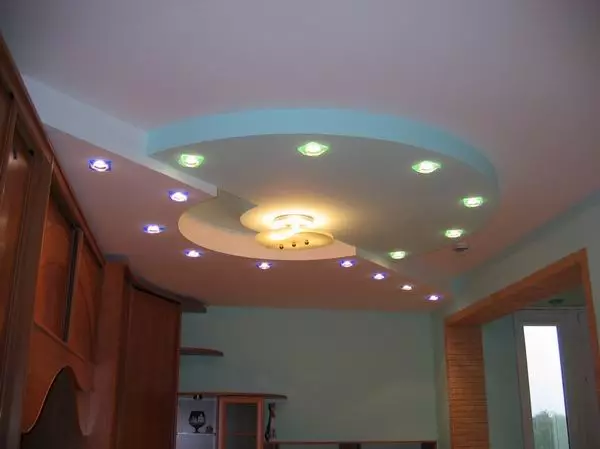
Plasterboard allows you to do both single-level and multi-level designs of the most different configuration.
One of the most popular types is plasterboard. Universal and reliable, which can be used in rooms of different types. The material allows you to do both single-level and multi-level designs of the most different configuration, create various niches to illuminate and use a variety of lighting.
The second type of solid ceiling is stretched. This is a superscript vinyl film stretched on the frame. The scope of stretch ceilings is very wide due to a variety of colors and textures.
The simplest solution for the design of the suspended ceiling is the wrap or lining, which is from wood, plastic or MDF. Such design is the ease of installation and does not require additional departure, except for wood.
Installation ceiling from polystyrene foam plates there is one feature. Plates are glued directly on the ceiling with special glue. This is the most budget way to design the premises.
Article on the topic: Liquid wallpaper and decorative plaster "Wet Silk" - What is the difference?
Grillyto grille ceiling and modular Armstrong type ceiling are used mainly in commercial buildings: shopping centers, offices and other public places. Due to the fact that these designs consist of separate modules, it is easier for access to communications that pass over them. Another type of modular ceiling is a cassette, the details of which are made of fine steel or aluminum, possibly a mirror design.
Installing construction from plates
Despite the variety of materials, the technology of installation of the suspended ceiling of any type is about the same. Separately, it is possible to highlight only the installation of stretch ceilings.
It is not recommended to throw, put on angular surfaces or turn over.
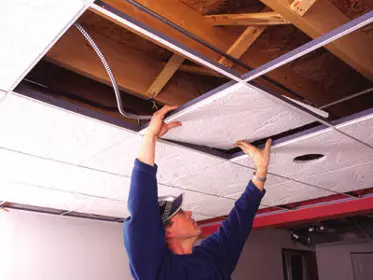
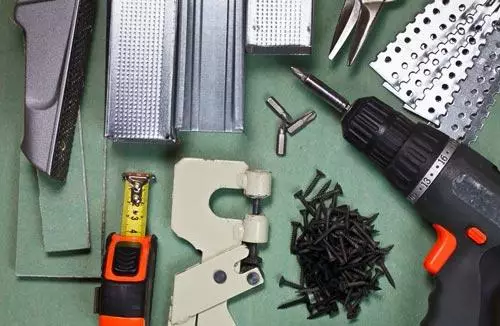
The ceiling installation can be viewed on the example of the ceiling slab device, which are mainly produced by the size of 600x600 and 1200x600 mm. Before starting work, you need to prepare the necessary materials and tools:
1. Panels for suspended design.
2. Metal profiles and suspensions.
3. Level.
4. Pliers.
5. Roulette.
6. Screwdriver or drill.
7. Bulgarian.
8. Self-tapping screws and dowels.
Installation technology does not cause any difficulties. Works start with markup. The distance from the base ceiling to the suspended will depend only on the desire of the owner and on the purpose of using this space. If you plan to arrange different communications over the ceiling, then this should be considered. Marking can be carried out using an alcohol or laser level or a retiring (colorful) rope.
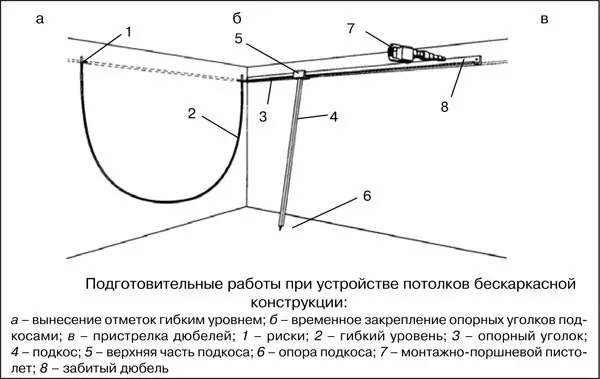
Preparatory work in the device of frameless design ceilings.
If the ceiling will pass electrical wires, they should be tightly fixed by special screeds. Starting the installation is necessary from the site, which is first striking at the entrance to the room. If the plates have to be cut, then such pieces are better installed above the door or in less noticeable angles.
On the perimeter of the room, accommodate the angular metal profiles, which must be attached with 100 mm long-standing. On the concrete wall will have to start drill holes for the dowels, install them and only then screw the screws.
Next, the base of the frame is mounted, for which intermediate profiles are used. They will fix the panels of the suspended ceiling. The distance between the profiles is the width of the ceiling tile. As a rule, intermediate profiles 1.2 m or 0.6 m long and long transverse supports are used. On the angular profiles of opposite walls, mark the length of the average, for example, 1.2 m. Check the roulette cross-distance and transfer it to the profile itself. Excess to cut with a grinder. Install the transverse profile by fixing it on the corner.
Build finished design
To collect cells for the ceiling tiles, you need to strengthen profiles in parallel to the angular guide. Each profile has its own fastener system, so fixation will not cause any problems. The use of fasteners are simple: on the main profile there are slots, and in intermediate - small protrusions. They must be inserted into the slots on long profiles. If everything is done correctly, a light click will be heard. As a result, the grille should turn out, the cells of which are equal to the size of the plates.
Article on the topic: How to cover with a lacquer wooden door in order to return her for the old look
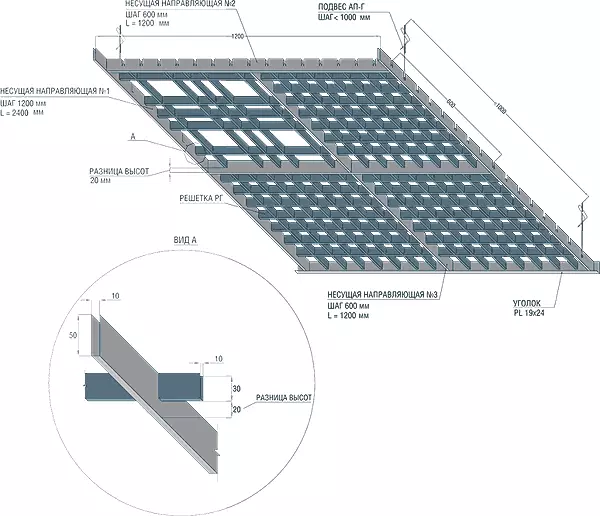
Installation of the suspended ceiling Grilyato.
So that the finished design does not begged, in the middle you need to attach a transverse profile to the basic ceiling. For this there are special suspensions. They need to be installed on profile rails into special holes. The upper loop bends 90 degrees and is attached to the ceiling with a self-tapping screw. The lower end in the form of a hook is inserted into the profile hole. Suspension is easy to adjust the height of the ceiling, thanks to the thin curved plate in the center. It must be pressed and putting the height.
The operation is completed by mounting short transverse swops that form cells. During the work, it is constantly necessary to check the horizontal framework. In the created cells, alternately install a suspended ceiling consisting of panels. If some tiles will be ruined during operation, they can be easily replaced, without reworking the entire design.
Ceiling of plasterboard
Mounting technology of this type of decoration is almost no different from the installation of ceiling tiles. The difference lies in the consumables, because plasterboard sheets are larger than the tile. For their mounting, a guide profile is needed (in the form of the letter "P"), to which the rack (in the form of the letter "C") is mounted, on which plasterboard is mounted.
Tools for installing plasterboard ceiling: drill, level, saw, screwdriver, hammer, screws, dowels, profiles.
To install a plasterboard ceiling, you will need:
1. Drill.
2. Level.
3. Saw.
4. Screwdriver.
5. Hammer.
6. Self-tapping screws on plasterboard and metal.
7. Dowels.
8. Metal profile.
On the perimeter of the room, markup is made and the shooting profile is attached at a distance of 45-50 cm. Under the screws need to install a dowel, pre-drumped the hole and scoring them with a hammer.
When the guide profile is installed, you need to fix the rack on special brackets-holders. At the brackets, the type of perforated metal grid, which must be given the form of the Litera "P". The staples should be attached to the ceiling with two self-draws at a distance of 50-60 cm. The brackets will maintain a rack profile attached to brackets by self-draws.
If a multi-level structure is planned, then use metal rods with clamps, which are attached to the basic overlap. They will replace the standard brackets and will keep the metal frame at the height.
Article on the topic: What wallpaper Select for the hallway: 5 secrets of successful design
To cross the rack profiles to cross, you need to use a cruciform bracket, the hooks of which should be hooked for the inner edge of the lower profile, and the side walls are for the upper profile that keeps on the metal rod.
The distance between parallel with the rated rack profiles should not be more than 50 cm. The ends of the metal profile are fastened with self-drawing to the guide profile. After the fastening of the metal structure is completed, it is necessary to check its stability and horizontality and only after that begin the installation of plasterboard sheets.
Plasterboard is attached by self-drawing at a distance of 25 cm for the rack profile. The screw of the self-press should be slightly recessed in the panel. Sheets must be tightly docked with each other.
Installation of stretch ceilings
One of the most interesting ways to design the room is the installation of the stretch ceiling. The ceiling coating is stretched on fastening plats, which are attached to the walls around the perimeter of the room. Such a design makes it possible to reduce the distance to the basic overlap (at least 3.5 cm) and place an area of 40-50 square meters. m solid cloth. The ceiling can have a variety of shape: a square, rectangular, polygonal, round, oval, arcuate.
It is characterized by a stretch ceiling by mounting the design: the harpoon system and the flawless. For the harpoon system around the perimeter of the canvas is harpoon - fasteners, which is a soft plastic. To install the stretch ceiling, you will need:
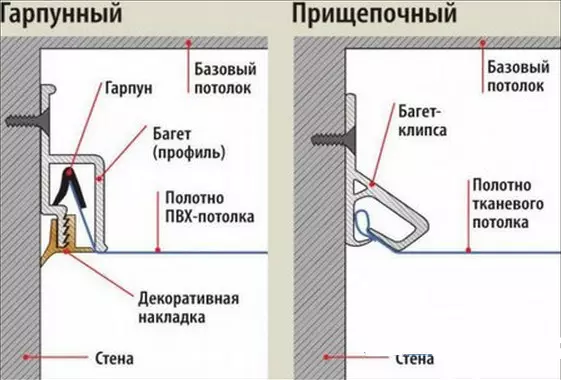
Technology of installation of stretch ceilings: Cartoon and pickle.
1. Vinyl film.
2. Special aluminum profile (baguette).
3. Installation blade.
4. Decorative lining.
5. Warm gun or gas burner.
6. Level.
The film is manufactured in size of a particular room. The required level is chosen around the perimeter and the framework of a special profile is installed. As a rule, the distance from the basic overlap to the film is 3.5 cm, but if it is planned to install lamps, then you should retreat by 7 cm. To install the web, it is necessary to use a heat gun that warms it up to 50-70 degrees. The film is suspended for preheating for special clamps. Then the film cant mounting the blade is refilled in the profile, starting with the corners. The next stage of the work: the canvas is refilled on the sides, starting with the middle and moving towards the corner. Then the decorative lining is installed, which will hide the groove in the profile. When the installation is completed and the film cools, it is formed perfectly smooth surface.
In the places of fastening the lamps, after installing the film, the reinforcing ring is glued. The material is cut inside it, the wires are pulled out and the lamp is attached.