
The stool is a fairly popular element of the interior. He is especially needed in large quantities when the owners love to take a lot of guests. You can make stools with your own hands.
Stool is universal and compact, which is why this type of furniture can be seen today in any residential room.
But if you do this work for the first time, you should know a few moments:
- The most reliable view of the connection is "Paz-Schip". But it should be applied in the case when there are already carpenter skills. It requires accuracy when cutting out the grooves, otherwise the design will not have durability, and during operation, wood fibers will create a creak.
- The stool is designed for constant movements. Therefore, the material for its manufacture is required to select such that it is not "spread quickly." It should also keep well-fastening elements, such as screws, nails or self-tapping screws.
Both of these moments should be taken into account before making a stool, especially if a newcomer is taken for work.
What makes a stool from?
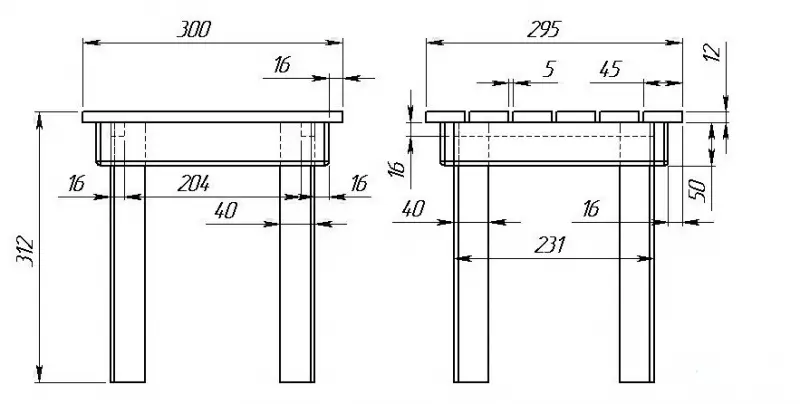
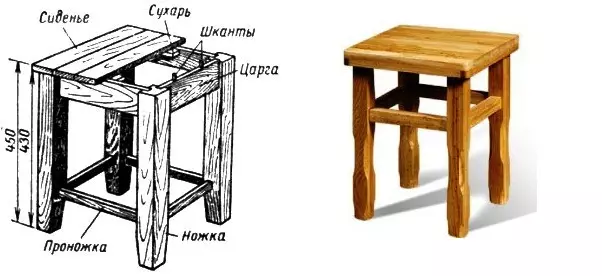
Drawing and sizes of ordinary toaster.
Depending on the style of the interior, you can find chairs of absolutely any shape and material, up to metal. For exclusive lovers, a stone or glass stool can be chosen. Although the most popular and affordable material still remains stools of wood.
The simplest design of such a chair consists of seating, 4 legs and connective plates. You can make a stool using the following materials:
- Bruus 3x30 mm, which will serve as legs;
- two boards (14.5x30 cm, thickness - 2-2.5 cm);
- plywood sheet (thickness 1.2 cm);
- glue;
- emery paper;
- acrylic varnish;
- Sculptures in size of 4 cm.
If such materials are under hand, then you can safely begin to make a stool.
Selection of the right tools
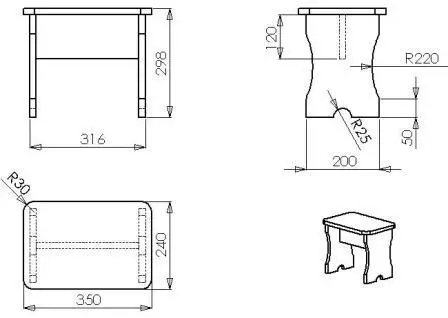
Drawing of tobupet with solid legs.
Basically, the design of stools from the tree does not constitute anything complicated. The main thing is to stock up the right tool, namely:
- fine-grained hacksaw;
- cruciform screwdriver;
- drill;
- construction meter and corner;
- simple pencil;
- drill;
- Brush under varnish.
If there are elementary knowledge of the building inventory, then one of the above elements can be replaced with analogue. But the newcomer is better to stick to this list to make it easier to carry out all the work.
Article on the topic: Convenient wardrobe on the loggia: Ergonomics and compactness
Instruction and action plan on how to make a stool
- The very first stage is the preparation of support, that is, legs. For this, the timber is cut into four equal segments of 43 cm long. From the boards, support will be made for the "fifth point", therefore it is selected into two blanks with a size of 14.5x30 cm.
- Plywood will serve as a connecting plate. For this purpose, the sheet is cut into a segment of 10 per 27 cm. After that, on the wide edges, it is cut through the groove (1.2x5 cm), and the distance from the edge of 3 cm, equal to the thickness of the leg. The obtained elements are collected in a square, which will serve as a frame.
- Further, plywood frame, seat and legs are connected.
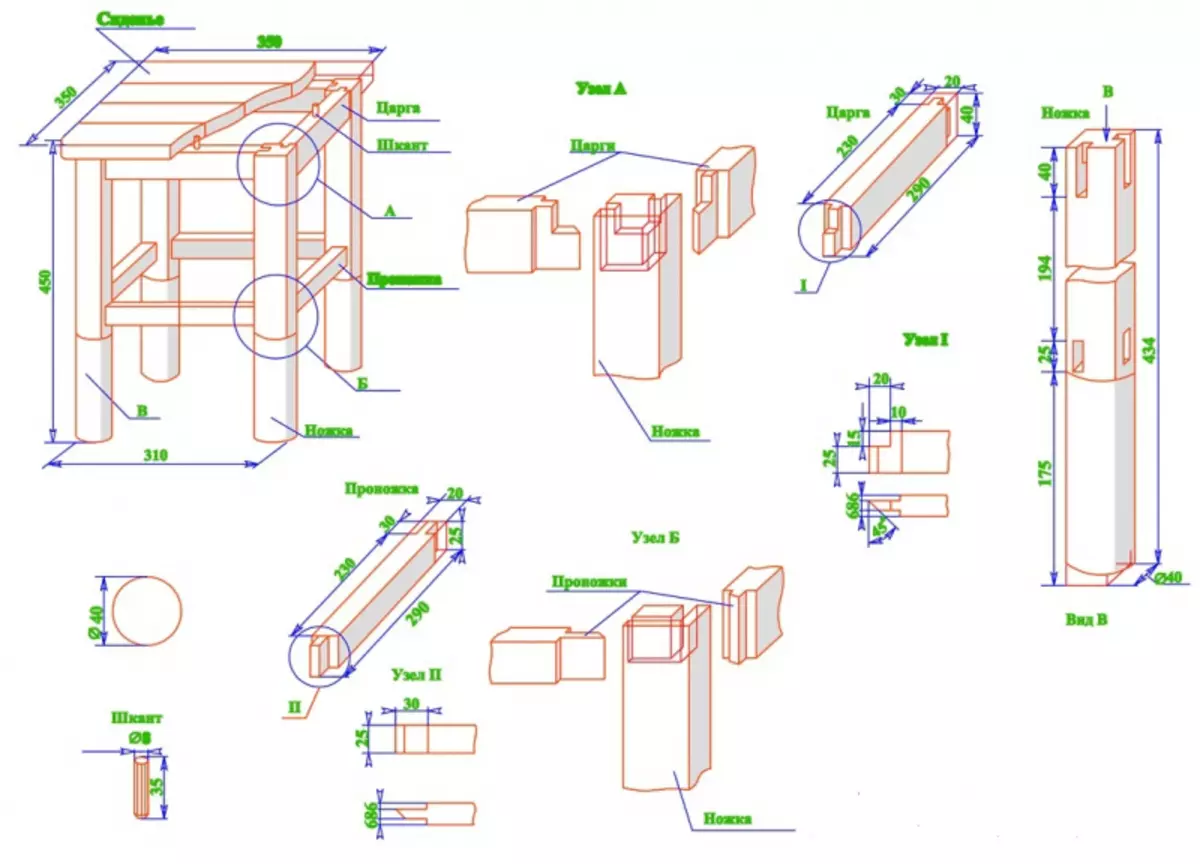
Tubereboard assembly scheme.
To do this, in the appropriate places you need a drill to prepare holes where all the elements of the stool will be attached using screws. So that the clutch was more reliable, the locations of the compounds can be opened with auxiliary glue. PVA is suitable for this purpose. For stools from a tree, it will not be superfluous to work on the fairy school, more precisely remove it. It will smooth the rib details, due to which the product will have a more presentable look.
The tree has such a structure that dussers on the surface are formed with it with it. In order to polish the stool, elaborate paper is used, and experts recommend to do it in two goals. That is, first work with a coarse sandpaper, and then fine-gravel go along the top. Grinding helps to eliminate not only burstles, but also to give the whole product "leveled" appearance.
The final moment is opening with varnish. Best of all, if the varnish will be applied in two layers. But only the subsequent autopsy is carried out when the previous layer is completely dry.
When designing stools from wood should be remembered about personal safety. For example, chips can get into the eyes or skewer under the skin. Therefore, it is necessary to think in advance about the means of protection: gloves, glasses, etc.
Second design version of stools
Above it was described how to make the most simple stool with their own hands. But there is another option more interesting cross-face legs and a soft seat. That is what model further will be discussed.
Article on the topic: Dielectric bots and galoishes
To begin with, we harvest the working tools and materials:
The device of the usual toaster.
- Wooden timber with a cross section of 60 mm;
- Rake (3x6 cm);
- sheet of plywood (thickness 1.2-1.5 cm);
- foam material (minimum thickness of 10 cm);
- cloth for tight seating;
- nails, screws, construction buttons;
- Circular saw and screwdriver;
- Tassel, moron;
- lacquer for opening or painting;
- marker, pencil;
- measuring roulette;
- Stuslo.
And again the first thing is prepared the base of the legs. For this, 4 segments are made of a bar, each 60 cm long. They are manufactured by Spike at 45 degrees. Such works are performed using stusl.
When the segments are ready, they must be cut together in pairs, that is, to mount the letters "x" on the manner. For this purpose, you need to prepare the grooves on each billet. The size of the depth of the excavation must correspond to the half of the thickness of the most initial timber. That is, if the thickness of the bar is 6 cm, then the grooves are 3 cm. It must be controlled, so that the legs tightly fastened with each other and did not get out of 6 cm for a mark, that is, the thickness. Thus, a pair of x-shaped structures should be obtained.
So that the stool was stable, both crossmen should be tightly fixed with each other.
To do this, you will need a plank made from a segment of a bar. The length of the bar must correspond to the size of the stool. In this case, it is a length of 48 cm. In order to be copper with both crossbars, screws are needed. So that the product has a more presentable look, under fasteners are made of small recesses. At the end of all the work, these recesses will hide under a special filler or using special plastic caps.
It is necessary to cross the legs and in the upper part of the cross. For each connection, two screws are used.
The last moment just is the "hide" hats of screws. Also, legs need to be closed or painted in any other selected color.
Practical recommendations
But what a stool without the seat. In the first case, a variant of wood stools with solid sidewa was shown. In the same case, a design with a soft surface is made.
Article on the topic: Embroidery with a cross scheme: in a hat man and woman, sets in red, with jug and cycling, with umbrella
The seat will consist of solid, and on top - soft base. For the lower case, the plywood is intended. Its recommended thickness is not less than 12 mm, otherwise the design will be too fragile and will not be able to perform its direct destination.
In this example, the base has dimensions of 40x60 cm. In general, this is the average sizes of wood stools. This base is cut from plywood with a circular saw. The corresponding dimensions must have a foam rubber. An applied gasket material that will fix the foam rubber with plywood. It means that it should have an area of 30% more than the foundation.
True coverage, you should measure the height and width of the obtained sidew. It should also be borne in mind that the fabric should be attached to the plywood, it means that it is necessary to make an additional stock. It is best when there is no folds on the corners of stools, it will last longer, without having fluttered.
In order to fix the cloth, the buttons apply. You can fix them in two places: on the bottom and on the sides. If the buttons are the simplest, then they are used for the first attachment, but if there is decorative, then they are best placed on the sides. Although for more reliable fixation both of these methods can be combined. So that the stool had a neat appearance, the tightness is carried out only with a taut fabric.
In fact, for the design of the toaster, you can take an absolutely any fabric or even leatherette. It all depends on the interior, the desire of the owner and its financial capabilities.
The last step in the assembly of such a stool is the connection of all elements in one design. With the help of screws, the seat is attached to the obtained cross-tree legs.
As it is clear, the build stools made of wood with their own hands. All the necessary materials and tools are easy enough to find at home or even lend from a neighbor. And at the same time there is always the opportunity to place all of its guests at home, and not run through the neighbors and ask them spare chairs.