
So, you have completed the main work - laying the tile. Now
You can proceed with the final stage - grouting seams and
Processing their sealant. Well made molding can
disguise existing stacking defects while
Bad grouting can destroy completely impress
Impecable styling.
Previously check whether the height glue is completely
which you put the tile, and carefully clean the seams from
garbage and mud. Delete all the remaining after laying
Separates (cross) between tiles. Some
Separate manufacturers claim that they can be left
In the seams and cover the grout. But in this case, the layer of grout
Above delimiters will be thinner, so it will have
another color after it freezes and can spoil
The appearance of the entire grout.
If you work with glazed tiles, you can immediately
Stripping seams. If you laid the unlawed
tile, then you must first moisten the upper and side
surfaces of each tile to warn too
Strong suction of moisture from the grout. Some
Tile stackers use garden sprayers for
Sprinkling water on the surface of the tiles. Regardless
What method you chose, the main thing - do not overdo it.
Puddles of water remaining on the tile or in the seams can
Hurt the grout, then it can sweat. (Not
there was a doubt about the conduct of such preparation of tiles and
Swiss, it is better to get advice from the manufacturer of the grout).
What are the thickening materials?
There are 2 main types of grout materials: a mixture onThe basis of cement and a mixture based on epoxy resin.
Council : when choosing, do not confuse
Materials with sealing compositions from Elastomer,
which are used in construction - they fill
Docking sites of various building materials. TO
Such seals include the silicone seal. IN
the store will tell you that it is really used
For tiles, and will be right. Just not worth silicone
Seal fill the seams between the tiles. It is created for
in order to fill emptiness when laying tiles on
Other surface. Sometimes used to fill it
Swiss, but better to avoid it.
Cement-based grip Present dry
A mixture that is divorced by water or liquid latex.
Sold and ready-made grouts, but usually they cost much
more expensive. Grouting on cement basis, as a rule, made from
cement and differ only depending on
Additives that are included in their composition. They can all be
divided into 3 classes: industrial cement, dry hardener
and a mixture of latex.
Epoxy clamp Contains epoxy resin and
hardener who make seams by impact resistant and resistant
To different chemicals. This type of grout is the most
expensive and therefore mainly used in
production and commercial premises. In addition,
Epoxy putting viscous and it is quite difficult to work with it.
If your tile is no more than 12 mm thick, and the width of the seams
less than 6 mm, then such a grout will not be able to penetrate such
Narrow seams.
What is the sealant?
The use of the sealant pursues 2 goals:
- He protects ceramic tiles from appearing on it and
In seams of stains
- It protects the tiles and seams to a certain extent.
Excessive water absorption
In order to the surface of the unlawed tile and on
seams did not appear stains, it is necessary to cover the facing
liquid transparent sealant. Most sealants are made
Based on silicone, varnish or acrylic. When choosing suitable
sealant need to take into account the types of tiles and grouts, and
Also, the place where the facing is being made.
Now let's find out how to rub the seams, apply grouting and
Sealant. Also, always follow the instructions
Product manufacturer that you have chosen.
Planned time costs: depend on the size of the area;
It is necessary about 3 weeks until complete drying
grout.
Planned costs of funds: 30-50 dollars.
Starting Tips: Compelate with the seller relatively
Choosing the most suitable grout.
Security Tips: cement-based grouts can
Cause inflammation of eyes, skin and lungs. When working S.
Use the respirator, protective glasses and
rubber gloves.
Width of the griming seams
The width of the grotype seam depends on personalPreferences, some, for example, like narrow seams.
Too wide stitches, as it were, visually suppress the tile.
Square tile size 10, 15, 20, 25, 30, and even 60 cm
It will look neat with seams of 3 mm.
Incorrect tile shape is less noticeable with wider
seams, but try to make their width of no more than 12 mm.
The fact is that the larger the width of the seam, the more
The probability that it cracks. Seam width more than 12 mm
will be more durable if you add sand to the grout
a large particle size, but it does not always help protect
Wide seam from cracking. (Another reason why
Grouting can crack and crumble - too big
The amount of liquid when mixing grouts).
Article on the topic: Pictures embroidery with a cross: Schemes in one color, Children's small pictures, make for beginners stencils
Equally, you should not do the thicker seams very
narrow because it will be difficult to fill them with grout as
It follows and as a result, through such seams will be seamless
Water inside facing. Many masters feel more
confident that the quality of the facing will be on
proper level if the seams have sufficient width to
It was possible to fill them with latex or acrylic grouts, in
that the seams will not only be waterproof, but
and will be able to serve shock absorbers in compression and expansion
Tiles. Such ability of the seams becomes insignificantly small,
When the seam width is less than 1 mm.
Grout tile
The grout process of seams includes several stages:
—
Mixing grouts;
- solving the solution for better wetting;
- repeated stirring of the grout;
—
Distribution of the solution;
—
Cleaning surplus grouts;
—
Everything related to the preparation of the solution, look in the article
How to mix the grout.
Tools and materials that will be needed for
Application of Zatirov
• Respirator (for working with grouts containing cement)
• Latex gloves
• Protective glasses
• Scraper with rubber nozzle or roller
• Put
• bucket
• Sponge
• Box, wooden stick with sharpened end or tooth
brush
• Clean fabric
• plywood
• sealant
• Paint roller or small drawing brush
Apply Zatir
First, lay out the slide of the grout on the surface of the tiles (you can
just pour a solution from the bucket if you work on the floor,
or scrape a solution with rectangular cells for applying
on the walls). In order to distribute the grout, more
Suitable rapid grater (in the appropriate option for
Floor or walls) than steel ironing.
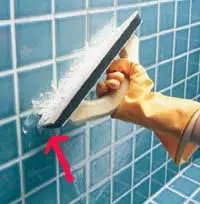
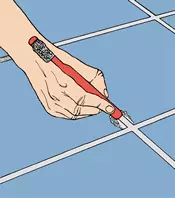
Keep it at an angle of 30 degrees to the tile (as
shown in the photo) and apply grout to the surface
Tiles diagonally (as shown in the figure).
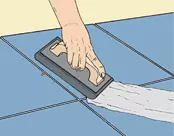
Pass the graking over the entire surface two or three times, but
do not just cover the seams with a solution, and try to label,
Press it with effort in the seam to be tightly filled
Solid solution. The stronger the resistance, the denser
Filled seam and the stronger it will be. The main idea is to
Tom fillets all corners and emptiness
Around the tiles that remained after applying glue. IN
The grout process liquid will leave from a cloud
solution and seams will be filled with sand particles and
cement - can be said, it turns out a solid instead
liquid cement test.
Do not make the out of the surface immediately , it is better
First distribute the grout on a small area of size
about one or two square meters. meters until you figure out
How quickly the grout is set. Thus, if
You will have to work with the grout, which is fast
grasps you will need to stop and engage
Cleaning. Sometimes it is possible to immediately wash about 9 square meters. meters
Before you begin to clean it; In other cases you can
Cover the grout only a small area. Work on
a small plot will help you determine the speed with which
You should work.
Using a grout bag
If you work with a surface that is particularly difficultClear after the grout, for example, with an antique brick
facing, use the bag for filling the seams for
grout. This bag looks and acts as well as
Confectionery bag for finishing cakes. At the end of the bag
Metal tip is fixed approximately
The same widths, like the rapid seam. The bag is filled with grout,
And then it is extruded with effort through the tip in the seam.
When working with a casual bag, place the bag tip in
the top of the seam and promote it forward along the edge of the seam
Extent to fill it. For greater efficiency, fill
Seam over its entire length, not around a separate tile. Usually
first fill all horizontal seams (along the x axis), and
Then the vertical (along the axis y). Should be squeezed
A slightly larger amount of grouting than it seems necessary.
After she slightly grab, sorrow the grout in
Seam with a bunch or slicing smooth metal
Tubes, the diameter of which is greater than the width of the filled seams.
Then give the opportunity compressing in the seam of grout
capture for half an hour, after which remove the surplus with
using a rigid brush.
Article on the topic: What to put near the fence in the country (20 photos)
Removal Zatir
The first removal of excess grouts - dry
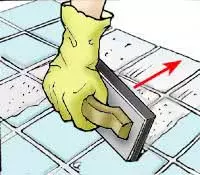
When all seams are filled, to remove extra
grouting you need a grater to keep under
almost direct angle to the surface of the tiles (as shown on
Figure). At the same time it is necessary to move the grater diagonally
relative to the seams, otherwise the edge of the instrument can get into
Seam and removes part of the grout. (If it happened,
Just add a little grout in the seam and align
Surface seam edge edge). As soon as the surplus
Removed, let the grout grab before starting
Cleaning. While you are engaged in grouting and cleaning, you need
Do not forget from time to time stirring the rapid solution
in the bucket so that it remains soft before applying it to new
Plots.
The second removal of the grout is wet. After what time
start off?After dry cleaning edge of the grouting grater (which removes
The main mass of superfluous grouts from the surface of the tiles), each
Facing to one degree or another requires wet cleaning.
The time you need to complete grout grabs
before wet cleaning, it differs greatly from laying to
styling. It can be equal to 5 minutes, and may take 20
minutes or more. On the rate of evaporation of the liquid from the grout
Influence the weather conditions, the type of base, glue and tiles.
Keep in mind that the remnants of the grouts on the surface of the tile
can be captured pretty quickly, although for grouting in the seams
May be required for a longer time. For rate
Preparedness of the surface of the tiles and thumping seams to clean
You can use a sponge: wet the sponge as stronger as possible,
And then test a small surface area
Facing. Grouting in the seams should be elastic and dense,
But not solid. If the grout grabbed too much,
Tiles will have to be cleaned with great difficulty, so at the same time
You can damage the seams. On the other hand, if behind the sponge
stretches grout from seams, it means that putting
It was not enough enough. Wait a few minutes and
Check again. Cleaning can be started when putting
In the seams remain in place.
If it turned out that too much time passed before
Cleaning, and put it out to the surface of the tile, you can
Remove it with a special abrasive grater. (IN
the difference from other cleaners, such a grater leaves
scratches on the surface of the tiles - not to doubt
Check first on trimming tiles). After cleaning dried
sprinkle residue, go through the whole surface well
Pressed sponge.
There are many grout cleaning techniques, some of
They are rather unusual. For example, some tiler
poured dry grout over the seams (so that the wet grout in
The seams dried faster). Others use sawdust in order
so that they stretch out extra moisture, and it was easy to remove
Surplus grout. Many of these methods weaken, and
most, destroy the throat, so we do not advise them
use. It is better to use a combination of tested
receptions that fit for commercial cladding,
So in the residential premises. The main principle of this method is
use a minimum of water during cleaning so as not to
Loosen the grout.
Beginning of wet cleaning
You will only need a bucket with clean water and sponge
(it is better to take a sponge with rounded edges, so not formed
Grooves in the clutter seams).
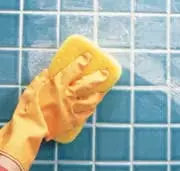
1. First, with the help of a sponge, quickly removes a large
Part of an extra stamina
Start cleaning grouts from the surface of the tiles soft
circular wiped movements, removing sand particles and
cement. Carefully so that in the thicker seams
Food grooves. Rinse the sponge as soon as the pores
Sponges will be filled with particles of cement and sand, and after well
Press it. If not too much passed before the cleaning
time, then you can remove excess grouts from the surface
Tiles for two or three passages.
Clean only a small area at once (1-2 size
sq. m), often wetting the sponge to wash off the grout particles,
which penetrated the pores of tiles.
When you rinse a sponge, always try to rinse as
You can better and squeeze as stronger as possible to be
confident that all the grout particles who were in the pores
Tiles, washed off. Do not forget to shry excess water from your
Hands.
If the facing is not more than 9 square meters. meters, then no
The need to change the washing water in the bucket. You can judge
water purity, how well the tile is washed (of course, in
some commercial projects need to constantly change
Water).
2. At the second stage, it is necessary to inspect the grotypes, whether
They are neat
Article on the topic: Phased construction framework for balcony
Align and scrape the seams using a batch, wooden
Sticks with sharpened end or end of a toothbrush. Then
Cover the edges of the seams with a sponge. Move the sponge parallel
Seam, carefully removing the protrusions and filling the available recesses
a small amount of grouts on the tip of the finger (wear
For this tightly tight rubber gloves). Actual
The seam size depends on the type of tile used and
Industrial or handicraft treatment of the upper edge of the tile.
If the edges of the tile are sharp and straight, grouting in the seams should be
Flat, clove with the top edge of the tile. If the top area
tiles rounded, tiler must decide what
Heights to make seam. Whatever height is chosen, ideally
seam should be even top, not convex, although big
part of the seams becomes slightly concave that quite
permissible. It is very important to give all seams the same shape and
depth.
3. At the end of the final thorough cleaning
Surface tiles from spitting residues
As soon as the seams in the facing will be aligned, the surface
Tiles should be carefully cleaned again. First rinse
And squeeze a sponge well. Then make a straight, vertical
Passing about a meter one side of the sponge, slowly
moving it towards yourself - slower than it seems
necessary - and without stopping. (If you move a sponge
Quickly or intermittently, on the surface of the tiles will remain
Strip from grout). After the first pass, turn the sponge
Pure side and make a similar passage in parallel
First, and then stop and rinse the sponge. For one
Use the passage just washing the side of the sponge.
Continue this process until the whole area
Facing will not be completely cleaned, trying to act
Gently, so that again the sponge did not pull the grout
from seams. If this happens, this may mean that
grouts in the seams too much and the seams must be fired, or
Too much water in a sponge. After this cleaning, all the remnants
grouts must be eliminated from the surface of the tiles, and it is necessary
Give seams the opportunity to dry for 15 minutes.
During this pause, the moisture remaining after cleaning on
Tiles, evaporates and particles of cement that were in
Waters are deposited on the surface of the tiles. If the tiles are covered
shiny icing, and the corners are smooth and straight, then fall from
grouts can be easily removed by rubbing immediately
gauze or soft, clean cloth. If the tile has a matte
Surface or rounded corners, it may be needed yet
One, additional passage with fresh water and sponge.
If the remnants of the grouts are still poorly cleaning,
Perhaps you have not clearly cleaned the surface in
first time. If glue remained on the surface of the tile, then
the reason that the grout grabbed stronger than usual
can be contained in it latex or acrylic
Additives. However, what would be the reason why raid
It remains on the tiles, the harder it is to remove it. If you not
were able to remove residues with a wet abrasive grater,
then you can try to use a special solution for
eliminate plaque, or, as a last resort, resort to
Aid of acid cleaners.
If you decide to use special cleaners or
acid, keep in mind that the grout must be completely
Capture before you use them. Nevertheless
less, do not wait for the grout completely grabbed to
Completion of the last stage of cleaning - removal of any
Traces of grouting from expansion seams.
Application sealant
When the grout hardens, tiles and seams can be coveredSealant in accordance with the manufacturer's instructions.
Clean the tile and seams thoroughly and let them dry in
For several days. Then apply sealant following
Manufacturer's instructions. If you cover sealant
And tile and grout in the seams, use a paint roller. If a
You will cover the sealant only seams, take advantage
Little tassel. All excess sealants that can
Randomly get on the surface of the tile, immediately delete.
For gentle care, the tile is sometimes required so that you
covered with sealant tile every 2 years (sometimes more often if
This requires manufacturers). In any case, if you
Notice. That the tile began to get dirty and it became
it's harder to clean, then it's time to cover it
additional layer of sealant, pre-carefully
Cleaning.
End of work
On the floor, put the sheet of plywood and prohibit someone to walk
Semi to complete grout drying. Be careful,
Some sodes will dry up to two weeks (check
The required time in the manufacturer's instructions).
Based on:
Internet portal "It's just"