
Photo
The thin canvas of stretch ceilings are fixed to the baguette installed throughout the perimeter of the ceiling indoor. Installation of baguette does not require special preparation of the surface of the ceiling. It is cleaned with the help of a brush where sprinkle can occur.
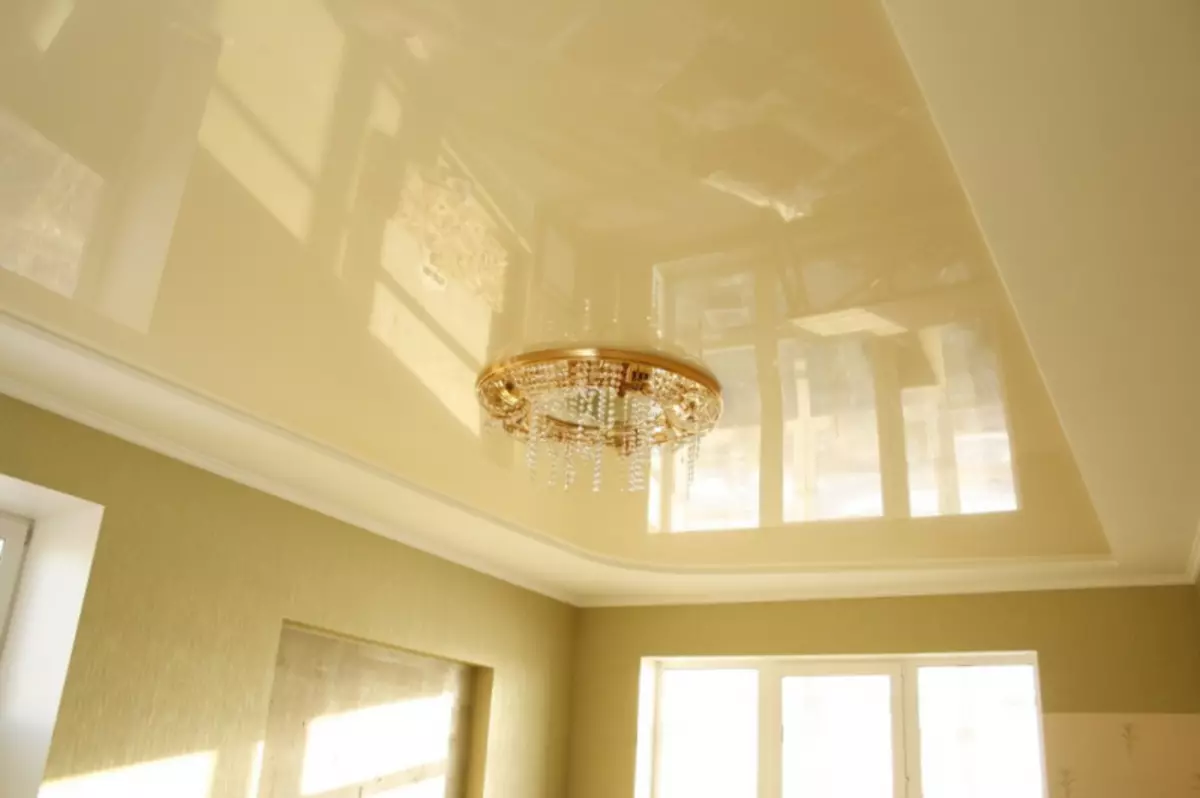
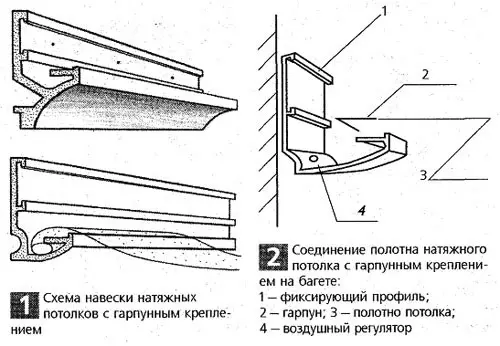
The stretch ceiling is attached to the baguette installed throughout the perimeter of the ceiling indoor.
A few words about stretch canvas
In the modern market, a huge selection of cloths for installation on the ceiling, such as glossy and matte, satin and suede, metallic and marble, translucent and shine, fantasy and modern, exclusive and gold sparks, chameleon and many others are presented.
Corrugated, monophonic, colored, smooth stretch ceilings allow you to create complex architectural compositions of ceiling structures, that is, make a multi-level stretch ceiling with your own hands. The canvas for the designs of stretching canvas are manufactured at Individual orders in Individual orders. Stretch canvas are made from vinyl.
The canvases are created by separate stripes whose width is 1.6-2 m.
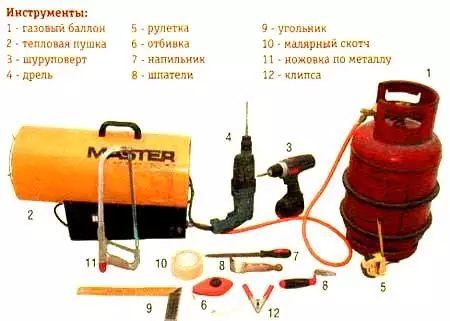
Tools for installing stretch ceiling.
Strips must be match between themselves. The use of stretching design allows the most efficient to save funds, because otherwise there would have to make constant repairs. The warranty for stretching canvas, which is given by manufacturers, is about 10 years.
The canvas will not pass water even during the flooding of the upper floor, since 1 m area of the ceiling surface can hold up to 100 kg of water. The ceiling canvas does not accumulate static electricity without collecting dust. The stretch canvas does not burn, but only mowes without the release of poisonous substances, an unpleasant smell. In general, the canvas sterile.
Designing the design of stretch ceilings can sometimes combine tensioning canvas simultaneously with drywall, it is made by a specialist in this area. The design of ceiling designs sometimes implies their installation simultaneously with the installation of the suspended design from drywall to the ceiling. Use such a combination is beneficial.
Repair of the ceiling and installation of the canvas are sometimes produced independently. The correct application of all tools and materials will last the new ceiling construction, therefore, often do not have to repair.
Article on the topic: Framuga for doorways do it yourself
FEATURES OF TECHNOLOGICAL TECHNOLOGY INSTALLATIONS
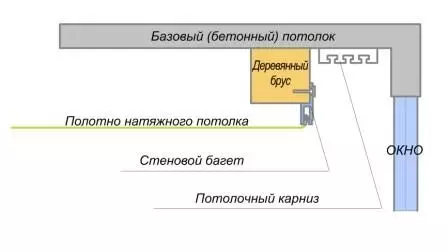
The cornice for the stretch ceiling is attached to the bruster with the help of the rings.
To begin with, you should familiarize yourself with the technology of installation of stretch ceilings. Implementation of all actions will require to take advantage of special tools and understand the main technological aspects of the installation.
The correct installation of the ceilings involves installing a baguette on the walls. Next, it is necessary to determine all the places where the lamps are located to pre-establish special holes under them. Then the material should be deployed and coping the corners. Make a stretch ceiling with your own hands will allow the use of a heat gun, which is necessary for heating the canvas. Film fixed when it becomes more supple. When the ceiling is completely cooled, we can assume that it has a finished shape.
Suspended and tensioning design options for the repair of ceilings have their advantages and disadvantages, which is associated with the installation technology. In order for two experienced masters to arrange a stretch ceiling, it will take 3-5 working hours. To make a two-level stretch ceiling with plasterboard, you will need 2-3 working shifts.
Start of the tension ceiling device from the installation of baguettes
Baguette installation scheme.
The first stage of the design of the design of the ceiling design involves the markup, which is carried out using a level that can be laser or hydraulic. If the stretch ceiling is two-level, then the markup is made on two levels: for the profile under plasterboard and baguette for the tensioning canvas.
To obtain an accurate perimeter of the ceiling surface, it is better to use a folding cord that can outline the smooth stripes that allow you to install baguettes that hold the tension cloth. Installing baguettes is a time-consuming job. Usually baguettes are a profile of plastic or aluminum. With a smooth ceiling, it is better to give preference to an aluminum baguette, and if there is a curvature on the ceiling, then plastic baguette is used.
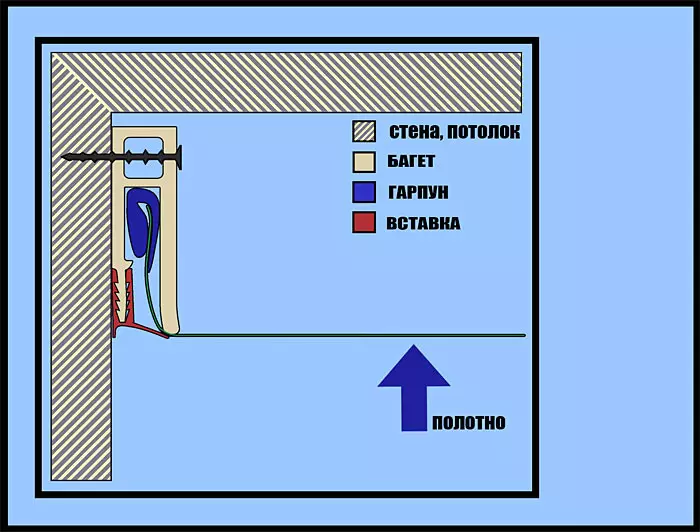
How to mount the stretch canvas with your own hands
Technology installation of stretch ceilings.
Baguettes are usually not supplied with special holes with the purpose of their device, it can be done with your own hands using a drill and drill (6 mm). The experienced masters use a special hole punch, allowing you to quickly do all the holes. Holes must be arranged every 15-20 cm, which depends on the material used for the manufacture of the walls. If you need to install a tension ceiling to plasterboard, then you need to drill more holes.
Article on the topic: How to make a hatch in the floor with your own hands?
It is not all because it is necessary that the angular turns are formed, since each of the corners may have the greatest load. Cutting edges need to be thoroughly handled to remove all burrs that are able to destroy the film.
Usually begin to strengthen baguettes from the corners when at first it is necessary to strengthen the curved profile, and then all others. When installed in solid walls of stretch ceilings, plastic dowels are generated by a diameter of 6 mm. When installed in plasterboard, tons of profiles are used without bookmarking for the profile material. If you need to lay the iron profile, then the baguettes screw in conventional metal screws.
The connections of each profile are one of the problem areas, as in the installation process you can hook by randomly for the canvas and break it. To protect all connections, scotch is usually applied. It should be made of dense foil. Scotch tape join compounds with film in places of its contact. The profile is usually better to accumulate with a foil from the foil outside and inside the grooves for which it is necessary to fill the film.
Stages of mounting ceilings with their own hands
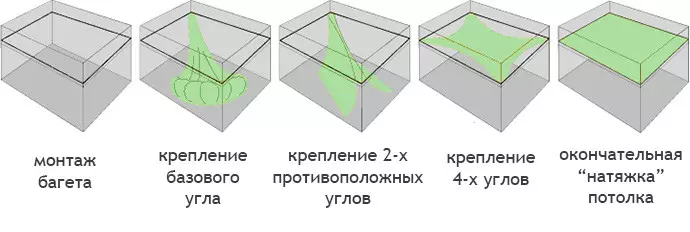
Scheme of the stages of the installation of the stretch ceiling.
The installation tool is quite simple, except for the heat or thermal gun that can be rented. It will take a spatula, stainless steel, from which it is made, should be the greatest thickness without acute ends, you will need 4 clamps resembling clothespins.
Next, you can unpack a new canvas. Running it, begin to hang the cloth to the previously installed baguetas for 4 corners of clothespins. It is required to tie small ropes, with which it is possible to fix the cloth in each of the corners of the room. A small rope is passed between the wall and the profile, starting from the corner of the room.
Next, you should turn on the heat gun, which is installed under the tensioning canvas. With tightly closed windows and doors, you need to warm the entire room well. It will be very hot, but after a while, the progluement film of the stretch canvas will lose all wrinkles and folds, becoming more plastic. Only after the warming step starts work.
Article on the topic: Salad wallpaper in the interior of the children's room
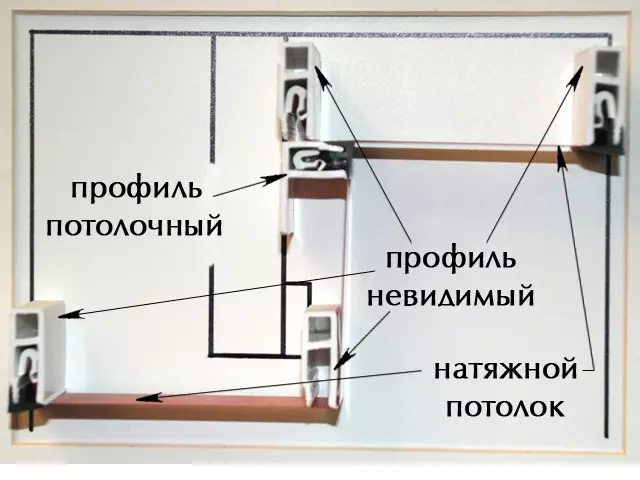
Types of profiles for stretch ceiling.
You need to sweep the clothespin on one of the corners. After that, with a spatula, the angle of the stretch canvas should be pressed into the profile. The film is refilled in the baguette by 10 cm from all sides. After that, go to the next angle, which is the opposite to repeat the first operation with another angle. All these actions are required to make the third and fourth angle.
Starting from the middle part of the canvas, the wall elected the wall, so that in its center to start refueling the cloth into the baguette. The free portion of the web must have a length of more than 10 cm. The same should be done with the other three walls. The following task is to divide any of the free sections into two parts, followed by refueling for the profile.
After the end of the passage in a circle, the canvas is considered to be fully refilled. In order to comply with the symmetry so that there are no excessive defects of the web, that is, the screeds, it is necessary to fix the edge of the canvas, which remained, symmetrically sharing it in half. If there is a cutout in the canvas, it must be refilled after the external edges of the film.
The heat gun is disconnected to wait for the complete cooling of the room naturally. Windows and doors should not be opened. During the cooling room, you can leave it by going to the balcony to lead the temperature of your body to normal after the heat in the room with a heat gun.
Approximately half an hour all work can be brought to the final stage associated with the ability to stick in the groove of the baguette molding from rubber. It will hide an unsightly compound of the canvas with the wall. The work ends inserted into the groove of the cropped to 45 degrees, which should not be stretched, on the contrary, molding needs to be compressed. If the canvas angle stretch, then it will take its initial position when used, and unnecessary slits are found in the corners.