
So the last stage of repairs, the final chord in which the stagnation of the foam ceiling plinth will be. With the help of a properly selected baguette, the correct spatial style of the room is formed, the irregularities in the surfaces of the walls and the ceiling are visually eliminated, the room acquires a complete designer and aesthetic appearance. Undoubtedly, the ceiling plinth can become the main element of the decor, clearly outline the contours of the room, visually making it more, spacious. There are many diverse types of ceiling baguette. Consider the foam plinth and its advantages.
Scheme of ceiling plinth installation with your own hands.
The main advantage of this choice is a relatively small cost with excellent quality and high reliability. The practicality of foam plinth is confirmed by great demand for it and frequent use. This material is a cellular masses, the main volumes in which it takes air. Thanks to this, they are highly warm and sound insulation and successfully apply in repair work not only by professional masters, but also people who decided to make the repair with their own hands. Baguettes are perfectly bent and cut, very lungs by weight, they are also very easy to paint, so there are no problems in working with them. Weak points of this building material - fragility (easy to break in the process) and fear of water, so the bathrooms are better not to hurt them. There is also a question than to glue foam ceiling plinth.
Main aspects when using foam ceiling plinth
Let's try to classify the items to pay attention to when buying a baguette.
Condition of adjacent quilt for inner corners.
Next, it is necessary to prepare the ceiling eaves themselves, cut the necessary corners of the foam, check that they converge among themselves, and there were no holes. Baghet must be glued up to final repair work, that is, before pasting, wallpaper and painting ceiling (it is better to paint together with the plinth).
Article on the topic: How to wash windows on the balcony outside: The best ways
Polyurethane plinth is perfectly with the surface of plasterboard and spacious concrete. In this embodiment, the installation is made using acrylic or gypsum putty, alabaster mixture.
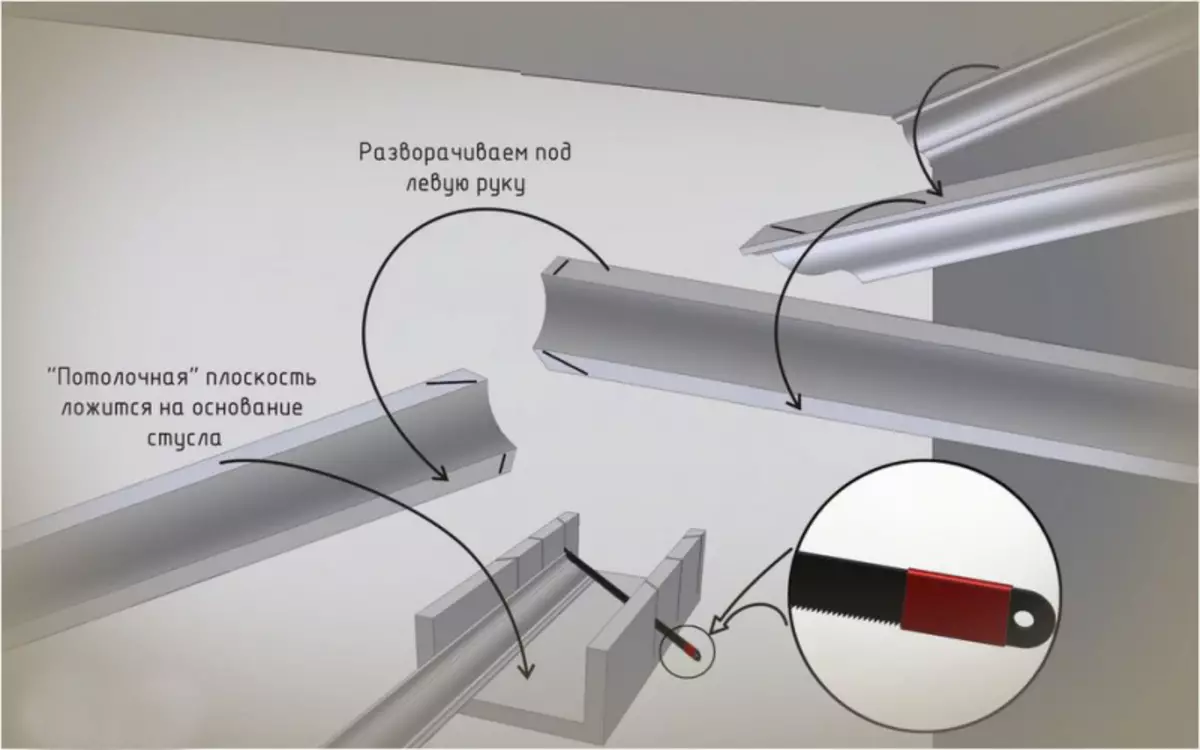
How to make an angle of foam baguette
If you have chosen a narrow plinth, then it is cut with scissors at an angle of 90 º. If a wide one will help the hacksaw. In order not to get to write and correctly cut the baguette, it is better to use a stub.
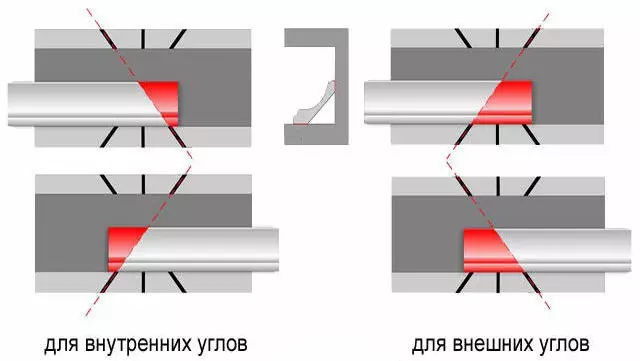
Cutting options for ceiling plinth.
Let's try to describe in detail the process itself.
- The cornice takes, and with the help of a pencil, a straight line at an angle of 45 º is stuck, then the unnecessary part is cut with a knife. Similar actions are made with the second plinth so that the joints are perfect with each other, there were no gaps.
- If you are two segments, if they are right, then sign them, then not to confuse. The clearance in the area of 1.5 mm is considered acceptable, it will not be visible. If the gap turned out more, then do not despair, the silicone sealant will help you. You can crawl the baguette strip with a knife and then rub the glue.
- Slowing at once all the angles of foam plinth, you need to make a stock of about 3 cm per wall. Excess then it will be necessary to cut off the direct junction in the middle of the room after the angle itself was cut.
When gluage glue, it is necessary to use them only with equal slices, then cracks and layers can be avoided.
The process of sticking foam ceiling plinth
The scheme of gluing the ceiling plinth.
First prepare baguettes. It is better to lay down the edges of the edges, if they are pre-processed with shallow sandpaper.
Special attention is paid to the glue. It should be a homogeneous mass without lumps and not too liquid, a little viscous. If you decide to prepare the glue yourself, you will need to stir dry the finishing mixture in water, having previously adding the PVA construction glue there in a ratio of 1 to 100.
Article on the topic: How to paint the laminated door: features and processing algorithm
It is better to apply such a solution point, while not forgetting that they need to cover both sides of the baguette every 20 cm. This is due to the fact that the adhesive is spread. Then, firmly press the plinth to the joint of the wall and the ceiling on both sides, just do not overdo it, since the eaves from polyurethane are still fragile, they can break. If the surplus comes, it will be necessary to remove them with a rigid brush and wipe the plinth with a damp cloth. An excess glue that has chopped under the baguette can also cover the slots and gaps on the joints.
It is recommended to break all the angles at the beginning, since it's more difficult to produce a joint than in the center. Vertical joints are easier corner.
Once again it is worth paying attention to that it is impossible to emphasize the foam ceiling plinths, indulge in irregularities. They should lie or straight, or smoothly. The gaps arising from the ceiling can be hidden by putty. If the gaps arose at the wall of the wall, then the putty is applied to the lower level of the base of the plinth.
Thanks to these small "tricks" you can easily hide small errors in sticking if the foam ceiling plinth is used.
The final stage of work
So, foam baguettes are pissed, the final work remains directly, finalizing the entire process.
When all the plinths are pasted, you only need to sharpen straight joints. This procedure must be done the next day after sticking the cornice. For these purposes, only gypsum putty and water-emulsion paint are used.
Do not forget to pay attention to the small slits between the plinth and the ceiling, which can also be smelted now.
Only after 24 hours it is possible to start the decorative side of the repair, namely to paint the foam ceiling plinth.
Brief summary
Foam cartoons have their advantages, one of which is their unique resemblance to stucco, which is very expensive and sophisticated finish. They are available at a price, they have light weight and incredibly easy to assemble.
Article on the topic: how to make a draft ceiling on wooden beams with their own hands
By gluing foam ceiling plinths, you will immediately see how the room has been transformed, the interior has changed. Thanks to this decorative element, the room is addressed, the repair becomes completed.