
Plasterboard is a material intended for alignment of walls, ceilings, creating partitions and arched designs indoors. This is an environmentally friendly raw material consisting of 93% of the gypsum. The remaining 7% is a cardboard and an organic surfactant. You can use drywall both in dry rooms and indoors with high humidity. It does not burn. The only part susceptible to burning is a cardboard. But due to the absence of air between the cardboard and the plaster itself, the plasterboard does not flame, but only charred. Despite the heavy weight, drywall is quite flexible material, so finishing work with its use requires minimal skills, qualifications and labor costs.
Mounting diagram of a multi-level ceiling of plasterboard with their own hands.
It is believed that the installation of a ceiling ceiling from drywall and other plasterboard structures is brought to us from Germany. This is an erroneous opinion. In Russia, the use of this method is popular for a very long time, only he had another name - dry plaster.
Facts about plasterboard
Types of plasterboard:
- Glk - ordinary plasterboard. Marking color - blue, leaf - gray.
- GKVL - plasterboard with increased moisture resistance and antiseptic properties. Marking color - blue, leaf - green.
- GKLO - Material with increased fire resistance. Marking color - red, leaf - gray.
- Glevo - plasterboard, having elevated moisture and fire-resistant characteristics. Marking color - red, leaf - green.
The advantages of drywall can be attributed:
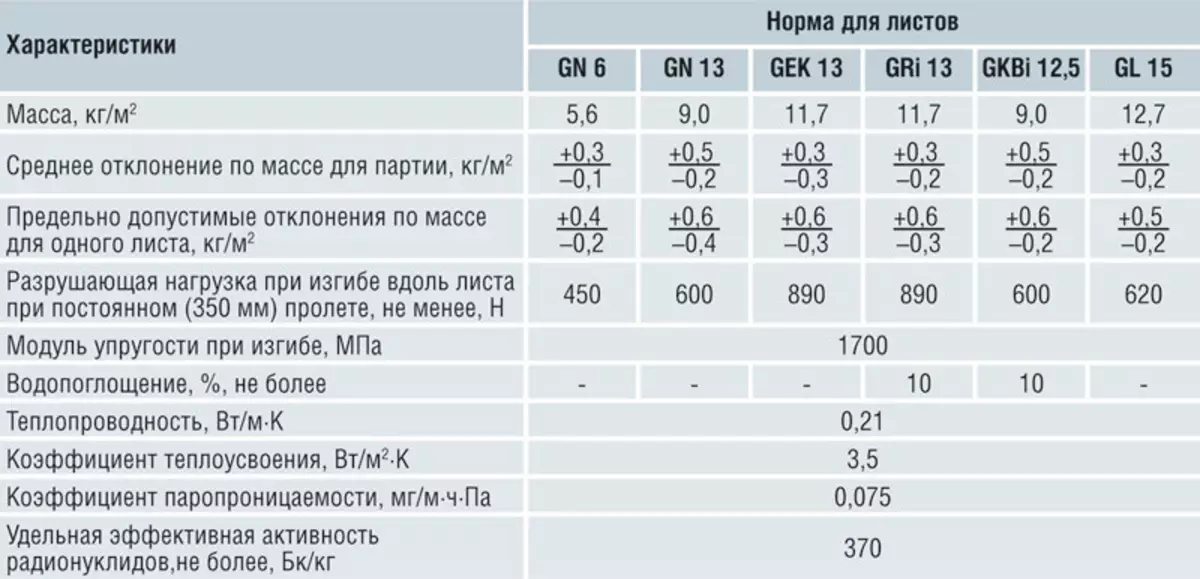
Physical and technical characteristics of plasterboard sheets.
- Lack of toxic components and high ecology.
- Good sound insulation qualities, which allows it to use it when erecting various partitions.
- Good plasticity that makes it possible to create unusual curly structures, multi-level suspended ceilings, a variety of alcohol, etc.
- A small weight that allows you to apply plasterboard structures in those places where monolithic concrete floors and brickwork are invalid.
- Ease of installation, work with plasterboard does not require possess special skills and knowledge.
- Plasterboard is a good tool for rapidly aligning a variety of surfaces. Where it is necessary to spend hundreds of kilograms of plaster and a lot of time to eliminate defects, a plasterboard leaf allows you to make an ideally smooth surface in 60 minutes.
Like any other material, plasterboard has its drawbacks. In comparison with the advantages, they are so insignificant that drywall has firmly holds the leading position in the building materials market. The minuses of plasterboard can be attributed:
- Fragility. Transportation and storage of plasterboard should be produced in a horizontal position, carefully and carefully.
- Reducing the area of the room during installation due to the installation of profiles and sheets.
Article on the topic: Wall insulation from inside Minvata - Technology and useful tips
Materials and tools for mounting plasterboard ceiling
Before starting work on the installation of drywall on the ceiling, it is necessary to calculate and prepare the required amount of material for the manufacture of the skeleton of the suspended ceiling. What is the plasterboard to choose? For apartment and office premises, standard drywall, bathrooms and basements are used with elevated moisture resistance, for premises with high fire hazard, buy sheets with red marking. In addition to the required number of plasterboard sheets, an equal area of the ceiling, you will need:
- UD guide profiles (wall) - 28x27.
- CD ceiling profiles - 60x27.
- Suspension or distant esters. If the ceiling is planned to be lowered to 12 cm to 12 cm, then there are distant esters, below 12 cm - suspension.
- Saws and dowels.
- Cross or crabs for connecting guides (if the premises length exceeds the profile size).
In addition, it must be remembered that the purchase material follows with a margin.
Installation of single-level suspended ceilings
With the help of construction profiles
and fasteners.
So, on waste, trimming, etc. You need to add about 5% of the scheduled volume.
Calculation of component elements and materials:
- The amount of UD profile should be equal to the ceiling perimeter.
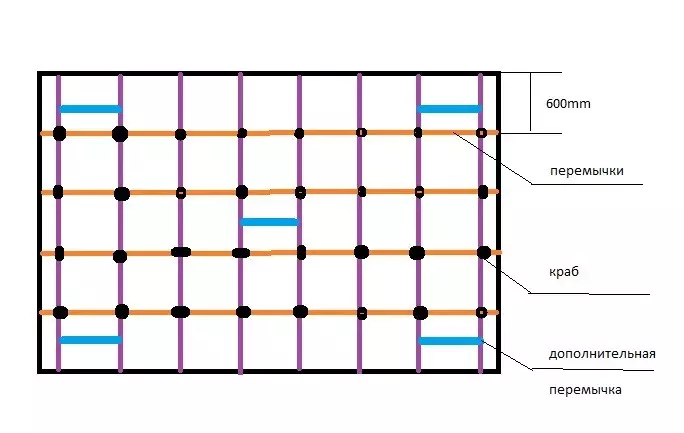
- The amount of CD profile is calculated by the formula: the first and the last rows are attached on the range of 30 cm from the wall, the distance between other rows should be no more than 60 cm. The same amount of ceiling profile is needed for jumpers.
- The number of suspensions is equal to the length of the ceiling profile, divided into the fastening step or 1 m.
- Connectors or crabs should be fixed on the ceiling profile, applying a stepper interval 60 cm. To calculate their number, the ceiling profile should be divided in meters by 0.6.
The necessary tool is also desirable to prepare in advance. To mount the plasterboard ceilings, you will need:
- Building level.
- Drief-screwdriver.
- Concrete drill 6 mm.
- Measuring roulette and pencil.
- Roulette.
- Spatulas.
- Emery fine-grained paper.
- Construction knife.
- A hammer.
- Corolnic
- Motion folding paint.
- Plancock for processing edges of sheets.
- Adhesive reinforcing tape.
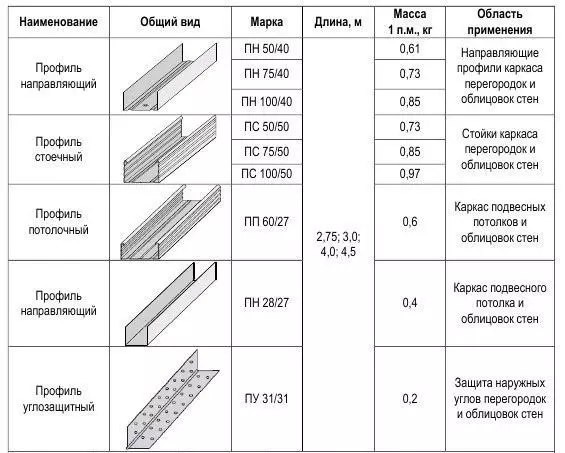
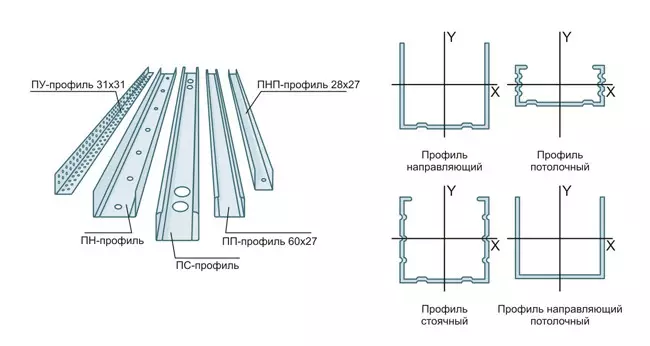
Types of profiles for mounting the ceiling of plasterboard.
Expensive power tools can not be bought, but renting. Building hydroery can be made with your own hands. To do this, it is necessary to buy a polyethylene tube with a diameter of 0.8 cm and a length of at least 5 m.
Article on the topic: How to make a playground yourself: 70 photos of real buildings
At its ends, it is necessary to insert ordinary flasks from the droppers and the marker to apply a graduation with a ruler. After that, the tube is filled with liquid and close the flasks.
Water level of own production is ready to work.
Step-by-step algorithm for plasterboard ceilings
Surface preparation
When installing drywall on the ceiling, the horizontal level of the room should be noted. It can be done with a hydraulic level. However, working with it requires certain skills. It is much easier to work with a laser level. But it is much more expensive than water. For horizontal marking, it is necessary to make small spotted pencils in the corners of the room. Next, you should measure the distance from the ceiling to notes and mark it. Subsequently, on the perimeter of the wall, the wall profile UD dowels is fixed in 50 cm increments.Installation of skeleton
Then follows the build of the frame. After the end of work with marking, it is necessary to attach the suspensions. To do this, measure the length of the lines on the ceiling and prepare profiles less than 1 cm died out.
Installation of jumpers in the framework of profiles for the ceiling of plasterboard.
CD profiles are located at a distance of 40 cm along the length of the drywall so that the joints of the sheets in length were on the profile. Also, on the lines, the suspension or distant esters should be consolidated with a step in 1 m. It should be noted that the suspensions in the adjacent guides are not near, but in a checker order.
After fixing the suspensions, we establish profiles and secure them to distant interferes or suspension. The walls are attached to the walls on the perimeter on the wall guides UD. In the joints, we use crossmen or crabs that are attached to a screw. The installation circuit of the plasterboard ceiling requires accurate fixation of the top guide and checking the step. The fact is that the drywall sheet has an ideal geometry and a permissible error when attaching can be no more than 0.5 cm for the entire height of the sheet. So the whole carrier design is assembled.
Fastening sheets
The sheet is tightly applied to the prepared crate so that one edge is to go close to the wall, and the other was located on the middle of the CD profile. Mounting sheets to profiles are necessary with the help of 25 mm metal screws in length.Finish finish
The spacing of the finished surface is carried out in several stages. The first layer is filled with basic deep pores, and hid hats of self-tapping screws. The drying out of the first layer is to take at least 24 hours. Next, the surface is treated with a fine-grained emery sheet, fixed in a special holder. Only after that you can apply the finishing layer of putty and releasing the sandpaper.
Article on the topic: Electroplite connection with your own hands
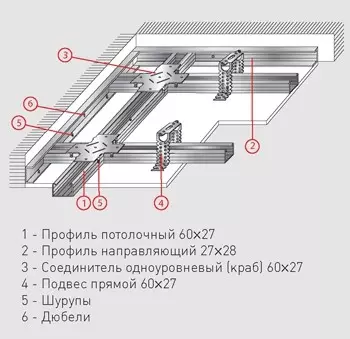
The frame assembly scheme by mounting a galvanized profile under plasterboard.
If you are planning a plasterboard staining, you should choose the highest quality putty, if the plans are plans with wallpaper (simple, volume or glazing), the requirements for the quality of the seam can be reduced. In rooms that have 2 windows, the final staining of the plasterboard ceiling should be done perpendicular to the window that goes out on the sunny side.
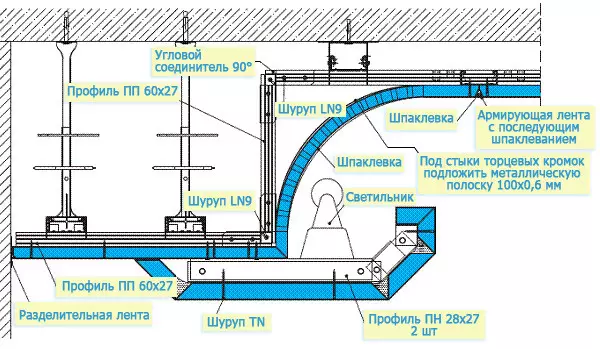
If you are planning to create a two-level plasterboard design, then the second level can be made in the form of an interesting figure pattern. Consider the order of work on the example of a recessed ball. The construction algorithm is extremely simple and consists in the following steps:
- Disable height from the first level for the second ceiling.
- Draw on the ceiling circle. You can do it with a thread and pencil. The length of the thread will be a radius of a circle.
- It is necessary to attach CD profiles to the first ceiling. It is better to think about the design so that most of the fastening ribs of the first ceiling. In radius areas, you need to bend profile with cuts.
- We derive wires for lamps and lamps.
- Do not forget about rigidity ribs.
- With the help of a hacksaw, we give plasterboard the desired shape, the resulting figures to the profile with the help of bugs.
- Cut the holes for the lamps.
- We are wearing a prominent metal strip of plasterboard. To do this, we wash the material with water, wound and fastened.
- Next, the final work on the plaster and color, the algorithm of which is described above.
Plasterboard Mounting Technology: Specialist Tips
All wiring work is performed before installing guide profiles.
All technological holes and schemes must be made until the wall is completely closed tight. In this case, the sheet should not be pressed to the end, and so that it remains to skip the cable through the hole.
For the processing of the joints, the serpent ribbon is used. It makes the seam tougher, but does not allow the appearance of cracks with sudden temperature drops or with increasing humidity.
Work on the construction of plasterboard structures is sufficiently elementary. The only moment that requires extreme accuracy and college is the markup of the walls and the ceiling under the guides. Before starting the installation of ceilings from drywall, it is worth carefully evaluating your strength and decide, work independently or still trust specialists.