
In recent years, the builders have gained great popularity with plasterboard. The sheets of this material can be used in various works when finishing the room. It is very easily mounted. For designers, this material opens a huge field for fantasies. In most cases, a single-level ceiling with the use of such sheets is made to create additional noise insulation. Multi-level ceilings are distinguished by a more complex design. They enable the backlight on the ceiling, create the desired holes and cut the original curly steps.

Frame scheme of plasterboard ceiling.
Installation of a multi-level ceiling made of drywall is available to almost everyone, even if he never dealt with such works. Plasterboard sheets are attached to a special aluminum profile having guides. The result is a framework in which the wires and various communications are hidden.
Plasterboard multi-level ceiling has certain functions:
- The room looks much more, the look of the room is changing, the apartment looks much more beautiful.
- Become invisible all the irregularities of the ceiling.
- The ceiling closes all engineering communications.
- There is excellent lighting thanks to the lamps of various levels.
To install a multi-level ceiling of drywall, it is successful, you must have a variety of tools:
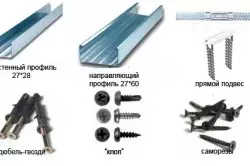
Required materials for installing multi-level ceilings.
- Perforator;
- screwdriver;
- level;
- Construction parliament;
- hacksaw;
- pliers;
- Scissors for metal;
- pencil.
Materials are mainly used:
- plasterboard sheets;
- metal profile to carry out the montage of the frame;
- self-tapping screw;
- Dowel.
To independently carry out the installation of sheets of GLK and make a frame, two types of profiles are used:
- UD;
- CD.
A guide profile is screwed to the walls in which the ceiling profile is installed. It will form a framework. The "CD" profile allows you to carry out the complement of the design of the plasterboard ceiling by parts of curvilinear geometry.
Article on the topic: Restoration of a home lamp with your own hands
Number and features of levels
Of course, the installation of a multi-level ceiling of plasterboard is the dream of many premises owners, but the solution of this issue is associated with the height of the ceiling. It is this value that regulates the number of levels that can be made in a certain room. To accurately calculate the number of levels, you first need to determine which level of the first level itself.
A diagram of a multi-level suspended ceiling.
To this end, it is necessary to find a lower point on the ceiling, from which 2.5 cm should be measured. On the wall there is a mark of this magnitude. It becomes a guide to install other tags in the corners of the whole room. For accurate markup applies a water level. On the entire perimeter, lay a marking thread. It is it that shows the lower level. In case of an increase in this size by 1.5 cm, the first level is designed.
In order for the installation of a multi-level ceiling to be completed correctly and consisted of several rows of profiles, it is very important to determine how the cutting of frames will be made. It is necessary to calculate the amount of profile and sheets of plasterboard. It is necessary to know very accurately how the material will be attached.
To respond to all the questions, it is necessary to first draw a sketch of a multi-level ceiling of plasterboard. On this plan to show the installation of all levels. All pre-measurements are made to the drawing, the required materials are shown indicating their quantity, the installation of auxiliary elements is taken into account.
Frame and design features
Drawing of a multi-level ceiling of plasterboard.
After mounting the line, the "UD" profile is first fixed. It is necessary that its lower surface can come into contact with the line. The profile fixation is made by dowels that correspond to the structure of the wall. On some profiles there are no holes. Therefore, they are attached to the wall through pre-drilled holes. The mounting step must exceed 40 cm. The docking compounds may be made.
Article on the topic: How to make a sofa bed with your own hands?
The next step is to determine the direction of laying of plasterboard sheets. "CD" profile is mounted across the ceiling. Indoors find the most even angle. It must have 90 °. After it is determined from his side, the installation is started.
The ceiling markup is performed to install the profile. This is done on both sides, withsting a step 50 cm. The folding thread is placed lines passing between marks on each wall. Each similar label becomes a guide for "CD". Withstanding a step of 40 cm, fixing brackets are fixed directly along the line.
Then it is necessary to measure the distance between the opposite walls. Extra details trim. The length of the profile should not exceed the resulting distance at approximately 5 mm. After that, "CD" must be inserted into the assigned "UD". In this case, the "CD" profile should be above the first level, it is required to lift a little. To this end, the profile is slightly cooked and rises a fastener bracket located in the middle. Under the bottom "CD", according to the surface of the frame of the frame, stretch the thread. So that it is well strained, the tapping screw is fixed in the frame for each side. The thread is screwed on them.
On the installed thread, the CD profiles are exhibited. Initially, they are screwed to the central bracket with small self-draws. For their small size, they are called "flea". Then remove all the screwdered profiles. After complete setting of CD according to the level, fastening brackets are tightened. The end of the bracket bends up.
How the framework is trimmed: recommendations
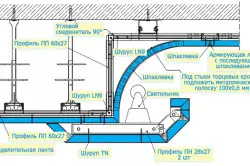
Mounting diagram of a multi-level ceiling of plasterboard.
Fixing sheets It is advisable to spend aims. Installation of the first row is made on a solid leaf. First, one part of the frame is closed, and the second sheet is installed in the same way, but only on the other side. To fix the GCC, 25 mm dowels are used.
Before starting to sew the framework, it is required to pre-make the marks of those places where the second ceiling tier will be mounted. Installation of labels will allow you not to engage in the trim in the invisible area. To hide the frame, the size of the resulting line increases by 10 cm.
Article on the topic: Decorative ceiling with your own hands - a modern solution
In order to make a semicircular view of the second tier, it is necessary to install a self-tapping screw in the profile, and to wind the wire. Having postponing the required radius, draw the arc, stretched wire plays the role of a circulation.
After that, the radius needs to be increased by 5 cm and to read another line. According to such a drawing, plasterboard is cut off. Thus, the installation of the bookmark profile will be made in accordance with the size of the second ceiling level.
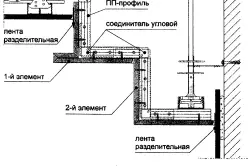
Mount the second level
For reliable fastening of the second level, you must mounte a mortgage profile.
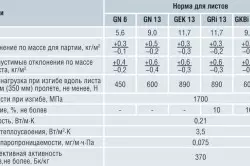
Physical and technical characteristics of plasterboard sheets.
The perforated "CD" is taken, it is screwed to the guides with the help of self-tapping screws. Fixation is made directly to the profile itself.
After that, "UD" is attached, for which 10 cm is postponed. This is the second framework, to install the second level. The part of the "CD" of the profile is fixed to the profile on the wall, and the other is fixed by the P-shaped brackets. The step of the brackets should be maintained in the area of 50 cm.
The second tier must be paved under the upper fixed profile, and the profile size must be made less than 4 cm.
The sheet of drywall is cut from 6 cm input and is screwed to the frame. In the same way, the circle is drawn, everything is unnecessary is removed by the construction knife.
The bottom tier is attached to the "UD" profile directly along the line of all diameter. The profile contains a band of plasterboard. As a result, all profiles become invisible. In order for the strip to bend into an arc, you need to screw in it holes and mix well with water. An hour later, the strip will acquire the required form. Now it can be screwed by self-drawing.
Following the technology mentioned above, you can install a two-level ceiling in your home yourself. Good luck!